Discovering Your Baud

I'm still pretty new to hardware hacking and find myself going through a lot of media (both text and moving pictures) about various techniques to interact with IoT devices and hardware in general. One of the tasks for a hardware assessment is attempting to get access to the device's firmware either through a debug interface, such as UART, or possibly removing the flash chip and extracting the firmware with additional hardware. Since leaving the flash chip on the device is a little less risky than blasting a PCB with hot air, finding a debug interface that offers an interactive terminal is a good place to start.
Once a UART interface is found, you will have to connect a device to interact with it, but you need to know the baud rate in order for the information to display properly. If you were unaware, baud rate is basically another way of saying "bits per second." At this point, most blog posts or videos suggest using 115200, as this is the most common data rate based on their experience, but if that doesn’t work, try all of the other common baud rates (4800, 9600, 19200, 38400, 57600, 230400, 460800, 921600). "Just try everything" never really sat well with me, so I decided to do a little poking around the information superhighway to try and find some better resources.
The easiest way to measure the baud rate is with a logic analyzer or oscilloscope. Since a logic analyzer has more utility for my purposes, I picked up a relatively affordable device off Amazon—the DSLogic Plus. If you just intend to dip your toes in the water of hardware assessment and want to follow along with this post, you can get a cheaper logic analyzer for under $20. Even these devices have a high enough sample rate to get a good idea of what the baud rate should be.
Before I get too far ahead of myself, I should mention that the sample rate should be at least double the frequency of the target baud rate—in practice, four (4) times the target rate is recommended. The highest common baud rate is 921600, and doubling that brings the sample rate just shy of 2 MHz. Again, this is something that even a cheap logic analyzer should be able to handle. Try not to go too crazy on the sample rate if the captures are being stored to disk since they can chew through disk space fairly quickly if data is being captured for a long period of time.
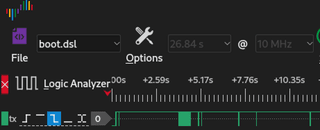
Now we can attach logic analyzer probes to the target device's TX pin, set our sample rate to 2 MHz or higher, begin a capture, and power on the device.
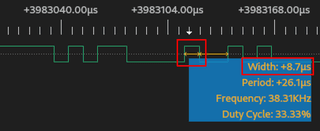
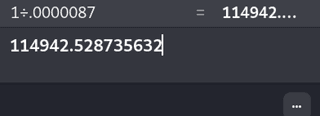
After zooming in on one of the chunks of data, look for the shortest transition period, which we are assuming to be 1 bit. Using DSLogic's DSView, we're able to see the width of each bit. To turn this into a baud rate, divide 1 by the width. This results in a baud rate that's just a few bits off one of the common rate of 115200.
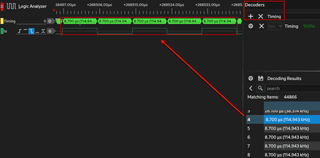
Another handy feature DSView provides is a number of decoders to help make sense of the retrieved information. Using the "Timing" decoder gives us the baud rate (in the form of kilohertz). This decoder can also help you determine if you really are looking at the smallest transition period at a glance.
The only thing left is to try it out!
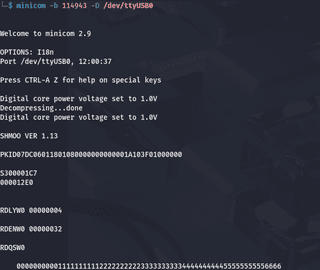
Full disclosure: I tried a few different terminal emulators to use the discovered baud rate, but each emulator either rounded up to 115200 or would only let me try one of the pre-defined rates. While the measured rate was at 114942, the real baud rate should be considered 115200. The discrepancy in measurement from the actual rate could be due to things like clock drift and components that are not 100% precise. While this methodology wasn't 100% accurate, it was at least 99.77% accurate and 100% fun to tinker.