Attacking JWT using X509 Certificates

Table of contents
While pulling together some information for a previous blog, I had identified an interesting JSON Web Signature (JWS) header that I wanted to learn more about. In RFC 7515 Section 4.1, a list of registered header parameters is outlined. This time, the x5u and x5c headers caught my attention. These headers make use of X.509 certificates and define where the public key is stored to validate the JWS integrity.
For both of these headers, an attacker could sign the token with their own private key and modify the header value to specify their public key for signature verification. At this point, an attacker would have full access to modify the token claims, and the server would accept the information. While this is not a new attack, I could not find a Burp extension that would allow me to easily exploit this flaw. In this blog, I will walk you through the breakdown of the attack and demonstrate a Burp Suite extension that I built for exploiting these headers.
1.1 Setup
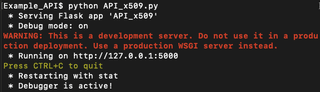
To get started with this attack, we will need a vulnerable application to test against. I have created a vulnerable API in flask for this purpose.
https://github.com/Tsynack/JWT_X509_Re-Signer/tree/main/Example%20API
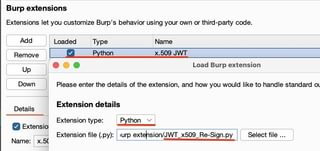
To make testing a little easier, I also built a custom Burp extension that will allow for modifying the headers and claims. The extension can also be used to re-sign the token. You can find the extension here:
https://github.com/Tsynack/JWT_X509_Re-Signer/tree/main/Burp%20Extension
NOTE: The extension relies on Jython being set up in Burp’s extension settings.
To install the extension, navigate to Extensions > Add > Extension Type: Python >and select the JWT_x509_Re-Sign.py file.
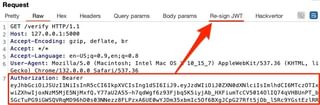
Once the extension is loaded, any requests that contain a JWS in Burp’s HTTP history or repeater should have a tab labeled Re-sign JWT.
The last thing we will need in order to perform this attack is an X.509 private key for signing the token, and the associated certificate, so the server can validate the signature. Using OpenSSL, this can be done with the below command.
openssl req -newkey rsa:2048 -nodes -keyout private_key.pem -x509 -days 365 -out cert.pem1.2 Anatomy of the attack
As a quick refresher, JWSs contain three (3) parts:
- Header - contains details about how the signature was generated and may contain details about the content of the JWS
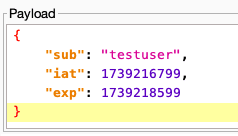
- Claims - contain details about the authentication process that took place. Some example claims include:
- Iat (issued at) - epoch time for when the JWS was generated
- Exp (expiration) - epoch time for when the token should no longer be accepted by the server
- Sub (subject) – the user that is associated with the token
- Signature - Claims are used to generate a signature in combination with the algorithm listed in the headers. This ensures the token has not been tampered with prior to the server processing a request.

Within the RFC for JWS, there are two (2) optional header parameters that are outlined:
- x5c - contains the X.509 public key certificate or certificate chain
- x5u - a URI that refers to the X.509 public key certificate or certificate chain.
The public key is how the server validates the token’s signature and determines if the claims have been tampered with. If the server uses the value of these parameters to validate the signature, there is an opportunity for us to modify the claims and sign the token with our own key.
1.3 Proof of Concept
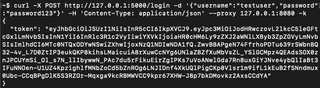
Using the example API mentioned earlier, we are going to send a couple of requests to Burp’s repeater to tamper with the token. Within the example API folder, I have included an API_example_requests.txt that contains curl commands for generating login and verify requests. You should be able to copy and paste the command for login and receive a token in the response. The token needs to be copied into the verify command.
If everything worked, in Burp’s proxy history, both requests should be logged. Right-click on the /verify request and send it to repeater.
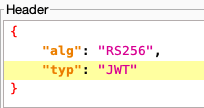
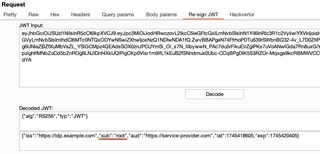
In repeater, navigate to the Re-sign JWT tab. Pressing the decode button will base64 decode the token header and claims. Any modification to these values will be reflected once the token is re-signed. Start by modifying the sub claim to a value of root.
For the first attack, we will embed the public key certificate directly into the x5c parameter. To do this, you will need to import the X.509 private key and certificate that were generated earlier using OpenSSL.
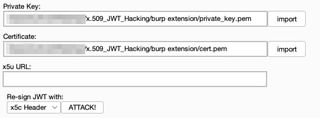
Since we are embedding the certificate into the token, choose to re-sign the token with x5c header and click Attack! The token in the request will automatically be updated with the newly signed token. Sending the request should result in a 200 OK, indicating the updated token has been accepted by the server.
If you’ve made it this far, congratulations on exploiting the token by signing it with your own private key!
1.4 Attacking x5u
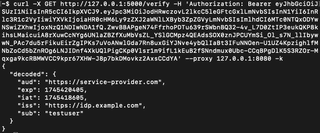
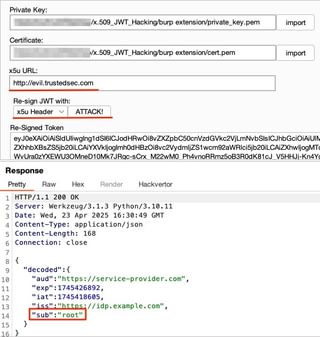
Instead of embedding the contents of the certificate directly into the token, the x5u header points the server to a URI for where the contents can be found. To exploit this, I have hosted the cert.pem on my web server, and I am going to add the URL to the corresponding field within our extension.
Make sure to update the method we are using for re-signing to x5u header and click Attack! When the request is sent, the web server where you have hosted the certificate should receive a request for cert.pem, indicating the API has reached out while validating the signature.

The API response should show a 200 OK, indicating the signature and claims were accepted.
1.5 Conclusion
For each of the identified headers, the issue is the server trusting the provided certificate for verifying the token signature. As an attacker, we can control the value of the header and, therefore, supply our own certificate. The end result is a compromised token that can allow anyone to change the values within the claims to impersonate another user or perform privilege escalation.
As a developer, check the verification flow for your tokens. Even if you do not explicitly use these headers when issuing a token, would the server accept the header value and verify the signature against a supplied certificate? Implement code to ensure only the expected certificate is being used to validate token signatures.