Attacking JWT with Self-Signed Claims

Table of contents
JSON Web Tokens (JWTs) are a widely used format for applications and APIs to pass authorization information. These tokens often use a JSON Web Signature (JWS) to verify that the data within the payload has not been tampered between the client and server. This post is going to walk through some lesser-known attacks against the JWS and how to check if your systems may be vulnerable.
1.1 Basic Overview of JWS
JWS has three (3) main components: header, claims, and signature. Each component is separated by a dot, with the header and claims containing JSON data that has been base64 encoded. In the below image, an example JWS is being passed to the API as part of the Authorization HTTP header.

Utilizing the Burp Suite extension JWT Editor, the token can be decoded to view the JSON within the header and claims.
Note: Claims are often referred to as payload, depending on the tool.
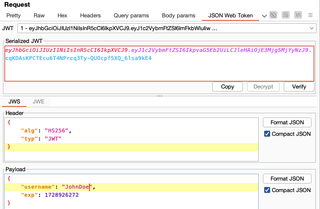
The example above provides a basic example of each section. There are many additional parameters for each section, and this example is meant to provide a quick view of what the data looks like when it is decoded. The header contains two (2) parameters, alg and typ:
- alg identifies the cryptographic algorithm used to secure the JWS.
- typ specifies the media type of the JWS. While this is an optional parameter, it is often included with most JWTs.
Two (2) claims are also present within the payload section, username and exp:
- username is the assertion the token was issued for the username provided.
- exp denotes the epoch time when the token should no longer be accepted by the server.
1.2 JWS Headers
While the alg header is widely known due to the algorithm none attack, I want to focus on some of the other headers that can be used to attack the JWS. An important detail in understanding the signature attacks is the difference between private keys and public keys.
When it comes to signing and validating the integrity of data, private keys are used to generate a signature. The signature is created by hashing the header and claims using RSA-256, followed by encrypting the hash using the private key. Since only the server should be allowed to generate a valid signature for the claims, the private key should be stored securely and treated similarly to a password.
Public keys are used to validate a signature. Since many users or services may want to validate that data has not been tampered with, this key is often hosted in a publicly accessible place. In the case of each JWS header below, the public key is either embedded within the JWS or hosted at a URL. Within RFC 7515 Section 4.1, multiple header parameters are defined for where the public key is stored for signature validation:
- JSON Web Key (JWK) indicates a public key is embedded in this parameter, in a JSON format.
- JWK URL (JKU) is a URL where a public key can be used to verify that claims have not been modified.
If a server is not validating the contents of these parameters, it may be possible for an attacker to generate self-signed tokens that would be accepted by the server.
1.3 Generating Keys for the Attack
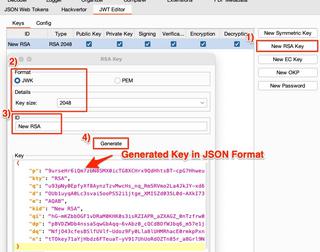
The Burp Suite extension JWT Editor can be used to generate the key pairs and sign the token. With the extension installed, navigate to the JWT Editor tab:
- Select new RSA key.
- The format should be JWK and the key size 2048.
- The ID can be any value you want; the main goal is to make it easily identifiable when we want to sign the token.
- Click generate; the key should be output in JSON at the bottom of the screen.
- Click OK to close the window and save the key.
1.4 JWK
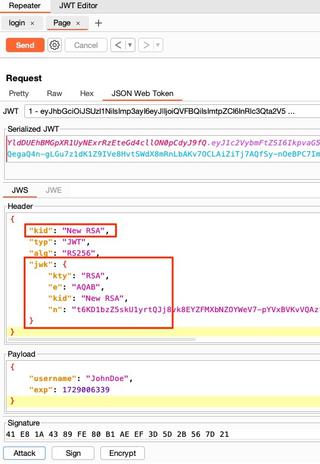
With a key already generated, send a request with a JWT to Burp Suite's Repeater. In the JSON Web Token tab, click Attack and choose Embedded JWK.
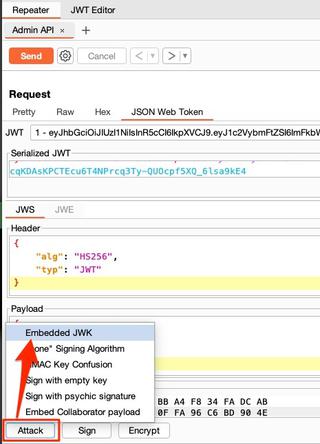
A new window should open to select which key to use for signing the request. From the example above, these values are:
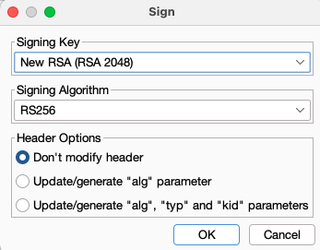
- Signing Key - New RSA (RSA 2048)
- Signing Algorithm - RS256
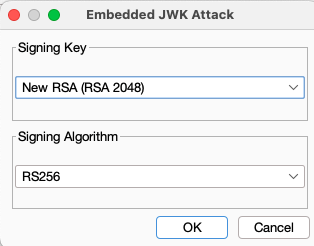
Once you click OK, the request should be automatically updated with the JWK parameter and a kid (Key ID) parameter. The kid is intended to be a unique value for each public key. In instances where multiple public keys may be stored in the same location, this value specifies which public key should be used.
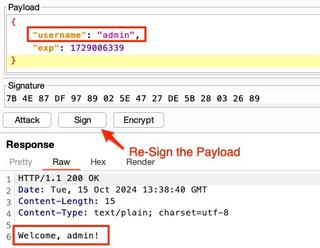
It is important to note that any update to the payload section will require the JWT to be re-signed.
If the server is vulnerable to this type of attack, submitting the request should result in a 200 OK or similar response, indicating the request was accepted.
1.5 JKU
The next attack utilizes a similar methodology. Rather than embedding the public key within the token, the key can be hosted on a web server. The JKU parameter can then be used to tell the server the location of the public key for validating the integrity of the token.
In this example, we can use the previously generated RSA key to create a JSON file with the public key. In a text editor, create a JSON document with the following structure:
{
    "keys":[
        {
            "kid":"New RSA",
            "kty":"RSA",
            "e":"AQAB",
            "n":"zDGvSO…",
        }
    ]
}
An important piece of this file structure is the keys array. This file is called the JSON Web Key Sets (JWKS) and can contain multiple keys.
In the JWT Editor tab of Burp Suite, right-click the certificate and choose Copy Public Key as JWK. The public key can be pasted into the JSON document and saved.
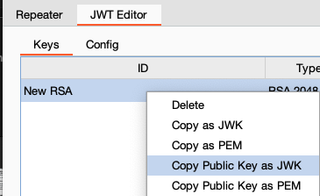
If the context menu to copy the public key does not work, double-click the key and manually copy/paste each of the kid, kty, e, and n values into the JSON document. The JSON document should then be hosted on a web server that can be accessed by the authentication server.
Remember the kid value—this will be important in the next step.
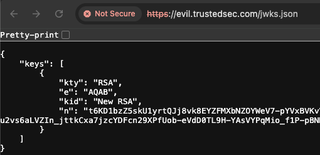
Back in Burp Suite, send a request to Repeater that contains a JWT. In the JSON Web Token tab, add the parameters jku and kid.
- jku should be the URL to the jwks.json file.
- kid should denote which key should be used to verify the token.
In the example below, I have modified the username and role to impersonate another user and gain elevated permissions.
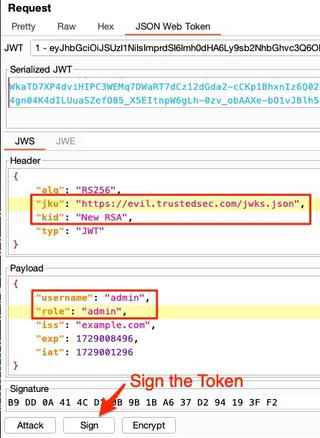
When signing the token, choose the signing key that matches the public key that was previously copied into the JSON file. For the header options, choose Don't modify header, as we have already manually done this step. Once you click OK, the signature should automatically update.
If the server is vulnerable, it should accept the request. Don't forget, every update to the payload requires the token to be re-signed. I ran into this mistake multiple times while making this walkthrough.
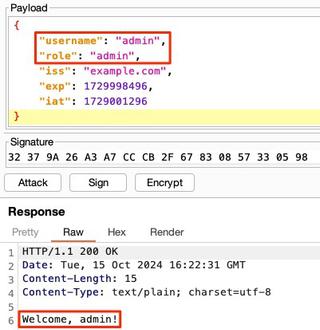
With a vulnerable application identified, it may be possible to change the claims to elevate privileges or impersonate another user. In some cases, the claims may be improperly handled by the server and could result in further vulnerabilities, such as SQL injection.
1.6 Conclusion
When reviewing applications, it's important to understand the parameters that are accepted by the server. When decoding a JWS, you may not see the JWK and JKU parameters. Since those parameters are defined in the RFC, there is a good chance the library used when coding the application supports them. Take some time to re-sign the token using each of these parameters to identify if the server may be vulnerable.
If you want to practice these techniques, I highly-recommend PortSwigger's JWT labs. There are individual labs for each of these parameters that can be used to practice exploitation.
1.6.1 References
JWT RFC - https://datatracker.ietf.org/doc/html/rfc7519#page-9
JWS RFC - https://datatracker.ietf.org/doc/html/rfc7515
JWT Editor - https://portswigger.net/bappstore/26aaa5ded2f74beea19e2ed8345a93dd
PortSwigger Labs - https://portswigger.net/web-security/jwt#jwt-header-parameter-injections