Malware Analysis is for the (Cuckoo) Birds - Working with Proxmox


For quick access to the repo, click here.
This post will be on how to setup and modify Cuckoo to work with a non-supported hypervisor, Proxmox.
“Proxmox VE is a complete open-source platform for all-inclusive enterprise virtualization that tightly integrates KVM hypervisor and LXC containers, software-defined storage and networking functionality on a single platform, and easily manages high availability clusters and disaster recovery tools with the built-in web management interface.The enterprise-class features and the 100% software-based focus make Proxmox VE the perfect choice to virtualize your IT infrastructure, optimize existing resources, and increase efficiencies with minimal expense. You can easily virtualize even the most demanding Linux and Windows application workloads, and dynamically scale-out your computing and storage as your needs grow ensuring to stay adaptable for future growth of your data center.”
Proxmox is built on the Debian platform. They provide a bootable ISO image, which can either be burned to a disc or better yet to a bootable USB flash drive. I used Ubuntu and its “Startup Disk Creator” to create the bootable USB drive.
[caption id="attachment_14284" align="aligncenter" width="470"]
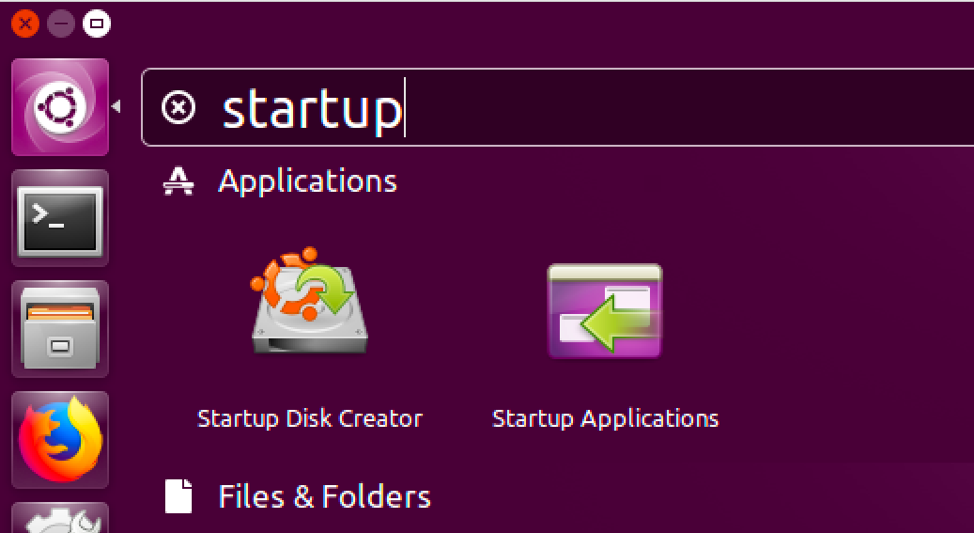
Fig. 1 - Find USB Startup Disk Creator[/caption]
Select the Proxmox ISO by clicking other and using the file dialog to navigate to the downloaded ISO. Next, select the Drive for which to copy the ISO. Lastly, click “Make Startup Disk”. This will take a few minutes but will prompt you when it is complete.
[caption id="attachment_14285" align="aligncenter" width="321"]
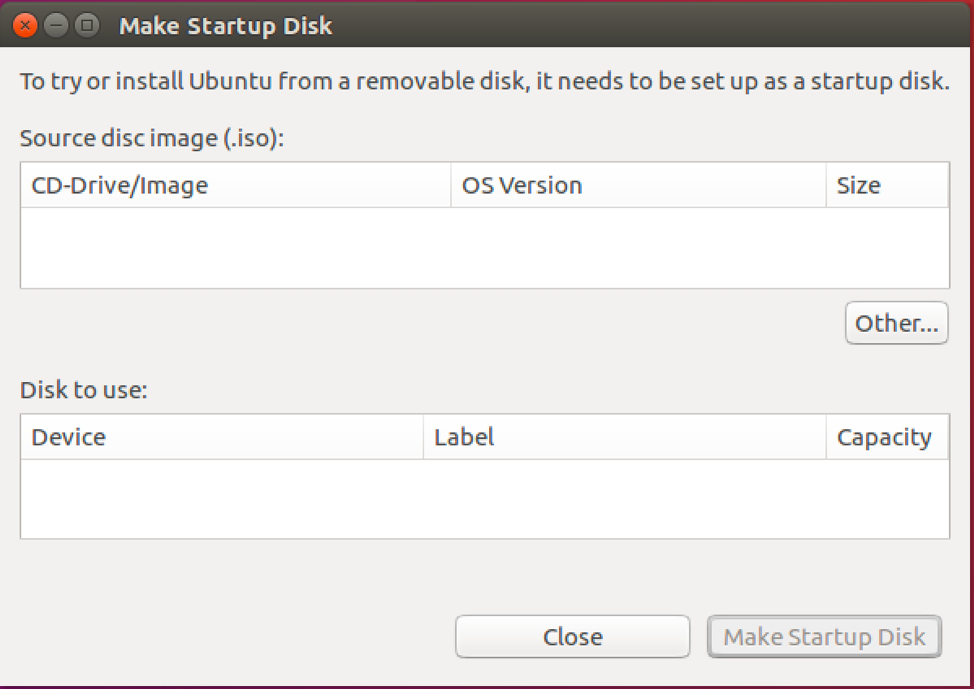
Fig. 2 - Startup Creator Main Dialog Screen[/caption]
Boot the computer from the USB Drive to install Proxmox. The installation is straightforward and pretty quick. Follow the instructions on their website. The only issue I came across was the partitioning of the drive, as I used a small drive and quickly ran out of space.
Installing Cuckoo
The installation of Cuckoo is almost identical to the installation on Debian, as Proxmox is a variant of Debian. SeeCuckoo Installation Notes for Debian for the full installation instructions. Here, I will focus on the additional steps needed to get Proxmox and Cuckoo to play nice with each other. Also, some of Cuckoo’s features are not supported as of this writing. I.E. Memory dumps for analysis through Volatility. I believe this can be done, but I have not invested the time as of this writing.
Setup Requirements:
The following commands are to be used in addition to the commands from Cuckoo Installation Notes for Debian.
<strong>pip install proxmoxer</strong>
Proxmoxer is a wrapper around the Proxmox REST API v2
<strong>pip install requests</strong>
Requests is an elegant and simple HTTP library for Python
<strong>sudo apt-get install qemu-kvm libvirt-bin Ubuntu-vm-builder bridge-utils</strong>
qemu-kvm -> Is already installed as part of Proxmox installation. Package pve-qemu-kvm
ubuntu-vm-builder -> Builds virtual machines from the command line
bridge-utils -> Utilities for configuring Linux Ethernet Bridges, normally already installed.
python-libvirt -> Provides an application written in Python with the ability to call the interface supplied by the libvirt library, manage virtualization capabilities. This functionality is provided by Proxmox. Installing this package will uninstall proxmox-ve and pve-manager. These two packages are the main functionality of Proxmox and the web interface. If you install the python-libvirt package, do the following to reinstall proxmox-ve and pve-manager.
<strong>apt-get install proxmox-ve pve-manager</strong>
For me, the sources.list was updated and I needed to modify that to get the correct package lists.
libvirt-bin -> Used to interface with different virtualization technologies.
Cuckoo Installation:
<strong>sudo adduser tweety</strong>
adduser -> Creates a new user. This example used the name tweety.
Proxmox logs in as the tweety user and does not have sudo by default.
<strong>apt-get install sudo</strong>
Configure Cuckoo
Cuckoo configuration is mostly the same as before, except: edit the cuckoo.conf, setup of the new VLAN and add the new configuration file, proxmox.conf.
Cuckoo.conf
Modify the machinery line to run proxmox.
[caption id="attachment_14286" align="aligncenter" width="300"]

Fig. 2 - cuckoo.conf Example Selecting Proxmox Hypervisor[/caption]
Setup a second network interface that was bridge. Figure 3 demonstrates the network configuration. Modify the file /etc/network/interface to add the new bridge.
[caption id="attachment_14287" align="aligncenter" width="220"]
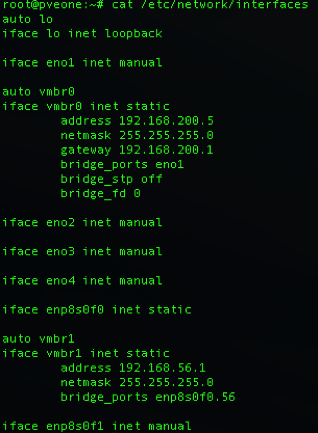
Fig. 3 - Proxmox Host Network Configuration[/caption]
<strong>auto vmbr1</strong>
Instructs the system to bring this interface up on boot
<strong>iface vmbr1 inet static</strong>
Sets the interface to have a static IP address
<strong>address 192.168.56.1</strong>
Assigns the IP address of 192.168.56.1 to this interface
<strong>netmask 255.255.255.0</strong>
Mask used to divide the network into subnets. 255.255.255.0 allows 255 IP for this subnet. The subnet is 192.168.56.1 – 192.168.56.255
<strong>bridge_ports = enp8s0f0</strong>
Assigns the bridge to interfaces. This could bridge multiple network cards or none. In the case where the analysis does not want any traffic to leave the system, leave this line out. In this case, the cable is not connected to the spare interface enp8s0f0.
Alternatively, the network configuration can be completed using Proxmox Web UI. Highlight the Node name on the left, expand the System, and highlight the Network. Click on Create, then Linux Bridge.
[caption id="attachment_14288" align="aligncenter" width="300"]
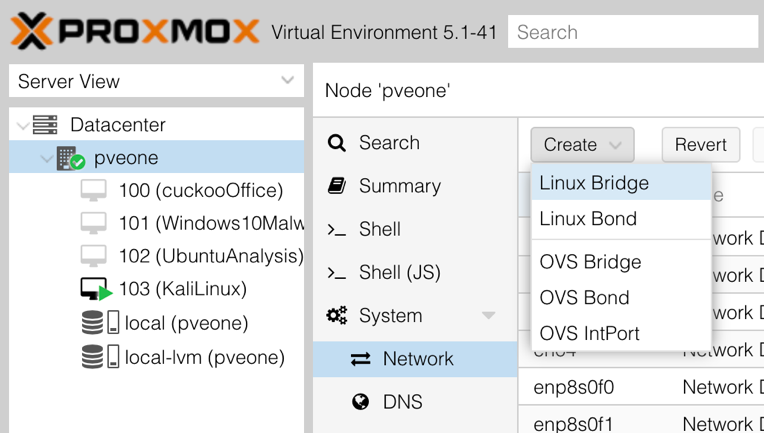
Fig. 4 - Proxmox UI Network Setup[/caption]
A new dialog window will be displayed. In this window, add the IP address for the Host, for this example, 192.168.56.1. The subnet will be 255.255.255.0. Check the VLAN aware box and fill out the Bridge ports if tying to interfaces, otherwise just leave blank.
[caption id="attachment_14289" align="aligncenter" width="300"]
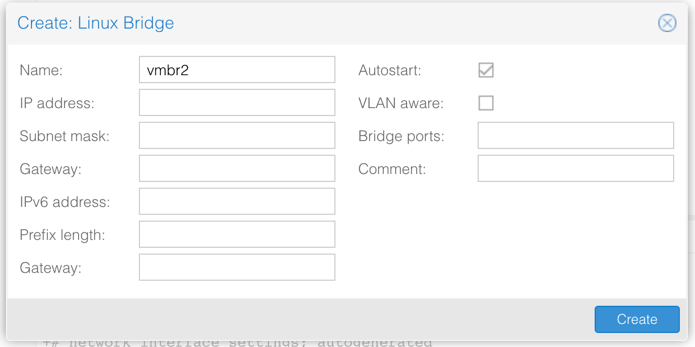
Fig. 5 - Proxmox UI New Linux Bridge Configuration[/caption]
The network settings can be viewed, edited, or deleted at any time from this page.
[caption id="attachment_14290" align="aligncenter" width="300"]

Fig. 6 - Proxmox Dashboard Host Network Configuration[/caption]
Adding the Guest VM to a specific network. Highlight the VM on the left pane. Select Hardware and double-click Network Device. Add the created Network to the Bridge field.
[caption id="attachment_14291" align="aligncenter" width="300"]
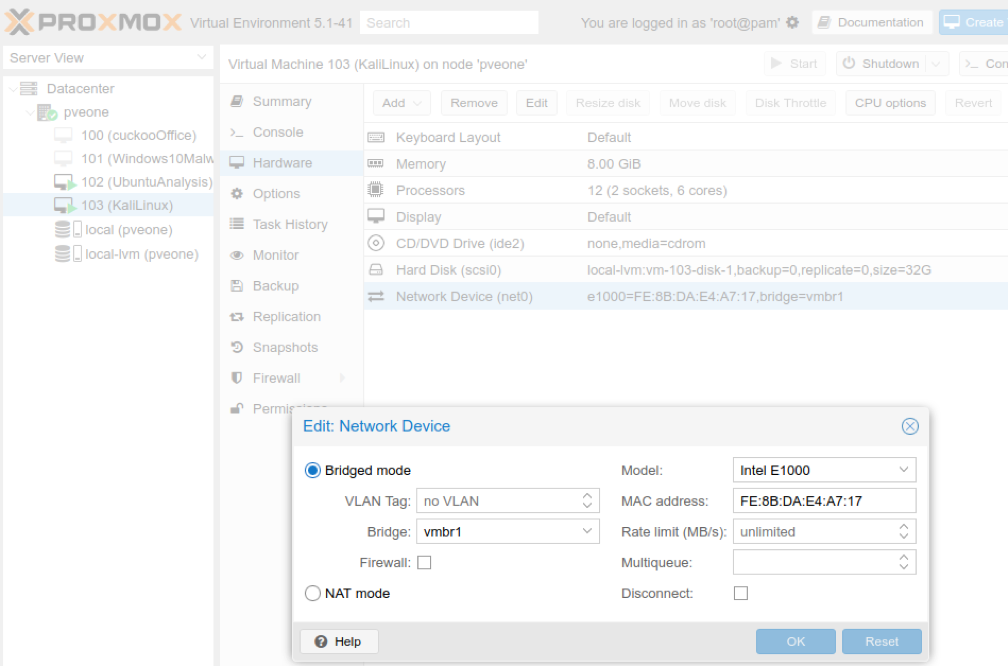
Fig. 7 - Proxmox Guest Network Configuration[/caption]
The configuration file, proxmox.conf needs to be added to the /home/tweety/.cuckoo/conf/ directory. This configuration file was originally based on virtualbox.conf, but has been modified to work with Proxmox REST API.
[caption id="attachment_14292" align="aligncenter" width="300"]
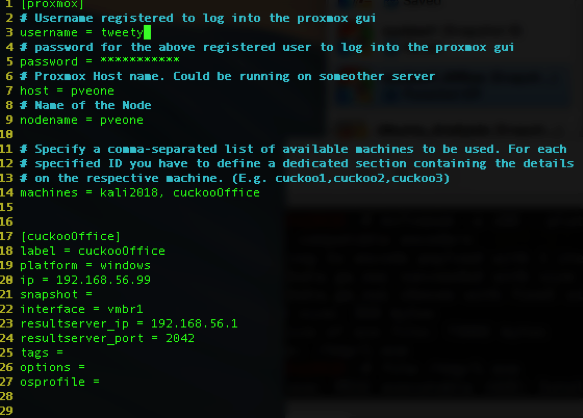
Fig. 8 - Example proxmox.conf[/caption]
<strong>Sections of the proxmox.conf file </strong>
The sections mirror those of the other machine configs. The first line is the name of the machine in square brackets “[“ and “]”
<strong>[proxmox]</strong>
Name of the hypervisor.
<strong>username = tweety</strong>

<strong>password = <the password for the user tweety></strong>
The username and password to the Proxmox GUI. This is used to log into Proxmox API. Currently, the password is in clear-text, so be sure to create a user with only privileges to start stop the sandboxes.
<strong>host = pveone</strong>
The Host will be the name of the server running the GUI. Usage of the IP address or localhost should also work.
<strong>nodename = pveone</strong>
Name of the node configured in Proxmox. Located below the Datacenter as shown below.
[caption id="attachment_14293" align="aligncenter" width="300"]
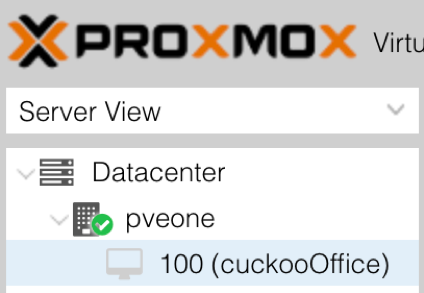
Fig. 9 - Proxmox Node Name Location[/caption]
<strong>machines = kali2018, cuckooOffice</strong>
The machines are a comma separated list of the different VMs available to use. These names must match the later sections. IE. cuckooOffice muse have a section that starts with [cuckooOffice]
Virtual Machine Sections
<strong>[cuckooOffice]</strong>
Starts the virtual machine section and must match that in the machines tag above. This does not have to match the name of the VM.
<strong>label = cuckooOffice</strong>
the label must match the name of the VM. The label is used to identify the VMs unique ID. Proxmox uses the ID rather than the name. Both ID and name are shown in Figure 47.
<strong>platform = windows</strong>
The operating system of the Guest. I.e. windows, linux, or Darwin
<strong>ip = 192.168.56.99</strong>
IP address of the Guest. The Guest must have this IP address or the Cuckoo server will not be able to transfer the malware sample to the Guest VM.
<strong>snapshot = </strong>
Cuckoo requires that each VM has at least one snapshot. If this is left blank cuckoo will revert to the last snapshot, otherwise this should be the name of the snapshot to revert too. As an example, if snapshot is left empty cuckoo will revert to the snapshot named Agent. If snapshot is set to InstallWin7 then that snapshot will be used.
[caption id="attachment_14294" align="aligncenter" width="300"]
Fig. 10 - Proxmox Snapshots[/caption]
<strong>interface = vmbr1</strong>
The name of the VLAN or bridge created above.
<strong>resultserver_ip = 192.168.56.1</strong>

<strong>resultserver_post = 2042</strong>
The resultserver_ip and resultserver_port will match the IP and port configured in the cuckoo.conf and must match the static IP assigned in the VLAN/Bridge configured above.
[caption id="attachment_14295" align="aligncenter" width="300"]
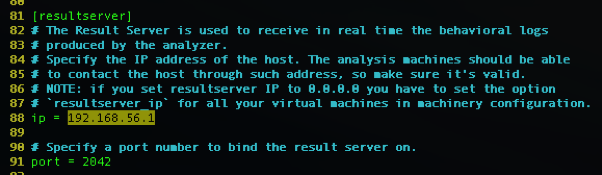
Fig. 11 - cuckoo.conf Example[/caption]
Cuckoo Code Modifications
Newer versions of Cuckoo have incorporated parts of the configuration files into the Python code itself. This stops the ability to just add a new machine.py file. However, this can be bypassed by adding the following to the /home/tweety/venv/lib/python2.7/site-packages/cuckoo/common/config.py
[caption id="attachment_14296" align="aligncenter" width="209"]
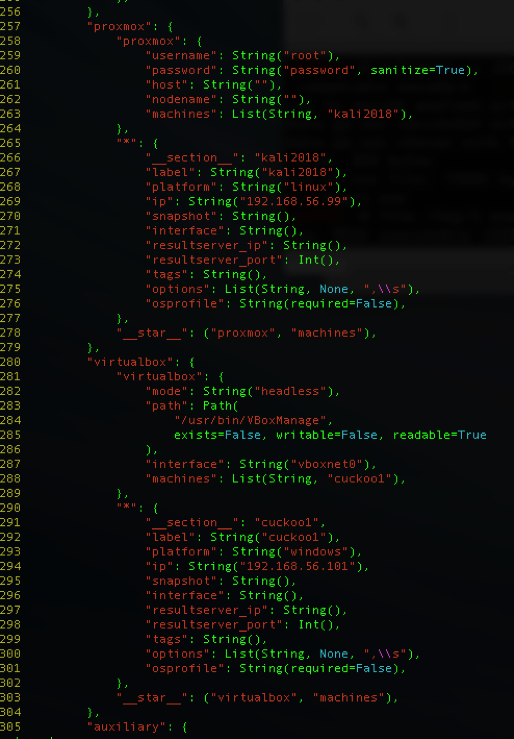
Fig. 12 - Cuckoo Code Modification config.py[/caption]
Since the configuration file was modeled after the Virtualbox file, this section was originally copied from the Virtualbox section. As the items in the configuration file changed, those changes need to be reflected here. These values will be used in the proxmox.py and will be overwritten by values in the proxmox.conf file. Be sure to include the “__star__” line or else Cuckoo will error.
[caption id="attachment_14297" align="aligncenter" width="300"]

Fig. 13 - Cuckoo Error if "__star__" is missing[/caption]
New Machine File
Each individual hypervisor will have a <machine>.py file located under /home/tweety/venv/lib/python2.7/site-packages/cuckoo/machinery/. Each <machine>.py file will be named the same as the configuration file ie. proxmox.conf and proxmox.py. The machine files are inherited from a base class, but leave you to implement the functionality such as start, stop, reverting a snapshot, and memory analysis. For simplicity, the use of the Python module promoxer is used to interact with the Proxmox REST API. This took some trial and error, as the modules did not work as the documentation explained. The following show the proxmoxer commands to retrieve specific hypervisor information.
<strong>proxmox.nodes().get(‘pveone/qemu’)</strong> => list of vm’s in the the node ‘pveone’
<strong>proxmox.nodes().get(‘pveone/qemu/100’)</strong> => list of options for the VM 100
<strong>proxmox.nodes().post(‘pveone/qemu/100/status/start’)</strong> => Start the VM
<strong>proxmox.nodes().post(‘pveone/qemu/100/status/stop’)</strong> => Stop the VM
<strong>proxmos.nodes().post(‘pveone/qemu/100/snapshot’, snapname=’testing’)</strong> => snapshot the VM and name it ‘testing’
<strong>proxmox.nodes().post(‘pveone/qemu/100/snapshot/testing/rollback’)</strong> => revert the snapshot to the ‘testing’ snapshot
The source code for the proxmox.py is located here. The main methods that where modified are restore, start, and stop. Each of these methods used the proxmoxer commands listed above to implement the functionality. The key/value pairs from the proxmox.conf file are accessible through the self.options.proxmox variable. The initialize_check is called first to verify and set up the environment. This section is used to verify the configuration file input and to create the connection to the Proxmox REST API. The API is then used to determine the available VMs. It is possible to have more VMs in Proxmox than registered with Cuckoo.
Subscription Message Removal:
Proxmox is free and fully functional but they offer a subscription. If you use it, I would recommend migrating to their subscription service. After all, this is how they are able to provide the free version for us to use and enjoy. However, for a trial period the Nag message is a minor annoyance. To remove the Nag message, edit the /usr/share/pve-manager/js/pvemanagerlib.js file. Comment out lines 849 – 867. As shown in Figure 52. Then add the orig_cmd(); }.
[caption id="attachment_14298" align="aligncenter" width="300"]
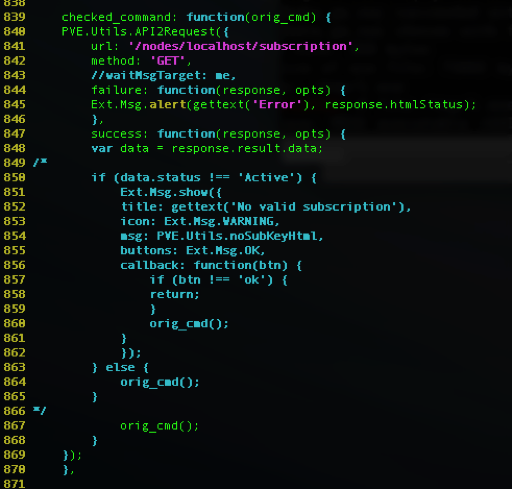
Fig. 14 - Proxmox NAG message Removal[/caption]
Cuckoo Usage
Now Cuckoo should be set up to run the new machine, proxmox. The actual usage of Proxmox is independent of the machinery. See Blog post Malware analysis is for the (cuckoo) birds.