Unpacking a laZzzy Donut
Table of contents
Recently, we came across an interesting malware sample. It used a multi-stage malware loader that chains together obfuscation and shellcode-injection techniques. The sample begins as obfuscated Python bytecode and concludes with encrypted .NET resources, using nested layers of shellcode generation, encryption, and obfuscation to frustrate detection and analysis at each stage.
While I performed the initial triage of the malware manually, it was a significant time saver to find existing public tooling to speed up the recovery. Public tools needed to be modified, and in some cases, we needed to create a customer tool to address a specific technique. In this post, we will walk through the steps used and what needed to be created or modified.
The Full Chain
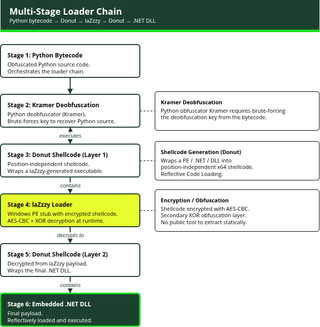
Each stage encrypts or obfuscates the next, and each must be reversed in order to trace the execution path and understand the final payload.
Stage 1: Obfuscated Python Bytecode
The file we first analyzed had the extension .pyc, meaning that it is most likely Python bytecode. To verify this, we run the file command:
******.pyc: Byte-compiled Python module for CPython 3.13 (magic: 3571), timestamp-based, .py timestamp: Wed Jun 24 06:18:29 2026 UTC, .py size: 8371083 bytesLet’s see what strings are visible in the file. Most of the time, I will use strings, but this time I opened the file in Vim. I noticed the string Kramer right away, and later in the file there is a large blob of text, which seemed to make no sense at first.
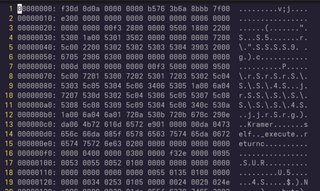
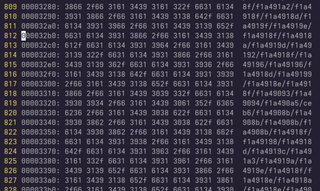
Next, we need to get from a .pyc file to .py. I used the NPX to convert from the bytecode to standard Python, which makes the script much easier to read.
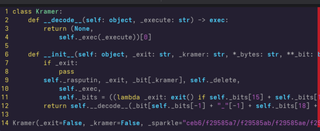
After searching for a little while, I came across the Kramer GitHub repo. This matched what I was seeing perfectly. The only problem was that it was protected by a key, so back to searching again. This time I came across a tool to brute-force the key, kramer_python_deobfuscator.py. I launched the deobfuscator against the sample and my server was immediately spiked.
I let this run for an hour before going to bed. In the morning, it recovered the sample. However, I did not look close enough at the code and missed that it wrote the output to STDOUT, so I needed to run the tool again. It took hours to complete, and I didn't want to wait for that. After reading the code, I realized the tool was reading in the whole encoded command but only needed a small section. After the modifications below, the key was recovered in less than a minute.
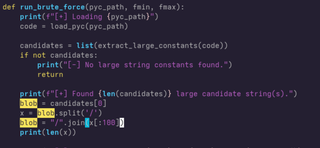
The Python source code was recovered as sampled below.
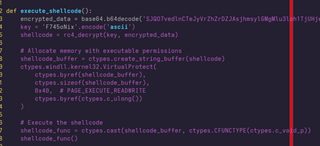
The Python code contained a base64 encoded string that is RC4 encrypted. This shellcode is then copied into a section of memory with the permissions needed to execute, and execution is passed to that code. After decoding and decrypting the string, we have access to our first shellcode.
Stage 2: First Donut Layer
The Python script hands off to shellcode generated by Thewover's Donut, a tool that wraps arbitrary executables or .NET assemblies into position-independent x86-64 shellcode. During the initial analysis, I did not know this was created with the tool Donut. I loaded the sample into Ghidra and started resolving strings and function pointers. Only after I manually decoded and extracted the embedded executable did I identify the Donut tool. After comparing my static analysis to the source code, it was quick work to verify my analysis.
Now that we know the tool used to create it, we looked for a tool to extract the embedded executable without the need to open a debugger. This first Donut layer was decoded using Volexity's donut_decryptor tool, which extracts the unencrypted instance (metadata) and module (payload) components.
The decoded module from this stage is an executable, specifically a laZzzy-wrapped binary containing the second stage of the chain.
Stage 3: laZzzy Layer - A Gap in Tooling
With this new binary, quick strings resulted in meaningful intel, which led to some open source leads.
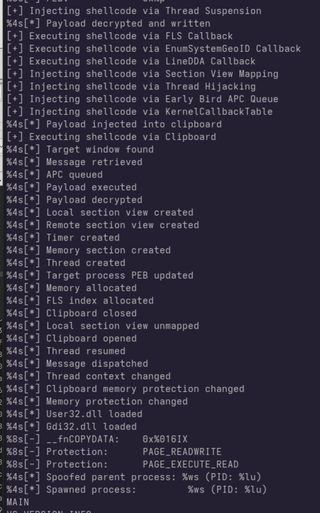
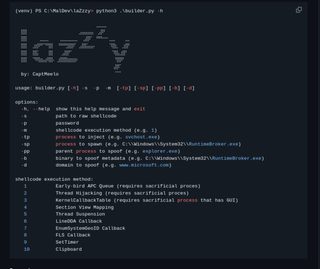
laZzzy is a shellcode-loader. It uses multiple techniques to inject shellcode into the current or remote process, with the options above. This tool is also open source, so I loaded it into Ghidra and walked along with the code to make sure there are no modifications. laZzzy reads in a shellcode and creates an encrypted shellcode payload using AES-CBC with an additional XOR layer. It then builds the rest of the Windows PE stub that decrypts and executes at runtime. Unlike Donut, laZzzy produces a complete PE executable rather than position-independent shellcode.
Looking through the executable, we get to the AESDecrypt function. Here it loads the AES key, initialization vector, and the encrypted payload (DAT_14002f010). The FUN_1400013b0 is the AES init function, FUN_1400014e0 is the AES update function, and finally FUN_14002beb0 is the encryption function, where the local_138 is the context, the DAT_14002f010 is the ciphertext, and the 0x12a50 is the length of the ciphertext.
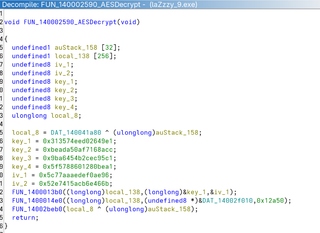
The AESDecrypt function is called by a function named MovePayload. This decrypt function is used by all but one (1) of the injection methods, meaning that the payload is encrypted and obfuscated the same way every time.
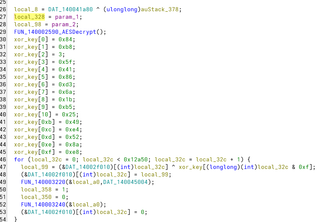
Once the payload is decrypted, it is XOR'd to get the embedded shellcode. Manual decryption using this method is highly annoying, so we employed automation to make our analysis easier.
Closing the Gap: Static Extraction
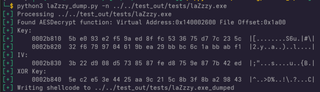
I was unable to identify a public tool to extract laZzzy payloads statically. The solution was to build a custom extraction tool using static analysis of the laZzzy PE binary and the source code. As a result, laZzzy_dump was born.
The approach:
- Locate the decryption routine: laZzzy's AES-CBC decryption wrapper function has a distinctive compiled footprint (a specific sequence of x86-64 instructions: AES initialization, a LEA loading the encrypted data, a MOV with the payload size, the decryption call, an XOR post-processing step, and a stack-frame teardown). Scanning the PE binary for this byte-pattern signature identifies the function without needing a disassembler.
- Extract the key material and ciphertext location: Once the function is found, RIP-relative addressing (LEA, MOV instructions with displacement operands) are resolved to recover the file offsets of the AES key, initialization vector (IV), and the encrypted shellcode.
- Decrypt offline: The ciphertext, key, and IV are pulled from the binary and decrypted using standard AES-CBC, followed by the secondary XOR layer that laZzzy applies.
This technique requires no debugger, emulator, or dynamic execution, only a copy of the compiled binary. The extracted tool was validated against multiple independently generated laZzzy samples to confirm the pattern was successful across different build configurations.
Stage 4: Second Donut Layer
Once the shellcode is extracted from the laZzzy binary, donut-decryptor is run again on the recovered bytes. This yields another instance/module pair, where the module is now the final payload: an embedded .NET DLL.

Stage 5: Embedded .NET DLL
The recovered .NET assembly is the true endpoint of the chain. At this point, standard .NET analysis tools (dnSpy, ILSpy, etc.) can decompile the C# source and analyze the malware's behavior.
Stage 6: .NET Resources
The final part of this malware chain is the .NET resources. I am not going to go into detail, but mainly the resources are encrypted, sections are parsed out of them and loaded into memory like shellcode, and then code execution is passed to them.
Conclusion
This multi-stage design accomplishes several goals for the attacker:
- Each layer uses a different obfuscation/encryption scheme and format (Python obfuscation, Donut shellcode generation, laZzzy AES+XOR encryption, another donut layer). A signature scanner looking for one (1) format will miss the others.
- Public tooling can make life easier by reducing time needed to manually walk through a malware sample, BUT sometimes these tools need a little attention to produce the correct results.
- Mixing shellcode generation (Donut) with a PE-based loader (laZzzy) and Python orchestration gives the attacker multiple execution contexts and flexibility in where each stage can run.
The key technical insight is that encryption and format layering can be unwound statically if the compiled code's structure is understood. This analysis shows that even without dynamic execution, knowledge of a loader generator's source code or reverse-engineered instruction patterns can yield a path to the final payload.