RPC Programming for the Aspiring Windows Developer

As EDR/AV solutions have evolved, attackers, be they malicious or hired testers, need to improve their techniques by exploring new avenues of accomplishing common tasks. These methods evolve over time and sometimes even cycles as techniques become highly detected, then dropped, and later rediscovered. Over a series of posts, we are going to investigate mixing the old and the new by programming Windows Remote Procedure Call (RPC) calls into a Beacon Object File (BOF).
RPC is the implementation by which a computer calls functionality on a different system to cause some action. In Windows, RPC is ubiquitous and is the backing technology behind some of the Windows Application Programing Interface (API) and standard Component Object Model (COM) interfaces. RPC is an old technology that even many seasoned developers do not fully understand.
BOFs are a new method of coding extensions into implants that live on hosts and establish continuous access for an attacker. At its core, it takes the previous technique of reflective loading and moves the responsibility of loading/linking code to the implant already executed on a target system. This technique is being widely adopted by multiple implant technologies, including Cobalt Strike’s Beacon, Metasploit's Meterpreter, Sliver’s Implant, and other commercially available implants. In a way, BOFs have become a standard plugin interface that can be shared across offensive tooling.
Over three (3) blog posts we will dive into:
- Programming against RPC as an offensive tool developer
- How BOFs have changed since I last wrote about them here
- Incorporating RPC code into BOFs
RPC for the Windows Developer
RPC often does not need to be directly touched or manipulated to accomplish goals as a Windows developer, at least if you have access to the Windows API. The Services API could be used instead of coding against MS-SCMR, the registry API instead of MS-RRP, and multiple net commands instead of MS-SAMR.
Interestingly, tooling like Impacket is based around direct manipulation of RPC and is the reason your non-Windows computer can suddenly manipulate a Windows-based machine. Overriding protocols directly is also what allows pass-the-hash (PtH), as we are not allowing Windows to step in and control the authentication steps. Coding new tools into these external to Windows packages requires intermediate knowledge of RPC and Windows Authentication, and is therefore outside the scope of this article.
Having established that a Windows developer normally does not have to worry about RPC particulars, why care about RPC? There are instances where direct coding against RPC can give an advantage to the aspiring developer. Specifically, it:
- Allows us to call functionality without going through potentially hooked Windows APIs
- Provides deeper and more direct access to information the OS sends/receives
- Gives access to functionality not exposed via the Windows API
Multiple CVEs and vulnerabilities have originated from bypassing the assumptions about how an RPC interface might get used. In short, direct coding against RPC is not needed most of the time; having the knowledge to write that code when needed can make or break the user getting the information they need.
Environment Setup
Before diving in, we need a collection of tools to make this job possible. All these tools should be installed on a Windows-based host or VM since we will need the Windows toolchains later to generate some of the backing code required by RPC.
- A version of Visual Studio (This article is written using Visual Studio 2022, but others will work with modified paths.)
- Visual Studio Code or a more basic integrated development environment (IDE) of your choice
- Windows Terminal (We will configure this to make using Visual Studio’s CLI tools easier.)
Visual Studio Setup
The Visual Studio setup is fairly simple. After acquiring and running the installer, make sure you have selected Desktop development with C++ as one of the workloads to get installed.
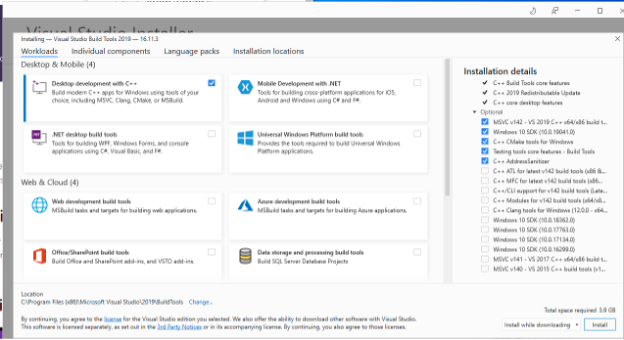
With that selected, click Install and wait for the installation to finish or set up Visual Studio Code in parallel.
Visual Studio Code Setup
Visual Studio Code is, in my opinion, a genuinely nice extensible IDE that can get almost all basic file editing needs done. Once we hit the stage of writing a BOF, Visual Studio Code will be the tool used. There are a few items we need to accomplish to make that an enjoyable experience.
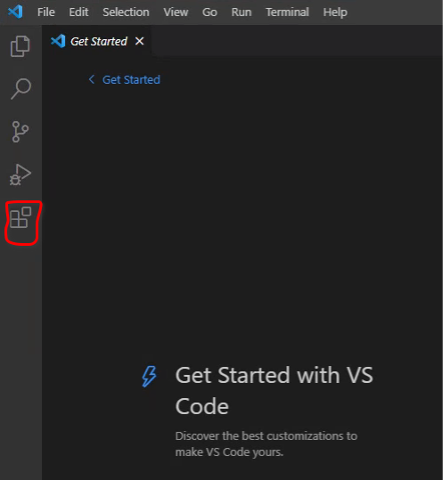
- Install VS Code
- Open VS Code and select extensions
3. Search ms-vscode.cpptools and select install
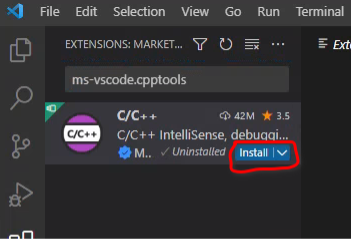
For now, that is all we will need to do inside of VS Code.
Windows Terminal Setup
The Windows Terminal app is a modern, multi-tab terminal. Specifically, we are interested in using it to set up x64 and x86 developer profiles that will automatically configure our paths and toolsets such that we can use things like Microsoft command line compiler (cl.exe), linker (link.exe), and idl compiler (midl.exe). After this setup, we will be able to access these tools from a simple terminal tab dropdown menu.
- Search for and install the Windows Terminal from the Microsoft store.
- Open and press ctrl+,
- You should a profile for Developer Command Prompt for VS XXXX. If you have this, base your copy in the next step off this. If not, base your copy off the standard Command Prompt profile.
- Select Add a new profile in the bottom left. Duplicate the profile called out in step 3.
- If you duplicated an existing Developer Command prompt:
- Edit the command line replacing –arch=x64 with –arch=x86
- Rename profile such that it signifies it is for x86 compiles
- If you duplicated Command prompt:
- Locate VsDevCmd.bat inside of your visual studio install. An example path is C:\Program Files\Microsoft Visual Studio\2022\Enterprise\Common7\Tools\VsDevCmd.bat, but this is likely different on your box.
- Once you have found it, edit the command line to be %comspec% /k "[path to VsDevCmd.bat" -arch=x86
- Name this profile to signify it is used for x86 compiles
- Duplicate that profile, replace –arch=x86 with –arch=x64, and rename it to signify it is for x64 compiles
You now have easy access to a 32-bit and 64-bit compiler environment. This will be used repeatedly as we develop our tooling.
Coding Against an RPC Interface
At this point, we have our environment set up and we are ready to write some code. Now the question is, what code should we write? Recently there was an interesting tweet about discovering endpoint protections through interface defined in MS-LSAT. This gives us a goal to shoot for and after looking at the interface, should not be too complex. Before we ever worry about writing up a BOF, it can be simplest to first code a basic console proof of concept that verifies what you want to do can work. This is especially true when dealing with RPC interfaces since we need to deal with a potentially high amount of generated code.
Broadly, the development steps we need to pass through are:
- Locate the IDL of the interface we want to touch (or generate it if it is not public, but that is outside our scope)
- Generate the x86 and x64 C stubs of the interface
- Create a new project backed by our newly generated code
- Write the supporting code to connect to a given computer and bind a given RPC interface
- Optionally authenticate against that computer
- Call our interface and handle its result
Locating the IDL File
Lucky for us, many of the default RPC interfaces available on Windows are documented in public specifications. A Google search for MS-LSAT should contain a result bringing you to this page. Download the PDF under “Published Version” and save it—you will need to reference it multiple times.
Our IDL file itself can be viewed by following the link labeled 6 Appendix A: Full IDL on the left side navigation bar. The file presented in that link is our full IDL file. As a Windows developer, it would be beneficial to learn how to read the information contained in it, but it is not required. For now, copy the entire IDL contents and paste it into a file named ms-lsat.idl on your development machine.
The first line of that IDL file reads `import “ms-dtyp.idl” `. We need to have any imports for our target IDL file available at compilation time. Thankfully, Microsoft also provides this file here. Copy this and place it in a file named “ms-dtyp.idl” next to your ms-lsat idl file.
Compiling the Interface Stubs
Microsoft provides a MIDL compiler to generate code stubs from IDL files. Having acquired the needed files, we are ready to make those stubs. This can be done following a few basic steps:
- Open windows terminal and select your x64 developer profile.
- Navigate to the folder where you saved your two (2) IDL files.
- Run `midl.exe /server none /env x64 /cstub ms-lsat_c_x64.c /h ms-lsat_x64.h ms-lsat.idl`.
- Open your x86 terminal, and run the command in step 3, replacing all instances of x64 with win32.
- Run `midl.exe ms-dtyp.idl`, which will produce the header file that both the x86 and x64 LSAT depend on.
You should now have four (4) files consisting of a header and a code file for x86 and x64.
Compiling the Code Stubs
If you have done any degree of development, you probably expect this to be an easy task. We just used a tool to generate code for us, so surely that code will compile under Visual Studio as is, right?

Let us see if that theory holds. First, we need to create a new console app to run our code in. After that is created, we make references to our set of files, and use a common .c file to #include either the x86 or x64 version based on our compile target. That might look like below:
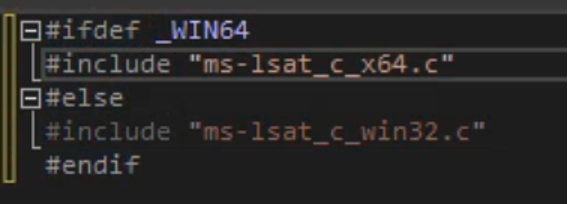
Create a header file with similar code and a #pragma once at the top, then try to compile it.
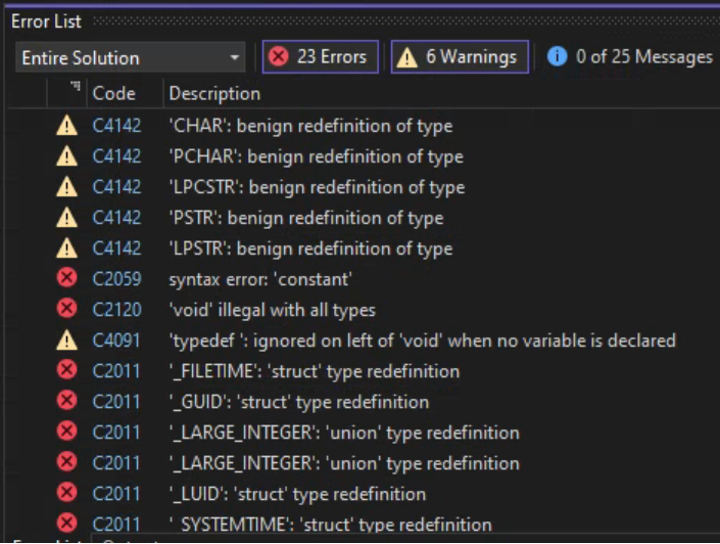
The issue we run into is ms-dtyp.idl presents many variable types that already exist in Microsoft headers. We have a few options on how to approach this, but the simplest is to create a trimmed down ms-dtyp.h that no longer has these overlaps. (The official advice given by Microsoft is here. I have made my copy available for download here.) To be honest, making all these modifications kind of sucks, but currently I am not aware of any better/cleaner way to handle it inside of Microsoft's compilation environment.
After cleanup of this or any other IDL you work on in the future, you will be left with four (4) remaining errors.

These errors are expected. The MIDL_user functions are callback hooks that Microsoft expects us to provide. These will end up being the functions that the stubs use to allocate and free memory. NdrClientCall2 is the function that marshals the RPC data. The MIDL_user functions can be implemented very simply using HeapAlloc and HeapFree, an implementation of which can be found here. NdrClientCall2 can be resolved by linking against Rpcrt4.lib
Gathering Required Information
We have now gotten to the point where we are compiling our RPC stubs and can produce an executable. Surely, I must now be able to simply call these interfaces, right?
Unfortunately, no; the next step in our RPC journey is to answer a few questions, namely:
- What protocol should I use to connect to the RPC interface?
- What destination do I need to specify with that protocol to bind this interface?
- What is the UUID of the interface I am going to bind?
- Do I need to employ connection level authentication?
- Do I need to employ RPC specific authentication?
This will vary between protocols, and if you happen to be investigating an undocumented protocol, all I can really say to you is good luck! We, however, are looking at a documented protocol, so some reading of MS-LSAT should give us our answers. I am reading revision 32.0 if you are following along in the future.
The answer to question number 1 is found in section 1.4. It states: “This protocol depends on the Server Message Block (SMB) Protocol [MS-SMB] and the TCP/IP protocol for sending messages on the wire.”
Questions 2 and 3 are answered quickly after in section 1.9 and further clarified in section 2.1: “This protocol has no standards assignments. It uses private allocations for the RPC interface universally unique identifier (UUID) (12345778-1234-ABCD-EF00-0123456789AB) and the RPC endpoint (\PIPE\lsarpc).”
Further:
“RPC clients for this protocol MUST use RPC over SMB for the LsarOpenPolicy2, LsarOpenPolicy, LsarClose, LsarGetUserName, LsarLookupNames, LsarLookupNames2, LsarLookupNames3, LsarLookupSids, and LsarLookupSids2 methods. RPC clients MUST use RPC over TCP/IP for the LsarLookupNames4 and LsarLookupSids3 methods.”
Question 4 can be tricky to answer and is not always clearly labeled or spelled out. I have only run into one (1) protocol that rejected connection level authentication and then required RPC level authentication. By and large, if RPC requires authentication, first attempt to authenticate on the connection level, and then if items do not work as expected, remove connection level authentication. In this document, Appendix B notes that connection level authentication was not always required but introduced a vulnerability, and it has since been patched to require it.
For this specification, question 5 is addressed in specific messages/opnums where needed. We intend to call LsarLookupNames(). To avoid access being denied, we need to meet one (1) of the following criteria:
1. The RPC_C_AUTHN_NETLOGON security provider (as specified in [MS-RPCE] section 2.2.1.1.7) and at least RPC_C_AUTHN_LEVEL_PKT_INTEGRITY authentication level (as specified in [MSRPCE] section 2.2.1.1.8) were used in this RPC message.
2. The PolicyHandle was granted POLICY_LOOKUP_NAMES access.
Binding to RPC
We can now finally attempt to bind to our RPC interface. For a normal interface, the API calls we will need to employ are:
- WNetCancelConnection2
- WNetAddConnection2
- RpcStringBindingCompose
- RpcBindingFromStringBinding
- (optionally) RpcBindingSetAuthInfoEx
- (optionally) RpcBindingSetOption)
- RpcEpResolveBinding
- RpcExceptionFilter
- RpcBindingFree
I am not going to go through each call individually here. What I will do is point you to a prototype project that does setup work and accepts a callback function such that multiple interfaces can be coded against in one (1) codebase, and the actual binding code can get reused. That is available for review in the proof of concept final example available here.
The main entry point that helps us as a C programmer connect to and exercise an RPC call from this helper program is make_rpc_request. It is a variadic argument function that has the following prototype:
` int make_rpc_request(RPC_IF_HANDLE spec, wchar_t * targetServer, RPC_WSTR pipename, byte authtype, const wchar_t* service, const wchar_t* username, const wchar_t* password, const wchar_t* uuid, BOOL rpc_use_auth, RPC_CALLBACK callback, ...) `
RPC_CALLBACK takes two arguments: ` (RPC_BINDING_HANDLE *hrpc, va_list args);`
This callback programming simplifies our coding requirements by hiding all the RPC code. This code has served me well so far, and while I will not call it feature complete, it does serve as a good starting point. I would also be remiss if I did not point out the connection logic is largely taken from mimikatz, which is a great project to read if you want to learn about security concepts by reading C code.
Always a Quirk With RPC
I must confess at this point that I went through taking the template code I have used for every RPC project before and assumed it would be required for this project. That, however, was a false assumption. Let us look closer at the first RPC call that we will need to make LsarOpenPolicy2.
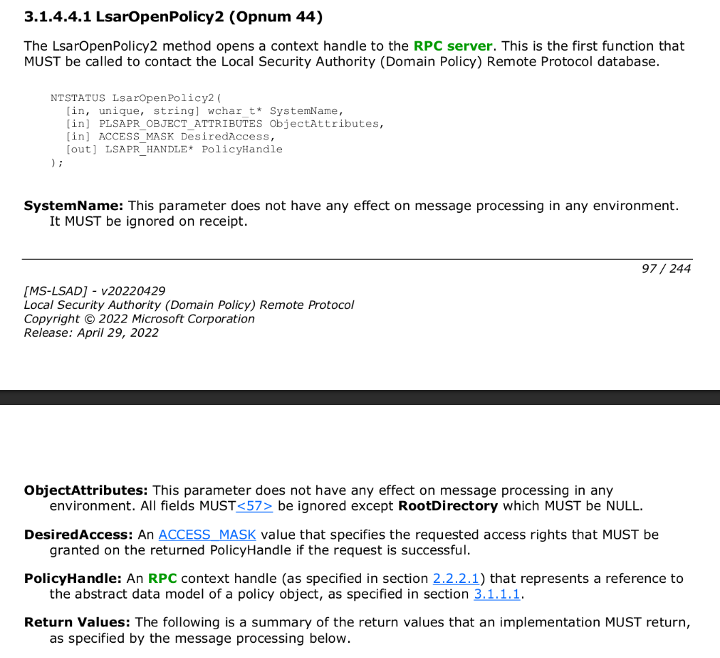
We take as input a name, a structure, and an access mask and we get back a policy handle. What do we NOT take? An RPC binding handle. You see, the LSA remote protocol does not have you bind a standard RPC handle in the normal sense. I will skip about four (4) hours of me troubleshooting and tell you now that LsarOpenPolicy and LsarOpenPolicy2 do not even work for a modern Windows computer (They will return “The requested operation is not supported.”).
Instead, we need to call LsarOpenPolicy3, which takes a few additional parameters. If you are following along and just searched MS-LSAT for LsarOpenPolicy3 and found it to be missing, you have not gone crazy. This is a classic case of documentation falling behind implementation.
Skipping another hour of troubleshooting, we cannot include both MS-lSAT and MS-LSAD in the same project, because they both are defining the same interface for LSA remote. A note about this is included on the MS-LSAT IDL page, but the full significance of that did not occur to me at first. Microsoft makes available a merged IDL file here.
After compiling this, you will learn that the merged IDL that Microsoft provides is incorrect and does not have OpenPolicy3, so we will add that from MS-LSAD ourselves. As you merge these files together, make sure to include all OpnumXXNotUsedOnWire(void) functions. These may appear meaningless, but each one increments the opnum of functions after it, so without them, our server would think we were calling a different function than the one we intend to call. After the merge, you will see that two function definitions are missing.

If you Google those names, you will not find much. No documentation calls out those needing to be defined. MS-RPRN has something similar but talks about it in the specification file.
For our use case, we can adopt the definition of those two (2) files from the reactos project’s lsa.c.
Calling RPC Functions
At this point, we can finally code against the actual RPC interface. We will not need to use the helper functions from before because the LSA remote protocol has decided it is doing its own thing. We first call LsarOpenPolicy3, providing the hostname of the computer we want to contact, and pass in POLICY_LOOKUP_NAMES as the access mask. Check that this call was successful and then pass it on to LsarLookupNames. Most things in RPC use unicode_string structures so we convert our names into that format and then call our function, passing in the other expected variables. At this point, we have working code for interacting directly with an RPC interface. The main item to notice is coding against an RPC interface is not much different than making any other function call after you have worked out fixing up the converted IDL and figured out what the general workflow of the protocol is.
One other important item to note when dealing with RPC code: The RPC back-end will raise exceptions, which can crash your process if not caught. You can get around that issue by using RpcTryExcept, RpcExcept, and RpcEndExcept macros.
Closing
If you followed along at this point, you should be comfortable with the concept of taking IDL files and generating stub C code and a header for use in other projects. My main purpose for writing this post was to show what an average developer's experience might look like for coding against a raw RPC interface. It was also intended to serve as a basic roadmap for anyone who wanted to try out some raw RPC coding in the future, as I did not find many examples that were simply consuming existing IDL information to write code (most were full server client custom examples).
Finally, I would be remiss if I did not point out that absolutely none of this code was really needed to accomplish this task on Windows. When I first started talking about the initial tweet that inspired this post, @_xpn_ quickly coded and posted a demo that used LsaOpenPolicy and LsaLookupNames. The takeaway there is before you spend hours fixing up compiled IDL files and reading specifications, make sure the functionality does not already exist in the Windows API.
References:
- https://github.com/fortra/impacket
- https://learn.microsoft.com/en-us/openspecs/windows_protocols/ms-samr/4df07fab-1bbc-452f-8e92-7853a3c7e380
- https://learn.microsoft.com/en-us/openspecs/windows_protocols/ms-rrp/0fa3191d-bb79-490a-81bd-54c2601b7a78
- https://learn.microsoft.com/en-us/openspecs/windows_protocols/ms-scmr/705b624a-13de-43cc-b8a2-99573da3635f
- https://learn.microsoft.com/en-us/openspecs/windows_protocols/ms-lsat/1ba21e6f-d8a9-462c-9153-4375f2020894
- https://visualstudio.microsoft.com/free-developer-offers/
- https://code.visualstudio.com/Download
- https://apps.microsoft.com/store/detail/windows-terminal/9N0DX20HK701?hl=en-us&gl=us&rtc=1
- https://twitter.com/an0n_r0/status/1619145879591735297?t=TjxfRt4l3bAEDZJElCt60A&s=19
- https://learn.microsoft.com/en-us/openspecs/windows_protocols/ms-lsat/23cd602f-e46c-430d-ab5d-a678b9044a7d
- https://learn.microsoft.com/en-us/openspecs/windows_protocols/ms-dtyp/24637f2d-238b-4d22-b44d-fe54b024280c
- https://imgflip.com/
- https://github.com/gentilkiwi/mimikatz
- https://learn.microsoft.com/en-us/windows/win32/api/ntsecapi/nf-ntsecapi-lsaopenpolicy
- https://learn.microsoft.com/en-us/windows/win32/api/ntsecapi/nf-ntsecapi-lsalookupnames