Oops I UDL'd it Again

Table of contents
Introduction
Phishing. We all love phishing. This post is about a new phishing technique based on some legacy knowledge I had that can be used to get past email filters and such. I would expect that after publication, this method will be identified and addressed by most vendors.
The Discovery
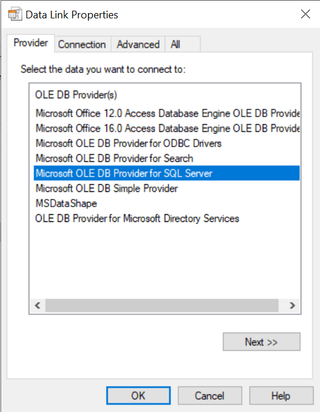
As usual, the discovery was made during an engagement where I actually did something completely different. I was in a scenario where I needed to find the databases servers through a locked down Citrix session. Based on some old notes I had from 2017, I knew that there is a native way to enumerate database servers in Windows environments by simply creating an empty file with the .udl extension. Once that file is created, you can open it and you will be presented with a GUI that looks like this:

The interesting part for this scenario is that you can press the down arrow on the top line (1. Select or enter server name), then it will broadcast the network for available SQL servers and list them right below the down arrow. This gave me what I needed at the time; however, I could not stop thinking about the struggles I had early in the engagement with getting any phish into the mailboxes. Out of curiosity, I decided I would simply send this to my own mailbox from a test account I had and see if the attachment would come through. To my big surprise, it did! It was not even blocked by Outlook and that is a great thing.
This is when I started to research if I could abuse this in a phishing scenario, and, you guessed right, you can.
Details about Universal Data Link Configuration (UDL) files
The main purpose of UDL files is to be able to test connections towards a database server. The UDL file supports various providers, and this also depends somewhat on what is installed on the host. However, there are a few standard providers that are most likely to be present. For instance, the Microsoft OLE DB Provider for SQL Server, which is also the default chosen for new UDL files.
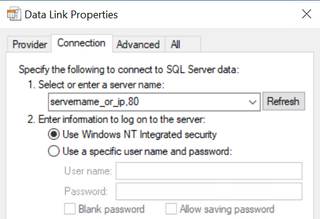
The Connection tab is the default shown when you open a UDL file, and these fields change based on the provider that has been chosen. Looking at the 'Connection' tab when using the default provider, we can see that you can fill out a server name, choose between integrated security, and choose to enter username and password. You can also choose to select a database on the server or attach a database file as a database name.
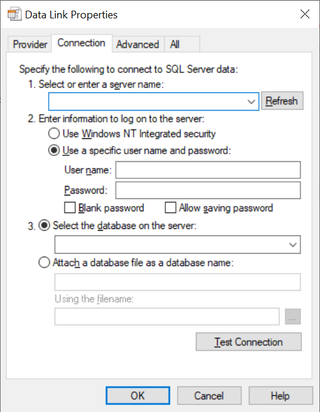
I will leave the rest of the tabs up to you to explore, however no adjustment of settings on these are necessary for this to work. since it is not really that interesting. Let’s enter a server name. set it to use windows integrated security, and press OK to store it.
Now, lets take a look at what a UDL file actually looks like by opening it in Notepad (The best editor next to Nano).

That’s it. That’s the entire file. It is just a text file. Based on some experimentation, the commented line needs to be present for it to work as a UDL file. You also might be wondering what happens when you press the 'test connection' button. Well, that is where things get interesting, because it will attempt to connect to the server defined in the server name field on port 1433. Upon successful connection, it will then use Integrated Security to authenticate as the user. If you choose to fill in a specific username and password however, it will send that as part of the authentication. And I am assuming you can seewhere this is heading in terms of phishing. We need to send this to a user with a pretext that gets the user to either press 'test connection' or fill in their username and password before hitting it. Now that you have some details, let’s see if we can use this in a phishing scenario.
Using UDL Files for Phishing
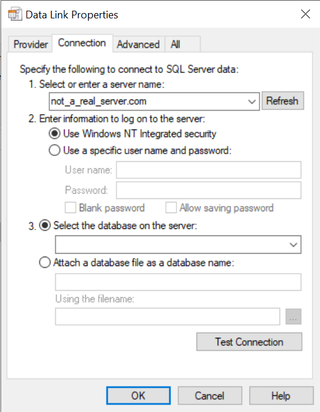
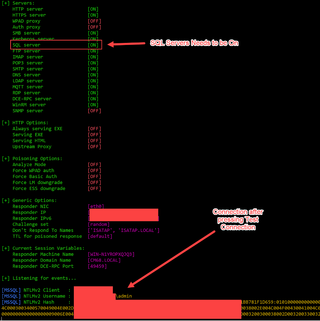
Let’s first see if we can capture a hash with this technique. First, fire off a Responder instance on a public IP address (Just add the public IP address to the server name) and see what happens when you press 'test connection'. As you can see, you now have a NetNTLMv2 hash (As shown in the screenshot below).
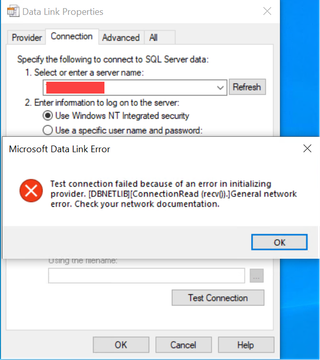
On the client side, you will get an error message like the one shown below, so take that into account when creating the actual pretext.
When using the option to let the user fill the username and password, the flow will look like this:
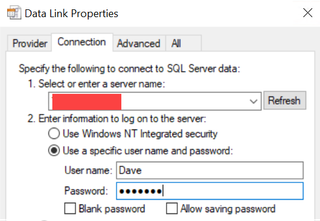
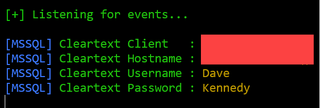
One thing to note on filling username and password, is that you can prefill the username before you send it to the user, making the pretext more believable.
This is cool and all, but in most cases , based on my experience, port 1433 will be blocked outbound from the customer, making this technique somewhat useless. You can take a gamble on that it will be open, of course, but let’s see if we can make things little more exciting. Let's change the port to a more friendly one, for instance, port 80. The trick is that you can simply change the port in the server name field by adding a comma between the name and ip and the port like this: servername_or_ip,80. It should look like this:
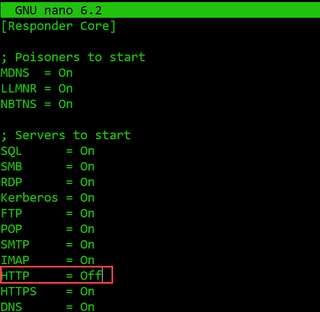
The only problem is that if you press 'test connection' now, Responder will not understand what to do since this is a MSSQL connection and not a standard HTTP connection. For this to work, we need to adjust Responder a bit. I will walk you through the minor changes we need to adjust, so no need to worry.
Firstly, you will need to change the responder.conf file and turn off the HTTP server. I recommend using nano since it is the superior editor (Yes, this is a running joke in TS).
Next, we need to change the port in the code so that the Responder SQL server will listen on port 80. Change the 1433 in line 370 inside the Responder.py script to 80, as shown below:

Save the file and refire Responder, then try and hit test connection with it pointing to port 80, and you should get a hash. You are now ready to create a pretext and ship this bad boy of a payload out the door. In terms of pretext, I will leave that up to you to find a good one. If you want to use one file per user that you are sending to with the username prefilled, I have a Powershell script that you can find here that you can use.
Conclusion
As you can see, diving into older knowledge can certainly be a great thing when you are up against Modern Defenses, and Windows sure has a lot of historical file formats and legacy things. Who would have known that this file format could be used for phishing? My prediction is that after posting this blog, Microsoft will start to default block the UDL file format in Outlook, since this technique is now know.
If you want to learn more about the UDL file format you can visit this link.
Hope you found this post interesting, learned something new, and got inspired.