Offensive Lab Environments (Without the Suck)

What
Have you ever been in an engagement where you need to test an evasive payload or technique, but you lack the time or resources to spin up a replica lab environment quickly? This blog will help clear that hurdle for you.
From building payloads, testing evasions, and practicing offensive techniques, a must-have for every seasoned tester is a lab environment to serve as a test range to ensure a successful client engagement. Bonus points if that lab is dynamic in nature and able to be spun up quickly. If stealth is a goal in your engagement, you can't risk the we'll do it live approach.

In this brief blog, I'll demonstrate my methodology for building a dynamic and robust lab environment for testing attacks that doesn't take hours or break the bank. In fact, with the right strategies and automation tools, it's possible to craft a dynamically configured lab setup on inexpensive hardware with ease.
Goal: Create a process for rapidly deploying dynamic AD lab environments useful for payload testing or attack simulation without the suck.
Hardware
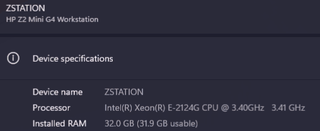
There are endless options of micro PCs available for relatively cheap; these devices are terrific for our dynamic lab environments. For this particular build, I landed on the HP Z2 Mini G4 Workstation), a powerful 4-core Xeon processor that will be ideal for my lab needs. Additionally, I threw in a 1TB NVMe SSD for additional disk space for my VMs. Any NUC-style device would be adequate, and the hardware can vary greatly based on your budget. This build cost me approximately $300.
Build
I've tried various hypervisors, from VMware to Proxmox. The base for this install was Hyper-V on Windows 11 due to the automation tasks we'll be using. Once the Windows Box with Hyper-V is up and running, you'll need to fetch AutomatedLab and follow the installation instructions. Note: you'll need to point your AutomatedLab instance to a source of your preferred Microsoft ISOs via MSDN or the Evaluation Center.
To make sure that AutomatedLab is ready to go, try to get a list of available operating systems. Open an Elevated/Admin PowerShell ISE and call the following command (make sure you point to the right location for the LabSources folder. If you don't get a valid listing, you missed a step and should rectify.
Get-LabAvailableOperatingSystem
You're all set; let's get to the lab builds! In this blog, I present 2 scenarios: a payload development lab and an AD Attack Lab. These scripts are meant to be pre-built recipes to get you 90% up and running. Custom tweaks and configurations might be needed once deployed. You can easily deploy both scenarios at the same time!
In your Hyper-V server, open an elevated PowerShell ISE and create a new empty document (CTRL+N) if one is not already open.
Scenario 1: Payload Development Lab
Build Time: 20 Minutes
This is my go-to lab was inspired by my awesome co-worker Hans Lakhan and is a great way to get a domain spun up, staged based on your client's domain, and test payloads against standard Microsoft endpoint controls. This is my starting point when spinning up a new client engagement. Set your domain variables to match the target, allowing for accurately keyed payload development. This will spin up an isolated network, while granting the hosts routed Internet access. Now you're ready to roll with testing your payloads and communication channels.
Note the optional script args to add Microsoft Defender exceptions while you are trialing payloads.
# Domain Joined Payload Detonation Lab
New-LabDefinition -Name PayloadLab -VmPath D:\LAB-VMs -DefaultVirtualizationEngine HyperV
Add-LabVirtualNetworkDefinition -Name PayloadLab -AddressSpace 10.100.100.0/24
Add-LabVirtualNetworkDefinition -Name 'Default Switch' -HyperVProperties @{ SwitchType = 'External'; AdapterName = 'Ethernet' }
Add-LabMachineDefinition -Name Payload-DC -Memory 4GB -OperatingSystem 'Windows Server 2016 Datacenter (Desktop Experience)' -Roles RootDC -Network PayloadLab -DomainName client.local
$netAdapter = @()
$netAdapter += New-LabNetworkAdapterDefinition -VirtualSwitch PayloadLab
$netAdapter += New-LabNetworkAdapterDefinition -VirtualSwitch 'Default Switch' -UseDhcp
Add-LabMachineDefinition -Name Payload-Router -Memory 1GB -OperatingSystem 'Windows Server 2016 Datacenter (Desktop Experience)' -Roles Routing -NetworkAdapter $netAdapter -DomainName client.local
Add-LabMachineDefinition -Name Payload-Client -Memory 2GB -Network PayloadLab -OperatingSystem 'Windows 10 Pro' -DomainName client.local
Install-Lab
#########################################
# Optional post-deployment configuration:
$labVMs = Get-LabVM
foreach ($vm in $labVMs) {
Copy-LabFileItem -Path C:\LabSources\Tools\SysInternals\Winobj64.exe -ComputerName $vm -DestinationFolderPath C:\users\Administrator\Desktop\ -verbose -PassThru
Copy-LabFileItem -Path C:\LabSources\Tools\SysInternals\procexp64.exe -ComputerName $vm -DestinationFolderPath C:\users\Administrator\Desktop\ -verbose -PassThru
Copy-LabFileItem -Path C:\LabSources\Tools\SysInternals\dbgview64.exe -ComputerName $vm -DestinationFolderPath C:\users\Administrator\Desktop\ -verbose -PassThru
######################################################################
### Optional Payload/Install methods for quick deployment and testing
######################################################################
#Copy-LabFileItem -Path C:\LabSources\Tools\payload\payload.exe -ComputerName $vm -DestinationFolderPath c:\temp -verbose -PassThru
#Copy-LabFileItem -Path C:\LabSources\Tools\payload\setup.ps1 -ComputerName $vm -DestinationFolderPath c:\temp\ -verbose -PassThru
#Invoke-LabCommand -ActivityName 'Install service ps1' -ScriptBlock { . C:\Temp\setup.ps1 } -ComputerName $vm -PassThru
}
foreach ($vm in $labVMs) {
# reboot
Restart-LabVm -ComputerName $vm -Wait -NoDisplay
}
######################################################################################################
# Set optional exclusions for Defender
foreach ($vm in $labVMs) {
Invoke-LabCommand -ActivityName 'Add Exception for Payload Directory' -ComputerName $vm -ScriptBlock { Add-MpPreference -ExclusionPath 'C:\temp\'} -PassThru
Invoke-LabCommand -ActivityName 'Temporarily disable realtime-protection' -ComputerName $vm -ScriptBlock { Set-MpPreference -DisableRealtimeMonitoring $false} -PassThru
}
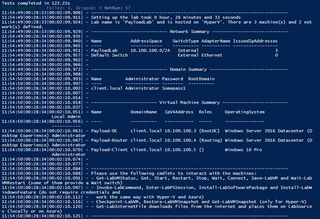
Show-LabDeploymentSummary -Detailed
Scenario 2: AD Attack Lab
Build Time: 60 Minutes
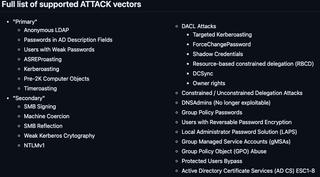
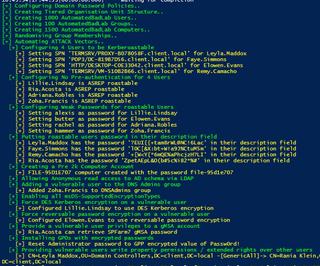
If your lab goal is to practice TTPs and vulnerable scenarios, I recommend leveraging AutomatedBadLab (@spyr0-sec) based on @davidprowe's BadBlood for populating the domain and introducing various AD misconfigurations, as shown below. Excellent work by these folks for these automation scripts :clapping_hands:
“BadBlood by Secframe fills a Microsoft Active Directory Domain with a structure and thousands of objects. The output of the tool is a domain similar to a domain in the real world. After BadBlood is ran on a domain, security analysts and engineers can practice using tools to gain an understanding and prescribe to securing Active Directory. Each time this tool runs, it produces different results. The domain, users, groups, computers and permissions are different. Every. Single. Time.”
Simply pull down the lab files from AutomatedBadLab and run the Template AutomatedBadLab.ps1 after updating the variables. In my case, I had to adjust my Internet subnet to establish connectivity. This may vary based on your setup.
#--------------------------------------------------------------------------------------------------------------------
# CHANGEME - Global parameters
$LabName = 'AutomatedBadLab'
$Subnet = '10.10.200.0/24'
# CHANGEME - Active Directory parameters
$DomainUser = 'LabAdmin'
$DomainPass = 'Somepass1'
$Domain = 'client.local'
$DCIP = '10.10.200.10'
# CHANGEME - Certificate Authority parameters
$CAName = 'AutomatedBadLabCA'
# Path to our custom provisioning scripts
$CustomScripts = 'C:\AutomatedBadLab-main\PostInstallationActivities'
#--------------------------------------------------------------------------------------------------------------------
# LAB CREATION
# Create our lab using HyperV (Azure is also supported)
New-LabDefinition -Name $LabName -VmPath D:\LAB-VMs -DefaultVirtualizationEngine HyperV
# For Internal networks, just need a name and subnet space. Internet Network is a static NAT network
Add-LabVirtualNetworkDefinition -Name $labName -AddressSpace $Subnet
Add-LabVirtualNetworkDefinition -Name "Internet" -AddressSpace 192.168.255.0/24 # REMOVE IF INTERNAL ONLY
# Create a domain admin account to handle Windows machine creation / Active Directory configration.
# NOTE: Make sure these passwords are the same and needs to be complex
Add-LabDomainDefinition -Name $Domain -AdminUser $DomainUser -AdminPassword $DomainPass
Set-LabInstallationCredential -Username $DomainUser -Password $DomainPass
#--------------------------------------------------------------------------------------------------------------------
# Defining default parameter values, as these ones are the same for all the machines.
$PSDefaultParameterValues = @{
'Add-LabMachineDefinition:Network' = $labName
'Add-LabMachineDefinition:ToolsPath' = "$labSources\Tools"
'Add-LabMachineDefinition:DomainName' = $Domain
'Add-LabMachineDefinition:DnsServer1' = $DCIP
'Add-LabMachineDefinition:MinMemory' = 1GB
'Add-LabMachineDefinition:Memory' = 4GB
'Add-LabMachineDefinition:MaxMemory' = 8GB
'Add-LabMachineDefinition:OperatingSystem' = 'Windows Server 2016 Datacenter (Desktop Experience)'
}
#'Add-LabMachineDefinition:OperatingSystem' = 'Windows Server 2019 Standard Evaluation (Desktop Experience)'
#--------------------------------------------------------------------------------------------------------------------
# Create the DC with custom name and IP parameters
# Give both machines Internet access to download updates
$DC1NICs = @()
$DC1NICs += New-LabNetworkAdapterDefinition -VirtualSwitch $LabName -Ipv4Address $DCIP
$DC1NICs += New-LabNetworkAdapterDefinition -VirtualSwitch 'Internet' -UseDhcp
Add-LabMachineDefinition -Name BLDC01 -Roles RootDC -NetworkAdapter $DC1NICs
# Create the CA
$CARole = Get-LabMachineRoleDefinition -Role CaRoot @{
CACommonName = $CAName
KeyLength = '4096'
ValidityPeriod = 'Years'
ValidityPeriodUnits = '20'
}
Add-LabMachineDefinition -Name BLCA01 -Roles $CARole
# Give Workstation Internet access via NAT switch
$WS1NICs = @()
$WS1NICs += New-LabNetworkAdapterDefinition -VirtualSwitch $LabName
$WS1NICs += New-LabNetworkAdapterDefinition -VirtualSwitch 'Internet' -UseDhcp
# For the workstation, use Get-LabAvailableOperatingSystem to get correct OS name
Add-LabMachineDefinition -Name BLWS01 -NetworkAdapter $WS1NICs -OperatingSystem 'Windows 10 Pro'
# Install our lab, has flags for level of output
Install-Lab # -Verbose -Debug
#--------------------------------------------------------------------------------------------------------------------
Write-ScreenInfo "Creating GPPPassword files"
Copy-LabFileItem -ComputerName BLDC01 -Recurse -Path $CustomScripts\AutomatedBadLab\AD_Attack_Vectors\GPPPassword\ -Destination "C:\Windows\Sysvol\sysvol\$Domain\Policies" -Verbose
Write-ScreenInfo "Creating Domain structure and objects via AutomatedBadLab"
Start-Transcript -Append -Path "$CustomScripts\AutomatedBadLab\$(Get-Date -f 'yyyy_MM_dd')_AutomatedBadLab.log"
Invoke-LabCommand -ComputerName BLDC01 -ActivityName InvokeAutomatedBadLab -FileName Invoke-AutomatedBadLab.ps1 -DependencyFolderPath $CustomScripts\AutomatedBadLab
Stop-Transcript
Write-ScreenInfo "Creating Insecure ADCS Templates"
. "$CustomScripts\AutomatedBadLab\ADCS_Attack_Vectors\New-WeakADCSTemplates.ps1"
New-WeakADCSTemplates
# Add Defender exclusion before uploading the Windows Defender removal script
Invoke-LabCommand -ComputerName BLWS01 -ActivityName AddExclusions -ScriptBlock { Set-MpPreference -ExclusionPath "C:\Windows\Temp"; Set-MpPreference -ExclusionExtension "bat" }
# Upload Batch file to remove Windows Defender
Copy-LabFileItem -ComputerName BLWS01 -Path $CustomScripts\RemoveWindowsDefender\RemoveWindowsDefender.bat -Destination "C:\Windows\Temp"
# Run the batch file as TrustedInstaller via Scheduled Task
Invoke-LabCommand -ComputerName BLWS01 -ActivityName RemoveDefender -FileName 'Remove-WindowsDefender.ps1' -DependencyFolderPath $CustomScripts\RemoveWindowsDefender
Write-ScreenInfo "Enabling Auto-enrollment for Certificates"
Enable-LabCertificateAutoenrollment -Computer -User -CodeSigning
# Take a snapshot of the DC in a working state
Checkpoint-LabVM -ComputerName BLDC01 -SnapshotName "$(Get-Date) - AutomatedBadLab Complete"
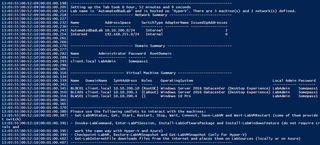
# Provides a pretty table detailing all elements of what has been created
Show-LabDeploymentSummary -Detailed
While the setup builds, you might be forced to manually reboot the domain controller and workstation to finish applying updates. After reboots occur, the domain objects and vulnerable configurations should fire up during the post-installation steps.
Connectivity
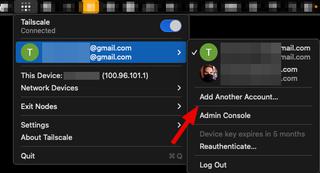
Once deployed, I like to set up a new Tailscale account (isolated from my primary account) and a subnet router within the lab domain. To do so, simply download Tailscale, log in with a secondary/burner account, and bring up the local routes on 1 of your newly deployed lab hosts (only 1 if you're using the subnet router).
tailscale up --advertise-routes=10.100.100.0/24 (might differ based on your lab's subnet)
Using my primary Tailscale account on my primary workstation, I then Add Another Account... pointing at the new lab Tailscale account (isolated) and can access the lab VLAN without messing with local routers/etc.
Wrap-Up
That's all there is to get up and running in 2 scenarios. I hope this serves as a resource to save you time on your engagements and invigorates you to expand beyond these basics. Implement forests/SCCM/Azure elements into your lab automation!