Keys to JWT Assessments - From a Cheat Sheet to a Deep Dive

Table of contents
The Cheat Sheet section is for quick reference.
The Learn section is for those who have never touched the topic before.
The Implement section is for more detailed descriptions of each Cheat Sheet item.
Cheat Sheet
Session Management Cheat Sheet - JWT | |
|---|---|
How are sessions managed? | Bare minimum token(s) needed for sensitive request + find a test page |
JWT regex |
|
Gather Information | Review token contents with JSON Web Tokens' request/response tab Look for: exp, alg Any other interesting claims e.g., ‘password’, ‘role’, etc. |
Required? | What resources require the JWT? |
Signature Validation | Remove or modify last few characters from signature |
[HS256] Weak HMAC Secret | Identify:
Exploit: JWT Editor Extension Tab:
JWT Editor Repeater Tab:
|
Signature Exclusion ('none' Algorithm) | Manually: Set alg to none, remove signature JWT Editor Repeater Tab:
|
[RS256] Key Confusion | Identify public key (e.g., /.well-known/jwks.json) JWT Editor Extension Tab:
JWT Editor Repeater Tab:
In the event of failure, convert key format and repeat |
Injecting jwk | JWT Editor Extension Tab:
JWT Editor Repeater Tab:
|
Injecting jku/x5u | JWT Editor Repeater Tab:
Exploit:
|
Injecting kid Values | JWT Editor Extension Tab:
JWT Editor Repeater Tab:
|
New to JWTs? Learn Here.
JWT stands for JSON Web Token and a token of this format might look similar to the following:

Technically speaking, JWT is an umbrella term that includes two types of tokens, JSON Web Signature (JWS) and JSON Web Encryption (JWE). JWEs are encrypted and signed to prevent tampering and prevent reading of the embedded values. JWS on the other hand is only signed to prevent tampering but can be decoded to view the plaintext values held by the token. By far, the most common way JWTs are used is in the form of a JWS, the signed version that can be decoded. The distinction between JWT and JWS is not often made, with JWEs being somewhat rare. This post will likewise use the JWT and JWS terms interchangeably.
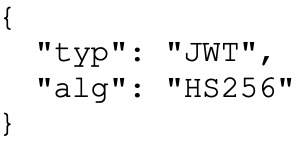
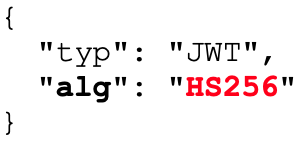
The token is made up of three distinct parts, all separated by a period: the header, the payload, and the signature.

These parts are Base64-encoded key-value pairs (called 'claims' in the payload, 'parameters' when in the header) represented in JSON format that contain useful information. The header includes parameters related to the cryptography used to sign the token. In this example, the alg claim says the signature will be based on the Hash-Based Message Authentication Code (HMAC) SHA-256 algorithm.
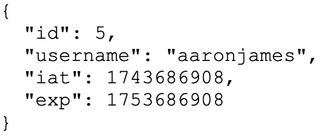
The payload contains the useful information the token is trying to convey. Here, some details are included to identify the user, when the token was issued, and when it expires. However, a JWT could contain a variety of other information the application might want to leverage when dealing with individual users.
Lastly, the signature is the product of a cryptographic operation on the header and payload and is used to ensure the data has not changed since the token was issued. The signature, again, is created using the algorithm specified in the header. Tokens are signed using symmetric algorithms, where one is used to sign and verify the token, and the other is asymmetric algorithms, which use a private key to sign the token and a public key to verify the token.
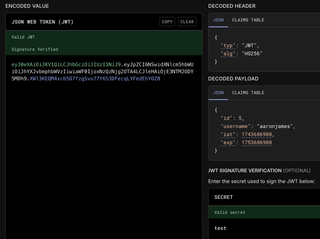
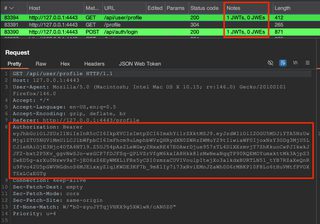
Here’s a view of the Base64-encoded value and the decoded values from https://jwt.io:
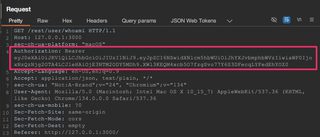
Here’s a view of that same JWT being used in an HTTP request, which is how JWTs will likely be handled by a penetration tester:
What are they used for? As in the screenshot above, web applications often use JWTs for authorization and stateless session management. Stateful session management and why it matters have been discussed in greater detail in our previous blog about cookies, but many of core principles also apply to stateless session management using JWTs.
Stateless session management serves the same purpose as more traditional stateful session management: identify a user and determine if they should have access to a web resource. However, with stateless session management, the server doesn’t have to keep track of user sessions. Instead, the token is created and cryptographically signed, given to the user, and from then on it is implicitly trusted (assuming the signature is validated by the server, which ensures the token hasn’t been changed at all).
JWTs are also small and self-contained strings, which is beneficial from a performance perspective because they can be sent with little data overhead. They also include everything that needs to be communicated inside them. This means no back-end communication or database interactions are required.
Another benefit is the ability for distributed systems to be able to leverage the token. If those systems can properly validate the signature, they will not need to communicate with a centralized resource.
The theme for JWT advantages is 'less work and faster.'
However, there are trade-offs for these benefits. Once a token is issued, it generally cannot be revoked. The server that receives it will continue to consider it valid because the token itself, as discussed, is implicitly trusted if the signature passes validation. They do, however, have expiration claims that define a timeframe the token is valid for, and after that expiration the JWT should no longer be accepted. Keeping these expiration timeframes relatively limited does help, but if a user logs out or access is changed, there will likely be a period where the token will continue to be valid before expiry.
Also, there are fewer built-in protections against theft when compared to cookie security attributes like Secure and HttpOnly. If JWTs are stored insecurely, like in the browser’s Local Storage or Session Storage, they are as vulnerable to theft through JavaScript attacks as a session cookie without HttpOnly set.
There are a lot of excellent resources available to learn more about JWTs and how to attack them. Some good options are:
- https://auth0.com/docs/secure/tokens/json-web-tokens
- https://datatracker.ietf.org/doc/html/rfc7519
- https://portswigger.net/web-security/jwt
Detailed Implementation of JWT Attacks
The goal of attacks against JWTs is usually to modify the claims within the token payload to values that grant additional access or privileges. However, effective testing of JWTs requires the right tools.
Within Burp Suite there are several extensions that streamline the various tests, with the JWT Editor extension seeming to be the most fully featured. The walkthroughs here will mostly leverage that extension, but consider using the others if you see fit.
Other than these, JWT_Tool has many of the same features as well as walkthroughs and guidance on testing JWTs. You can find the Attack Methodology here.
To practice these attacks, I've written a vulnerable application that implements the various vulnerabilities through command line flags. That code is found on GitHub with installation instructions.
Other attacks against vulnerable applications can be practiced through PortSwigger Web Security Academy labs that demonstrate these issues, as well as intentionally vulnerable web applications. For instance, OWASP’s Juice Shop also uses JWTs.
Determine Session Management Mechanism/Identify JWT
When beginning any session management testing, you need to identify which token(s)/cookie(s)/header(s) are required to make an authorized request. Find an application request that returns sensitive information, particularly if that request is specific to a user, like profile data. Remove cookies or tokens one at a time until access is denied. Skip over this value and continue the process until the request is narrowed down to the required tokens or values.
JWTs are very often sent as Bearer tokens in the authorization header of a request but may show up elsewhere in headers or cookies as well. Running certain Burp Suite extensions will also highlight requests that contain a JWT.
When extensions are not run or fail to identify a token, a regex search in Burp Suite will return all requests that contain JWTs, depending on your other search criteria. Go to Target > Site map > right-click target host > Engagement tools > Search. Check the 'regex' box in search options and include the desired regex in the search box.
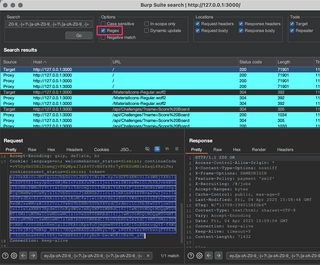
Configuring the search for just response headers will probably show you only JWTs being issued, so tailor the criteria to your needs. Some regex to try:
[= ]eyJ[A-Za-z0-9_-]*\.[A-Za-z0-9._-]*eyJ[a-zA-Z0-9_-]+?\.[a-zA-Z0-9_-]+?\.[a-zA-Z0-9_-]+[= ]eyJ[A-Za-z0-9_\/+-]*\.[A-Za-z0-9._\/+-]*
Information Gathering
Decode the JWT to review claims and parameters to identify any useful or interesting information. Tokens can be Base64 decoded to reveal the contents, but there are convenient options to make them easily readable.
The JWT Editor extension allow tokens to be decoded in a dedicated request or response tab:
JWT_Tool can do the same thing, and the syntax is simple:
python3 jwt_tool.py <PUT YOUR TOKEN HERE>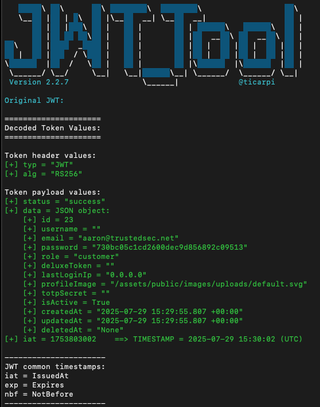
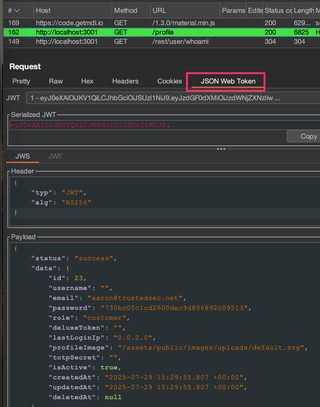
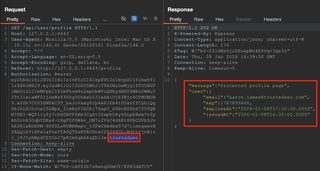
Collect what information you can from the decoded token. The question with session management is always going to be how does the application know who I am or that I’m allowed to access this? That information should be in the JWT, and it is what we are going to try to subvert. Ultimately, we’d like to forge a token, and looking at the above token, id, username, email, and role could be lucrative claims to target.
Good information to collect at this stage is also how long the token will remain valid, and that is typically in the exp claim. The token above, issued by the OWASP Juice Shop application token, doesn’t have an exp claim, which may mean the token never expires.
Also take note of the alg claim; this is the algorithm used to sign the token and will inform and help shape future attack attempts. Here it is as RS256, an asymmetric algorithm.
Even if the JWT implementation ends up being secure, the information in the token may still be useful elsewhere during testing. For instance, this Juice Shop token has some interesting-looking claims, like password and totpSecret at a minimum, and those may end up contributing to attacks that are not specifically tied to session management.
Required
To begin active testing, we want to know if the token is actually required to gain access to sensitive resources, and what resources specifically. For instance, is it possible the JWT is only used for API endpoints and other application resources are accessed with a separate cookie value?
Occasionally a token may be repeated. In the case of Juice Shop, it is the token cookie value and not the authorization header value that is used. Failing to recognize this will confuse testing, so ensure the correct token is targeted.
Signature Validation
The JWT signature verifies that the contents of the token have not been modified from the time the token was issued. The server must validate the signature before processing any claims within the token payload to ensure the claims remain valid. If the server fails to validate the token signature, claims can be arbitrarily modified, and the application will be vulnerable to maliciously crafted tokens that allow unauthorized access to resources.
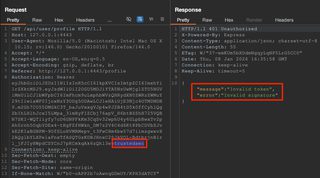
To test this, the last few characters from the JWT signature can be deleted and sent to the server in an otherwise normal request. If the response content is different or an explicit error is returned, the signature is being validated.
In some cases, signatures are validated for length, not content, so modifying the last few characters within the Base64 character set instead of deleting them may work as well. However, if the response content is identical to previous requests with the valid signature, then the signature is not validated. At this point claims can be modified within the token arbitrarily to exploit the application.
At a high-level, these are steps to test signature validation:
Signature Validation Testing | |
|---|---|
Goal: | Verify whether the server validates JWT signatures |
Step 1: | Remove or modify the last several characters from the token signature |
Step 2: | Send token with malformed signature and verify response content |
Success: | Server allows access to sensitive resources with forged token |
Failure: | Server rejects forged token, often with explicit 401 Unauthorized response code |
Exploit: | Modify available claims to gain illicit access |
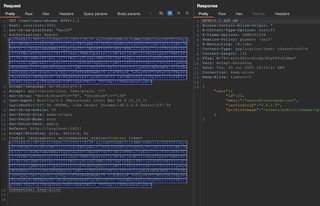
The companion code by default will correctly validate the JWT signature. Any modifications will result in a 401 Unauthorized response.
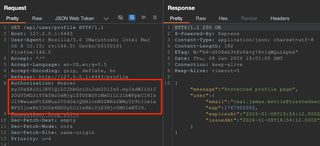
However, running the companion app with the --disable-validation flag will skip signature validation steps. The last several characters were modified arbitrarily within a Repeater request and the request was sent to the server, resulting in access to protected data.
Exploitation
This tells us the token signature is not being validated, yet it is still accepted, as evidenced by the valid data being returned. A simple way to exploit this further is to intercept a request or send to Repeater and edit claims directly in JWT's tab when an extension like JWT Editor is loaded. Claims can be quickly modified in this tab and changes applied before sending the request.
Without validation the claims can be modified at will to impersonate other users and gain unauthorized access to administrative functionality or data.
Weak HMAC Secret
This testing is valid for HMAC-based signatures (HS256, HS384, HS512). Skip this if the alg claim starts with RS.
JWT signatures can be generated in two broadly distinct ways, with asymmetric or symmetric keys. When using asymmetric keys, a secret private key is used to create the signature, and a public key can be used to validate the signature. However, symmetric algorithms like HS256 create a signature using a single key, and that same key is used to validate the signature. From an attacker’s perspective, this is useful because many guesses can be made offline, meaning no requests are sent anywhere. With enough time and resources, the secret key could be guessed if it is weak. If an attacker is successful and a key is guessed, arbitrary tokens can be created and signed with that key, and the receiving server will believe the JWTs are valid.
Weak HMAC Secret Brute-Force Steps | |
|---|---|
Goal: | Identify weak HMAC secret using brute-force cracking techniques |
Step 1: | Confirm alg is HMAC-based (HS256, HS384, HS512) |
Step 2: | Provide token to cracking software (JWT_Tool, hashcat) and review results |
Success: | Brute-force cracking tool reports secret key |
Failure: | Brute-force cracking tool fails to identify secret key |
Exploit: | JWT Editor Extension Tab:
JWT Editor Repeater Tab:
|
Running the companion app with the --weak-secret flag will sign tokens with a very weak HMAC secret. For this type of testing, confirm symmetric keys are in use. The alg claim will be HS256, HS384, or HS512 (other algorithms will use asymmetric public/private keys). Like this:
Try to brute-force the HMAC secret with JWT_Tool with a dictionary file. JWT_Tool has a few lists of common keys included on GitHub, and these may be expanded as you see fit.
python3 jwt_tool.py <PUT THE JWT HERE> -C -d <YOUR DICTIONARY FILE>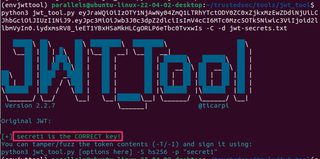
Something similar can be done with hashcat:
hashcat -a 0 -m 16500 jwt.txt wordlist.txt
If hashcat does not initially return the token's secret, consider running rule-based attacks as well. This attack mode will modify, cut, or extend the words in a provided list to create similar words, increasing the likelihood the secret key is found.
hashcat -a 0 -m 16500 jwt.txt wordlist.txt -r <path to hashcat>/rules/best64.rulePassword cracking is its own beast, and there is a lot to tinker with here, but best64.rule or rockyou.rule are good starting points for rule-based attacks.
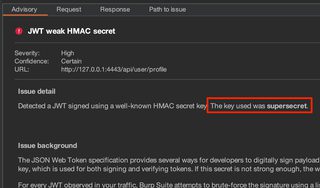
Burp Suite is also doing some passive analysis to find weak keys, and that gets reported as a finding.
Exploitation
Within the JWT Editor extension tab, select New Symmetric Key, specify the secret that was cracked, name the key something sensible, and select Generate.
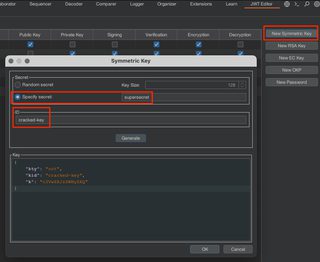
With this key generated, the token can be modified JSON Web Token request tab. Re-sign the token by choosing Sign, select the sensibly named key, and click OK.
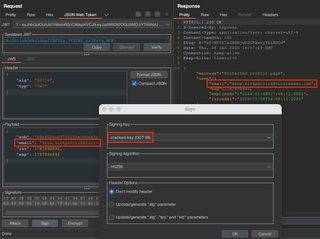
Now the request will be signed with the cracked key and be accepted as valid by the server.
Weak HMAC Secret Troubleshooting
If cracking software like JWT_Tool and hashcat cannot find the JWT secret, it may be because the secret is long and complex enough to make cracking infeasible with commonly available hardware. But before giving up on the effort, ensure the dictionary wordlist is large and you've applied some modifying rules to increase the likelihood of success.
Signature Exclusion
RFC 7519 includes a provision for ‘unsecured JWTs’ (https://datatracker.ietf.org/doc/html/rfc7519#section-6), tokens that are secured in some other way and do not need a cryptographic signature to ensure validity. Within the header of an unsecured JWT, the alg claim would have a value of none, and the JWT would have no signature.
This can introduce security issues because when a server receives a JWT, the server must first read the algorithm used to sign the token before the server can use that algorithm to validate the token. If the server accepts unsecured JWTs, an attacker can modify an otherwise legitimate JWT to be an unsecured JWT with arbitrary claims.
To check if the server is improperly configured to accept the none algorithm, replace the alg parameter value with none and remove the signature from the JWT.
These are the high-level steps to perform a signature exclusion attack:
Signature Exclusion Attack | |
|---|---|
Goal: | Verify whether the server accepts unsecured JWTs (none algorithm) |
Step 1: | Set alg parameter value to none |
Step 2: | Remove signature |
Step 3: | Send and review response |
Success: | Server allows access to sensitive resources with forged token |
Failure: | Server rejects forged token, often with explicit 401 Unauthorized response code |
Exploit: | Modify available claims to gain illicit access |
Running the companion app with the --allow-none flag will permit unsecured JWTs to be considered valid by the server.
OWASP’s Juice Shop is likewise vulnerable to signature exclusion attacks and can be used to demonstrate or practice the attack.
JWT Editor has built-in attacks for the none algorithm that can be launched in the JSON Web Token request tab. Click Attack > 'none' Signing Algorithm > select a version of 'none' > OK.
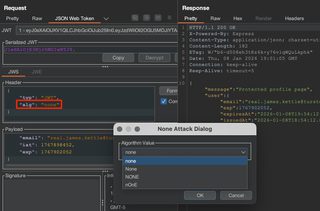
There are multiple versions of 'none' in case the server accepts or prevents a specific case.
This can also be done manually by setting the alg claim to none and removing the signature altogether. Either way, the raw JWT will look like the one below. Notice the trailing period.
If the server accepts one of these requests with the modified JWT, this means the server is accepting unsigned tokens that can be manipulated by the client. Claims can be modified arbitrarily, likely allowing unauthorized access to data or resources depending on what claims are available to be modified. These claims can be modified directly and sent to the server following the same steps used while identifying the vulnerability.
Signature Exclusion Troubleshooting
A common mistake during this testing is leaving off a trailing period that normally separates the payload from the signature. Even though there is no signature, the period is still required as a delimiter. A properly formatted token should look like this:

Additionally, the server may reject tokens using an explicit list of unacceptable algorithms, such as none. Varying the case of the spelling, such as None, NONE, or nOnE, may bypass this restriction.
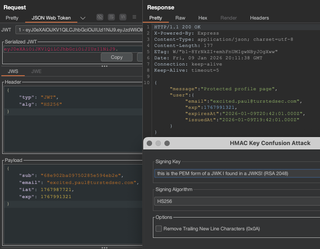
Key Confusion
JWTs can be signed with algorithms that broadly fit into one of two categories—those that use symmetric keys and those that use asymmetric key pairs. Algorithms using a symmetric key use the same key to create the signature as well as verify signatures of received tokens, such as HS256. Algorithms that use asymmetric key pairs, on the other hand, use one key (a private key) to create the signature and another (a public key) to verify received tokens have not been tampered with, a common example being RS265.
If an application expects the RS256 algorithm to be the only algorithm in use, it may assume all tokens were signed with the private key, and so blindly checks the validity of all received tokens with the public key. This would work fine for legitimate tokens.
However, an attacker could create a new JWT and sign it with a symmetric key algorithm, like HS256, and use the server’s public key to do so. In such a scenario, when the server receives the token, the typical process of validating tokens will be followed, which is to use the public key to validate the token. In this attack, the JWT will be considered valid because the public key matches the key used by the symmetric key algorithm to sign the token.
To conduct a key confusion (or this can be called an algorithm confusion) attack, a public key needs to be found and then the RS256 token needs to be re-signed using that public key and a symmetric key algorithm like HS256.
Key Confusion Attack Steps | |
|---|---|
Goal: | Re-sign an RS256 token with HS256 and the public key |
Step 1: | Identify public key, either in JWK or PEM format |
Step 2: | JWT Editor Extension Tab:
|
Step 3: | JWT Editor Repeater Tab:
|
Step 4: | Send and review response |
Success: | Server allows access to sensitive resources with forged token |
Failure: | Server rejects forged token, often with explicit 401 Unauthorized response code Convert the discovered public key to the other format (either JWK or PEM) and repeat |
Running the companion app with the --alg-confusion flag will permit/enable key/algorithm confusion attacks.
The first step is to find a potential public key. One potential way of doing this is to look for common application paths that host public keys. Having public keys available allows distributed systems to validate the JWT as well.
Try identifying public keys through file and directory brute-forcing. Some common application paths that host public keys are:
- /.well-known/jwks.json
- /.well-known/keys
- /.well-known/openid-configuration
- /api/.well-known/jwks.json
- /api/.well-known/openid-configuration
- /api/keys
- /api/v1/keys
- /auth/.well-known/jwks.json
- /auth/.well-known/openid-configuration
- /auth/keys
- /certs
- /common/discovery/keys
- /jwks
- /jwks.json
- /jwks_endpoint
- /jwt.pem
- /jwt.pub
- /keys
- /oauth2/jwks
- /oauth2/keys
- /oauth2/v1/keys
- /openid-configuration
- /openid/connect/jwks.json
- /public-cert.pem
- /public-keys
- /public.pem
- /public_keys
- /publickey
- /rsa/public.key
- /v1/keys
Some other ideas may be to look at the token itself to see if there are jku or x5u header parameters containing URLs that point to the location of the public key. Otherwise, perhaps the tokens are signed with the web server's TLS private key and the X.509 certificate can be used as the public key. Read more about finding public keys here.
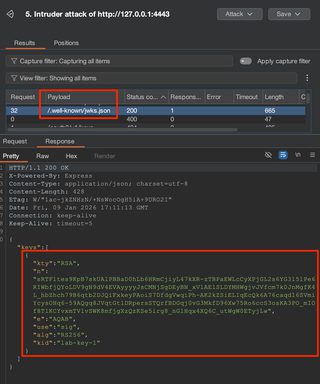
A quick note on keys is that they are generally formatted in one of two ways: JWKS or PEM. A JWKS is a JSON Web Key Set, and within that set is a JWK, a JSON Web Key. An example JWKS looks like the following, with the JWK highlighted in red:
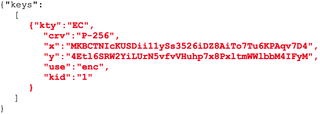
I make the distinction between the JWKS and the JWK it contains because sometimes you need one, and other times you'll need the other, so it is important to pay attention.
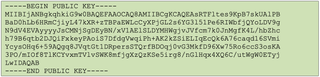
A PEM formatted key will look like this:
Once a public key is found, it can be used to sign a forged token. However, the format of the key used to sign the token will need to be the same as the format of the key the server is using to validate the token. These formats will often be either JWKS or PEM, and because it won't be known what format the server is using, both can be tried.
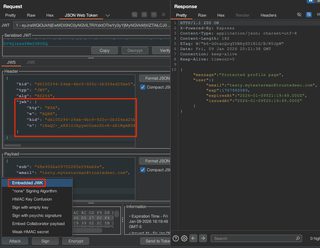
In the case of the companion app, the JWKS is available at /.well-known/jwks.json. We can attempt to forge a token by creating a new RSA key with the JWK, changing the alg claim to HS256, and re-signing the token.
JWT Editor Extension Tab > New RSA Key > Format as JWK > Provide an ID > Paste key > Ok
In a JWT Editor Repeater tab, load the HMAC Key Confusion Attack.
JWT Editor Repeater Tab > Attack > HMAC Key Confusion Attack > Select new RSA key > OK
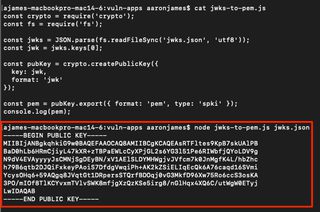
This, however, will result in a 401 Unauthorized failure because the server requires the token to be signed with the public key in PEM format instead. Converting between JWKS and PEM (or vice versa) is simple, and there are a variety of tools available to do so. A simple script can also be made to do the conversion.
Now create an RSA key again, this time in PEM format.
JWT Editor Tab > New RSA Key > Format as PEM > Provide an ID > Paste Key > OK
Now in the JSON Web Token request tab you can modify the JWT by selecting Attack > HMAC Key Confusion.
Key Confusion Troubleshooting
If you're using a wordlist to scan for public key endpoints using Burp Suite Intruder, make sure it isn't URL-encoding characters you don't want it to, as it does that by default in Intruder. Also, when copying a JWKS into JWT Editor to make a new key, copy just the key object, not the key container.
Additionally, the key will have to match what the server is expecting exactly; any differences like trailing new lines will cause a failure. The HMAC Key Confusion Attack has an option to remove trailing new line characters, so try this or anything similar you can think of before moving on.
Injecting jwk Values
An attacker can create their own key pair and include the public key in a JWK in a token header within the aptly named jwk parameter. The token could then be signed with the attacker’s private key. When the server receives the token, it will verify the signature using the public key embedded in the jwk parameter and accept the token, and any claims within it, as valid.
jwk Injection Attack Steps | |
|---|---|
Goal: | Coerce server into accepting a self-signed JWT by including an attacker-controlled public key in the jwk header parameter |
Step 1: | JWT Editor Extension Tab:
|
Step 2: | JWT Editor Repeater Tab:
|
Step 3: | Send and review response |
Success: | Server allows access to sensitive resources with forged token |
Failure: | Server rejects forged token, often with explicit 401 Unauthorized response code |
Exploit: | Modify available claims to gain illicit access |
Running the companion app with the --jwk-injection flag will cause the server to accept a JWK in the JWT header as a valid public key.
The point of this attack is to sign a token with an attacker-controlled private key, then instruct the server to validate a token using the corresponding public key. The server is instructed to do this by providing a key in JWK format in the jwkheader claim.
Begin this attack by creating a new RSA key.
JWT Editor Extension Tab > New RSA Key > Format as JWK > Generate > Ok
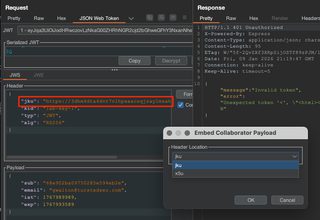
Make a note of the ID that is automatically generated. Now within a JWT Editor request tab, embed the JWK.
Attack > Embedded JWK > Select generated key > OK
Injecting jku and x5u Values
Other header parameters supported by JWTs are the jku and x5u parameters. These point to the locations of the public key and instruct the server to request those to validate the token. If these URLs are not strictly validated against a list of known-good URLs, an attacker may be able to entice an application into fetching an attacker-controlled public key. In that event, a token signed with the corresponding attacker-controlled private key would be considered valid.
jwk/x5u Injection Attack Steps | |
|---|---|
Goal: | Coerce server into accepting a self-signed JWT by including an attacker-controlled URL in the jwk or x5u header parameter that points to a public key. |
Step 1: | JWT Editor Repeater Tab:
|
Step 2: | Send modified token to application server |
Step 3: | Review Collaborator logs for request |
Success: | Application server sends request for Collaborator URL |
Failure: | Collaborator URL is not requested |
Exploit: | Host a remote JWKS (jku) or PEM (x5u) and point the header parameter to that URL |
Running the companion app with the --jku-injection or –x5u-injection flag will cause the server to request a valid public key from the provided URL.
Testing for this vulnerability is relatively simple with the JWT Editor extension. With a base request in Repeater, click Attack > Embed collaborator payload and send it. If this test causes the server to reach out to the Collaborator endpoint, it means the server is processing the jku or x5u header claim and reaching out for a key.
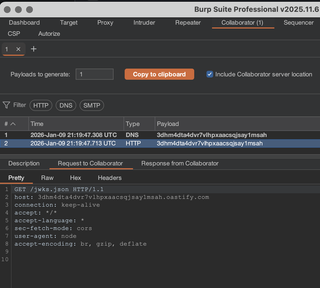
To exploit this flaw, a valid public key will need to be hosted in a network-accessible location, in either JWKS (jku) or PEM (x5u) format. Tokens will need to be signed using the corresponding private key. That complete process is skipped for brevity here, but the Collaborator test is sufficient to demonstrate the issue.
kid Attacks
The kid parameter in a JWT header specifies the ID of the key that should be used to verify the token signature. If this kid value is not validated and is used to load the key dynamically, several security issues may arise. In some cases, the kid value may be a filename, and modifying this value could lead to path traversal. JWTs signed with symmetric keys could be validated against files with known or predictable contents.
[HS256] kid Injection Attack Steps | |
|---|---|
Goal: | Leverage a path traversal in the kid header parameter to coerce the server into a predictable file as a symmetric key, verifying the self-signed JWT |
Step 1: | JWT Editor Extension Tab:
|
Step 2: | JWT Editor Repeater Tab:
|
Step 3: | Send and review response |
Success: | Access to sensitive data with forged token |
Failure: | 401 Unauthorized |
Exploit: | Modify available claims to gain illicit access |
Running the companion app with the --kid-injection flag will cause the server to load a file from the filesystem with the name of the kid value.
This attack takes advantage of a path traversal pointing to a known file with predictable contents when the server dynamically loads a keyfile based on an attacker-supplied kid. The goal is to use those predictable file contents as a symmetric key.
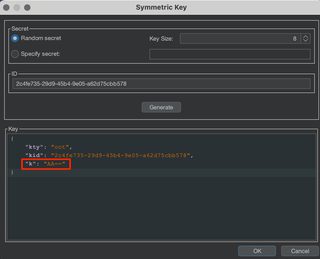
To do this, create a new symmetric key in the JWT Editor extension tab. After generating a new key, update the k value with a value of "AA==". This is the Base64-encoded null byte. Click OK to save the key.
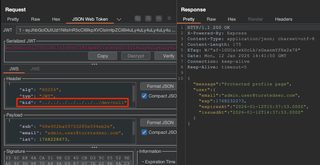
In the JWT Editor subtab in Repeater, modify the kid header parameter to reflect the "../../../../../../../dev/null". This file will always be empty in Unix systems, so the response will be predictable.
Lastly, sign the token with the previously created symmetric key and the 'Don't modify header' option selected. If the application is using a kid to dynamically load a symmetric key, and that process is vulnerable to path traversal, JWTs can be arbitrarily forged.
Alternatively, asymmetric JWTs could be forged by pointing to an attacker-supplied public key on the filesystem, if an attacker has the ability to introduce files and identify their path through a file upload or similar means.
Conclusion
JWTs are a primary means of ensuring user authorization in web applications, and flaws in their implementation can have devastating effects on confidentiality and integrity of business-critical data. Potential vulnerabilities must be well understood and thoroughly and consistently assessed during web application penetration testing to ensure the application does not allow unauthorized access to sensitive resources.