JS-Tap: Weaponizing JavaScript for Red Teams

How do you use malicious JavaScript to attack an application you know nothing about?
Application penetration testers often create custom weaponized JavaScript payloads to demonstrate potential impact to clients. Documents are stolen, privileges escalated, or account transfers initiated, depending on the client's “crown jewels”.
Payload development is simplified by the authenticated access that is typical during application assessments. Penetration testers also already know what sequence of requests and responses are required to achieve a particular goal when developing a payload.
Red teams have a different set of challenges and opportunities that are often not conducive to developing tailored JavaScript payloads. Custom applications often have unknown functionality and require a generic payload. Red teams also have opportunities to introduce malicious JavaScript beyond XSS vulnerabilities.
To address the unique challenges and opportunities for red teamers I have written JS-Tap, which provides a generic JavaScript payload. This payload does not require prior knowledge of the application, and does not require an authenticated user to run the payload.
Instead of attacking the application server, JS-Tap focuses on instrumenting the client side of the application and extracting useful information for the red team.
Data Collected
- Client IP address, OS, browser
- Typed user inputs (credentials, etc.)
- URLs visited
- Cookies (that don't have httponly flag set)
- Local storage
- Session storage
- HTML code of pages visited (if feature enabled)
- Screenshots of pages visited
- Copy of XHR and Fetch network API calls (if monkeypatch feature enabled)
- Network call endpoint
- Method (GET, POST, etc.)
- Headers set (including authorization headers)
- Request body and response body
The collected data is presented in the JS-Tap portal--a web based application that allows monitoring of clients running the payload.
Operating Modes
The JS-Tap payload has two modes of operation.
Trap Mode
Trap Mode is typically the mode we would use as an XSS payload. Execution of XSS payloads is often fleeting, as the user viewing the page where the malicious JavaScript payload runs may close the browser tab (the page isn't interesting) or navigate elsewhere in the application. In both cases, the payload will be deleted from memory and stop working. JS-Tap needs to run for an extended period of time or useful data won't be collected.
Trap Mode combats this by establishing persistence using an iframe trap technique. The JS-Tap payload will create a full page iframe, and place the user elsewhere in the application. This starting page must be configured ahead of time.
In Trap Mode JS-Tap monitors the location of the user in the iframe trap and spoofs the address bar of the browser to match the location of the iframe. More details on this technique can be found in the blog linked above.
Note that the targeted application must allow iframing from same-origin or self if it's setting CSP or X-Frame-Options headers. JavaScript-based framebusters can also prevent iframe traps from working.
Implant Mode
Implant Mode is typically the mode we would use if we're directly adding the payload into the targeted application. Perhaps we have a shell on the application server or the server that hosts the JavaScript files for the application. Add the payload to a JavaScript file that is used throughout the application (jQuery, main.js, etc.).
The ideal file really depends on the application in question and how it's using JavaScript files. Implant Mode does not require a starting page to be configured and does not use the iframe trap technique.
JS-Tap Walkthrough
To demonstrate the functionality of JS-Tap we can start with a simple WordPress example. This WordPress demo site uses a plugin with a reflected XSS vulnerability.
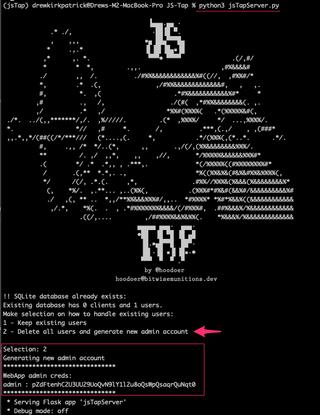
Next we'll start the JS-Tap server and receive our credentials to log in to the portal. The JS-Tap payload in the following example is configured in Trap Mode with the WordPress admin login portal set as the iframe trap start page.
We'll replace the alert box Proof-of-Concept (PoC) with the JS-Tap payload (telemlib.js) in the example served up from the following location on the JS-Tap server:
A user opening the following URL would run the JS-Tap payload:
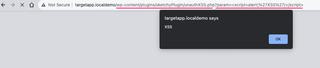
http://targetapp.localdemo/wp-content/plugins/sketchyPlugin/unauthXSS.php?param=When that URL is opened the user sees the following:
This page is loaded in the iframe trap with a spoofed location in the address bar. The user is still on the targetapp.localdemo/wp-content/plugins/sketchyPlugin/unauthXSS.php page and as long as we keep them using the application in the iframe trap the JS-Tap payload will continue to run and collect data.
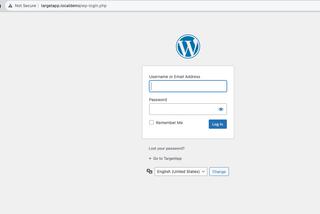
As an example let's say an admin user is targeted in a social engineering attack that requests they log into the WordPress site, verify a specific plugin isn't being used, and setup an admin account for a new employee. Our target follows those instructions and logs in.

The user sees the admin dashboard for WordPress. We can see their username in the top right corner and the spoofed address bar location which matches the real dashboard location.

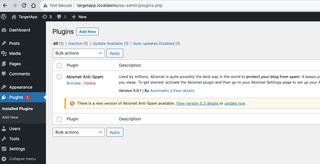
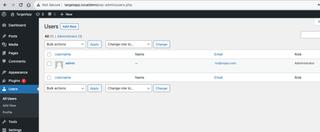
Our target now visits the plugins page and finds nothing to necessarily be concerned with.
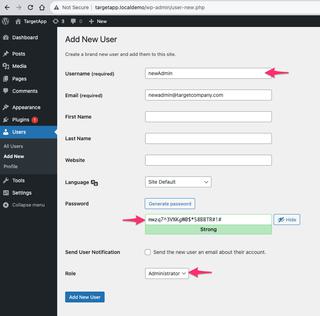
The target then moves to setting up the newAdmin account.
The target sets up the newAdmin account and instead of manually setting a password, uses the default generated strong password which we'll assume they write down to share with newAdmin.
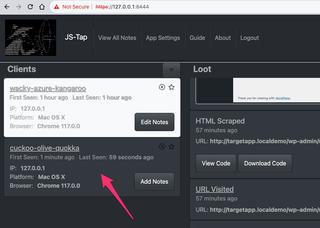
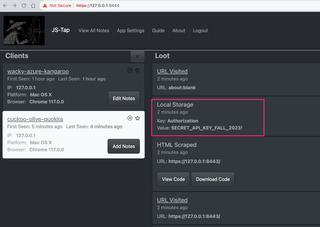
That should be enough to get us started to see what JS-Tap has collected from the target so far. In the JS-Tap portal clients will be listed on the left side and at the moment there is only one.
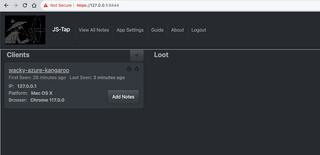
For this client we see we have a name, when they were first seen, and how long ago we received an update. We also see their IP address, platform, and browser. In the top right of the client box we see an option to star the client (the client list can be sorted and filtered) and an 'x' button to delete that client session.
When the JS-Tap payload starts up it retrieves a unique identifier from the JS-Tap server that is used as a session identifier. If a client is providing useless data we can delete their session and the client will no longer be able to submit data.
There is also a button to add client specific notes.
If we want to block all future clients from connecting and receiving a session, all new sessions can be disabled using the App Settings option at the top of the application.
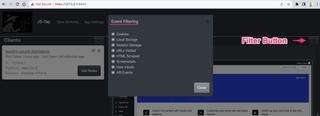
Selecting the client will present a time-series of events captured by the JS-Tap payload on the right side.

In the first few events we see URL Visited, which is incorrectly set to blank as the payload was initializing. This first event is often incorrect.
Next we see Cookie and Local Storage events. JS-Tap tracks cookies, local, and session storage. The first time it sees a value in these storage locations it will report them. JS-Tap will then monitor those values and if at any point they change we'll receive a new event with the updated value.
WordPress uses cookies for authentication, however the httponly flag is correctly set on the session cookie. This tells the browser that JavaScript (which JS-Tap is written in) is not allowed to read or write the cookie value. So unfortunately JS-Tap in this instance will not be able to steal the session.
Many applications and APIs use tokens for authentication. If these are sent in headers or the request body they are not included automatically by the browser like cookies. This means that they must manually be included in requests by JavaScript, so JS-Tap will be able to read these values from storage. We'll see an example of this later.
We can continue scrolling down to see additional events.
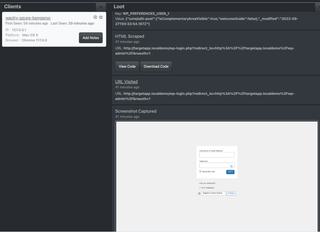
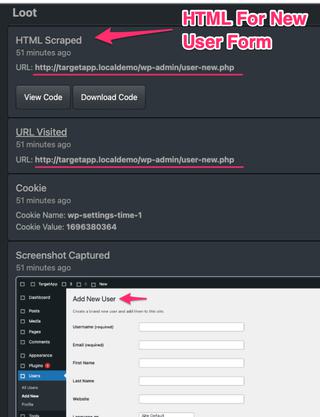
Here we see the HTML Scraped event, a correctly set URL Visited event, and our first Screenshot Captured event.
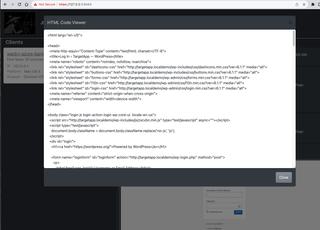
HTML scraped from the visited URL can be viewed directly in JS-Tap portal in a basic viewer, however it's best to download the HTML file and view in your preferred text editor for source code coloring.
Screenshots can be clicked and opened in their own tab for zooming in for details. From the first screenshot we can see the user is viewing the admin login portal, which is no surprise since we set that as the starting page for the iframe trap.
While WordPress session cookie can't be captured, JS-Tap is capturing user inputs, so the next set of events include User Input events where we capture their credentials.
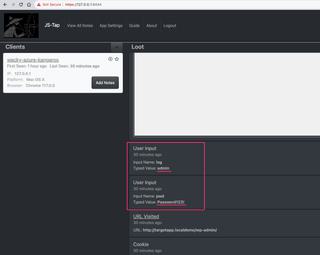
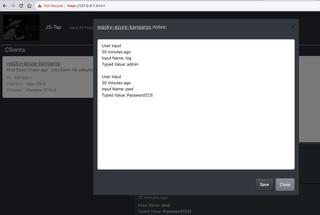
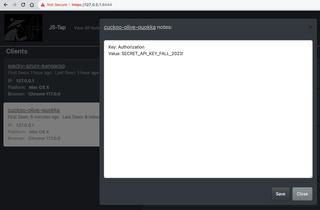
We have our first solid loot and can copy and paste these credentials into the client notes.
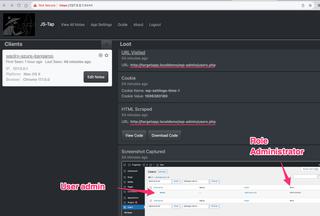
As we continue scrolling through the client events we finally see our first interesting screenshot.
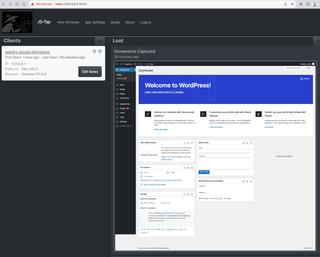
Looking at this screenshot we can confirm our user is an administrator since this is the admin view of the WordPress dashboard. Screenshots could prove useful in determining user roles of clients when sorting through a large collection of clients. We can filter the event list on the right by specific events that are most useful.
Continuing through the events we eventually come to the user list screenshot.
If screenshots are difficult to read in the JS-Tap portal they can be clicked to open a full tab view.
From this user list screenshot we can confirm there is a single user in the system and they are indeed an Administrator role.
Scrolling down further in the event list we see a new user page with a form to be filled out.
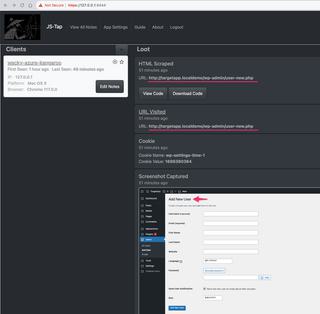
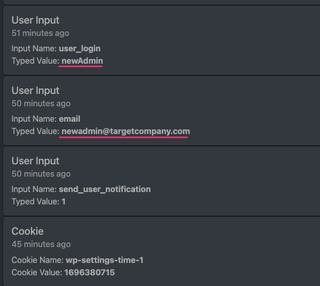
The next series of events are User Input events that include information about the new user account.
What we don't see is a password for this new user. This is because our target didn't type a password for the new user, they used the secure one automatically generated by WordPress. Let's take a closer look at the new user form screenshot by selecting it and opening a full sized view.
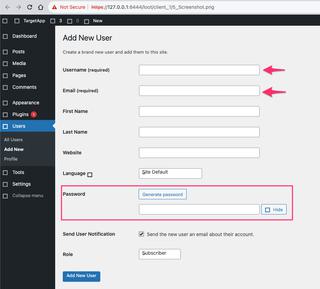
We can see the required fields that match up with our captured user inputs, but looking at the password area we see that there are options to generate a password and hide it. If WordPress is showing our target a generated password, it must be in the webpage itself. We can scroll back in our events list and download the scraped HTML code that matches this page and search for this password.
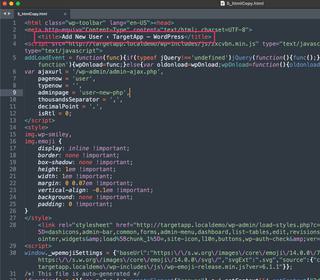
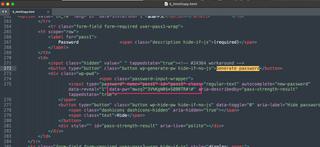
There's quite a bit of source code in this HTML file, but if we return to our new user form screenshot, we see there's a Generate password button right in the area we're interested in. If we search the source code for that button label it should put us quite close to our desired loot.
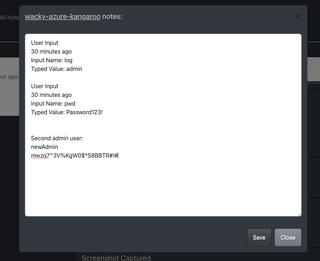
Sure enough, we find the password to the new Admin account in the HTML source code.
We can now add this second admin account to our client notes.
That covers most of what JS-Tap is able to collect. Let's pivot away from WordPress to a different style of web application.
Many web applications these days are dynamic and update what they're displaying in real time without users having to refresh the page or navigate elsewhere in the application.
Applications are able to do this because of JavaScript, which is able to make network connections in the background. With these network connections JavaScript is able to send data to the application server and retrieve new data. And when necessary, JavaScript can update the HTML of the page being viewed to show new information.
JavaScript provides two main APIs for making network connections; the older XMLHttpRequest (XHR) API and the newer Fetch API. Many developers use jQuery to simplify coding JavaScript, and that library also provides networking capability. jQuery's network features however are just abstractions on top of the XHR API.
Two quirks about JavaScript are relevant to the next set of JS-Tap features. One is that the XHR and Fetch APIs are presented to JavaScript developers as if they're normal JavaScript objects, like any other developer defined object.
The other quirk is that JavaScript supports monkeypatching, which means that JavaScript code can be rewritten at runtime by other JavaScript code.
This unfortunately means that malicious JavaScript payloads such as those that exploit an XSS vulnerability, can not only rewrite the client-side logic of a targeted application, they can also rewrite the networking implementation underneath it.
The next app is a demonstration application I created to help develop the JS-Tap payload.

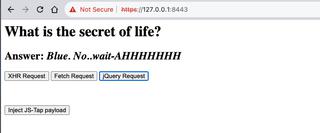
This simple application implements three different network methods to retrieve three different answers to a question and update the page display.
There is also a button to inject the JS-Tap payload, simulating an exploitation. Before we inject the payload we need to make some configuration changes to the JS-Tap payload. First we need to set a different iframe trap start page--different application, different start page. Since this is a single page application the choice is pretty straightforward.
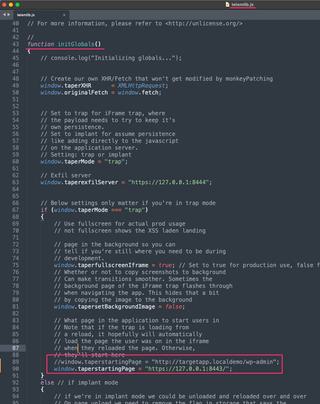
We also want to enable a few more options. First we need to enable the monkeypatch API feature. When this feature is enabled, the JS-Tap payload will find the XHR and Fetch API implementations and modify them on startup.

By default, JS-Tap captures screenshots when the path of the page changes. This demonstration application never changes its path, which would mean that only the first screenshot would be captured.
An optional setting will tell JS-Tap to take a screenshot some delay in milliseconds after a network API call is made, presumably to retrieve new data that might be displayed on the page.

We should be able to inject the JS-Tap payload into our monkeypatch application, and make all three network calls.
Shifting back to the JS-Tap portal we now see a new client in our list.
Selecting this new client will bring up the events captured. The demonstration application does not use cookies for authentication, but instead uses authorization headers with a secret token value. This secret token is stored in local storage, and we see this secret value captured from local storage in the screenshot below.
We can add this secret token to our client notes.
Scrolling further down our client event list we start to see the data we've extracted from API calls. The first API call made by our monkeypatched API was using the XHR API. We're capturing four items from API calls:
- API call endpoint and method
- API call headers being set
- Request body
- Response body
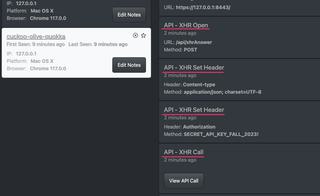
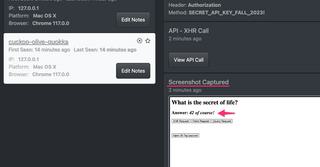
We see the endpoint the API call will go to (/api/xhrAnswer) and through which method. The method will typically be either GET or POST.
Next we see headers being set for the API call. We're capturing headers because authorization tokens are often sent as headers in API calls. Sure enough we see a copy of our authorization token being set as a header.
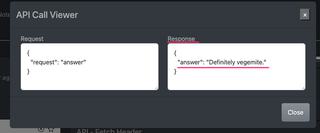
Last we se the actual XHR API call itself. Selecting the View API Call button will display the request and response bodies side by side.
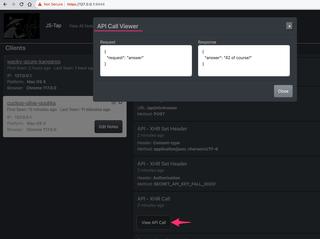
Next we get our slightly delayed screenshot that captured the application just after the API call was made. We see that the data in the response body is now displayed in the application.
Scrolling down further we see our Fetch API intercepts. While the monkeypatching techniques are rather different between these two APIs, the data extracted is similiar and presented in the JS-Tap portal similarly.
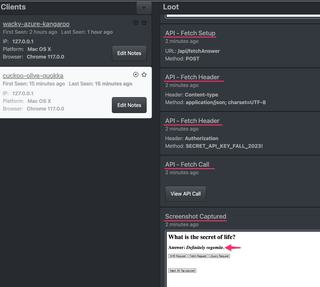
We see in the screenshot that the page now displays the answer "Definitely vegemite", which we can confirm was the Fetch API call response from the server.
Scrolling down to our last set of events we see one more round of XHR API events. However, upon closer inspection we see the API call is going to the /api/jqueryAnswer endpoint. This is the jQuery network call being intercepted at the XHR API level.

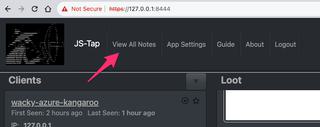
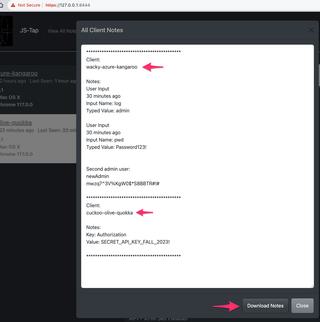
Now that we've extracted our loot for the two clients we can export all client notes as a single file.
That covers the features implemented in the first release of JS-Tap. I hope this tooling helps provide some basic capability to red teamers looking to attack web applications with JavaScript payloads.
I likely would not use this often on a penetration test, as I prefer creating tailored payloads that demonstrate maximum potential impact to my client's applications. However, the development of those payloads is often only possible with inside knowledge of the application itself.
If you have issues or ideas how this can be improved my DMs are always open. @hoodoer.
- https://github.com/hoodoer/JS-Tap (JS-Tap Repository)