Execution Guardrails: No One Likes Unintentional Exposure

Table of contents
1.1 Introduction
A hopefully rare scenario that gives red teamers a mini heart-attack is a sudden check-in from a new agent: admin on ALICE-PC.
If a blue teamer has managed to get hold of a payload used on an engagement and is able to unravel it to reveal the inner implant, then something has gone awfully wrong somewhere. In this post, I will review how an engagement went awfully wrong for me by expanding on this concept and looking at the laziness behind it.
In my case, I had access to a VDI for an assumed breach and generated a like-for-like key on the hostname—let’s called it WORKSTATION1. At some point during the engagement, I tripped an alarm unrelated to the implant itself and caused the blue team to track down WORKSTATION1. After some time, they managed to identify the implant process and took it offline. A few days later, I saw the admin@ALICE-PC check-in to my C2. So then, I immediately panicked and cycled all IPs, set up new listeners with new redirectors, and carried on. But, after speaking with the blue teamer who unraveled it, they said that all they did was gather a bunch of environmental components and just did some brute-forcing until they managed to fire off the payload.
On my side, all I had done was use a hostname key with SHA256 (265a787c97f61f963efe6d397ef712eef1b89f0641003d1664d118d123828379) to enter the execution cycle and then derived a new encryption key from the SHA256 value to decrypt the actual payload. In this instance, the implant was embedded within the payload using whatever transformations I applied.
I made several mistakes here:
- Having easy access to the VDI made me lower my guard/paranoia
- Used a single key
- Used an embedded payload
Points 2 and 3 above are directly fueled by point 1 because it’s not something I typically do. Alas, here we are.
In this blog, I want to discuss how these mistakes can be avoided by using a collection of different keying variations and mechanisms. The code shown in this blog is merely an example/proof of concept and will have OpSec considerations—this is purely to demonstrate the ideas and methodology.
1.2 The Multi-Step Process
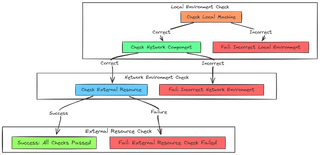
The diagram below shows the flow of keying that will be discussed in this blog.

It starts with a general local host check—i.e., the hostname is X, or file Y exists. If that is successful, it moves on to a network level check. This could be domain X, or SYSVOL file Y exists. And if both pass, we add an extra control that is external and controllable by us at any time. This consists of both a hosted payload and a kill switch. The kill switch in this scenario is a value in a TXT record. Obviously, if any of these checks fail, we exit.
All three of these steps have a ton of potential solutions. But, for the sake of the blog, we will keep it simple. Additionally, the code snippet provided does not comply with OpSec safe restrictions. Therefore, strings will just be shoved into the binary. In a real scenario, string obfuscation must then be considered, or else your keys are just sitting there.
Before moving on to the rest of the blog, it’s worth mentioning here that you can argue the hashing algorithm and storing of the hashes all day, but that’s out of scope for this blog. Samples can be seen using SHA256, MD5, Fowler–Noll–Vo, DBJ2, or whatever your heart desires. We will focus on SHA256 for simplicity.
1.3 Local Machine
For this component, there are a ton of potential things to key against, like MachineGuid in SOFTWARE\\Microsoft\\Cryptography or the hostname, expected user, environmental variables, directory listings—the world is your oyster. Let’s take a simple example for hostname.
Getting the hostname is easy with GetComputerNameA:
std::string GetComputerName() {
    DWORD bufferSize = MAX_COMPUTERNAME_LENGTH + 1;
    char buffer[MAX_COMPUTERNAME_LENGTH + 1];

    if (GetComputerNameA(buffer, &bufferSize)) {
        return std::string(buffer);
    } else {
        DWORD error = GetLastError();
        return "Error: " + std::to_string(error);
    }
}
Calculating the SHA256 with the wincrypt functions like CryptAcquireContextA:
std::string get_sha256(const std::string& input) {
HCRYPTPROV hProv = 0;
HCRYPTHASH hHash = 0;
std::vector<BYTE> buffer;
DWORD cbHash = 0;
DWORD dwBufferLen = 0;
std::string hash_string;
if (!CryptAcquireContext(&hProv, NULL, NULL, PROV_RSA_AES, CRYPT_VERIFYCONTEXT)) {
return "";
}
if (!CryptCreateHash(hProv, CALG_SHA_256, 0, 0, &hHash)) {
CryptReleaseContext(hProv, 0);
return "";
}
if (!CryptHashData(hHash, reinterpret_cast<const BYTE*>(input.c_str()), input.length(), 0)) {
CryptDestroyHash(hHash);
CryptReleaseContext(hProv, 0);
return "";
}
if (!CryptGetHashParam(hHash, HP_HASHSIZE, reinterpret_cast<BYTE*>(&cbHash), &dwBufferLen, 0)) {
CryptDestroyHash(hHash);
CryptReleaseContext(hProv, 0);
return "";
}
buffer.resize(cbHash);
if (!CryptGetHashParam(hHash, HP_HASHVAL, &buffer[0], &cbHash, 0)) {
CryptDestroyHash(hHash);
CryptReleaseContext(hProv, 0);
return "";
}
std::ostringstream oss;
for (const auto& byte : buffer) {
oss << std::hex << std::setw(2) << std::setfill('0') << static_cast<int>(byte);
}
hash_string = oss.str();
CryptDestroyHash(hHash);
CryptReleaseContext(hProv, 0);
return hash_string;
}Finally, doing the actual comparison in a very naïve way:
bool strings_equal(const std::string& str1, const std::string& str2) {
    return str1 == str2;
}
Executing this on a system where the hostname is WIZARD (f2bf44269b54b0ee26aab45fa61c69467ecc8fac375b09e8eb055d3dbb90d89b), we can compare the hashes and hit a true or false:

That’s the general logic and it can be adopted and repeated for as many local host checks as required. A concern here is golden images. If all/most machines in an environment derive from the same base, then a lot of the local host components may be the same.
1.4 Network Keying
In addition to making a comparison, another viable action would be to just check if something exists. For example, the function below can be used to check if shares are accessible.
std::vector<std::string> get_network_shares() {
std::vector<std::string> shares;
PSHARE_INFO_1 pShareInfo = nullptr;
DWORD entriesRead = 0;
DWORD totalEntries = 0;
DWORD resumeHandle = 0;
NET_API_STATUS status;
do {
status = NetShareEnum(
NULL,
1,
(LPBYTE*)&pShareInfo,
MAX_PREFERRED_LENGTH,
&entriesRead,
&totalEntries,
&resumeHandle
);
if (status == NERR_Success || status == ERROR_MORE_DATA) {
for (DWORD i = 0; i < entriesRead; i++) {
shares.push_back(pShareInfo[i].shi1_netname);
}
}
if (pShareInfo) {
NetApiBufferFree(pShareInfo);
pShareInfo = nullptr;
}
} while (status == ERROR_MORE_DATA);
return shares;
}Naturally, this could also be used to check for specific shares, hash a concatenated string of all the names, and so on. Another one could be to reuse the SHA256 logic from the local machine section and compare hashes of the Active Directory domain name:
std::string get_domain_name() {
    PDOMAIN_CONTROLLER_INFO pDCI = NULL;
    std::string domainName;

    DWORD dwRetVal = DsGetDcNameA(
        NULL,
        NULL,
        NULL,
        NULL,
        DS_RETURN_DNS_NAME,
        &pDCI
    );

    if (dwRetVal == ERROR_SUCCESS) {
        if (pDCI) {
            domainName = pDCI->DomainName;
            NetApiBufferFree(pDCI);
        }
    } else {
        domainName = "Error: " + std::to_string(dwRetVal);
    }
    return domainName;
}
Having an additional layer of keying, but this time focused on the network, provides just that extra bit of control and aims to ensure that this is 100% the correct environment.
1.5 External Resources
At this point, the local machine and network are confirmed. To give us that extra layer of control, we can implement a pseudo-kill switch into the execution flow that will allow us to disarm the implant. Two use cases come to mind:
- A “keying” process that causes the implant to reach out to a resource and validate the response; if correct, continue—otherwise, exit.
- A native staging solution that sends in the next component of the implant; in most scenarios, this should occur anyway, outside of the keying process. But, we will discuss it here anyway, as the concept is relevant.
To implement a kill switch, we can do a simple query to dev.mez0.cc that will have a GUID stored (8cf73556-6c58-4bf3-8e1e-b2b7658f8a45).

It's straightforward to do this with DnsQuery_A.
std::string get_txt_record() {
    PDNS_RECORDA txt_record = nullptr;

    DNS_STATUS status = DnsQuery_A(
        "dev.mez0.cc",
        DNS_TYPE_TEXT,
        DNS_QUERY_STANDARD,
        NULL,
        &txt_record,
        NULL
    );

    if (status != ERROR_SUCCESS) {
        return "";
    }

    std::string record = txt_record->Data.TXT.pStringArray[0];

    DnsRecordListFree(txt_record, DnsFreeRecordListDeep);

    return record;
}
By doing this, we have control over when the payload can trigger. It is also worth noting that by disabling the staging component externally, you would also achieve this. Me personally, I like to have both.
1.6 Payload Design
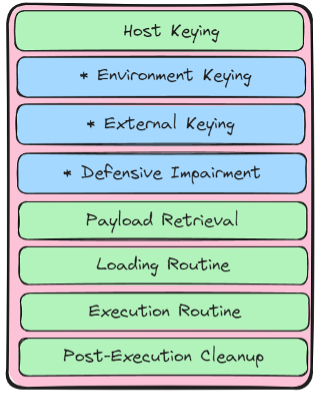
Putting this all together with a valid implant, I built out the following diagram to show my process when working with payloads.

Anything in green I consider mandatory; blue is situational and not always required. Granted, this blog is about two of the blue blocks; I do believe they may not always be suitable for that payload.
Walking through it, we start with the initial ‘is this the right host’ check. Within this, we can check hostnames, application versions, environmental variables, and so on. This is to make sure that this host is the one we want and not admin@ALICE-PC.
Next, we hit two blue blocks for environment keying and external keying. This is what was covered in this blog and will be checks like ‘can I list shares on X machine’. Following that, external keying is ‘can we at least reach out to our servers’; this provides us with a kill switch. The reason this one is blue is because you could just have this in ‘Payload Retrieval’.
We then hit a sequence of blocks that are not mentioned in this post but are fundamental when building a payload. Defensive impairment is marked as optional because you may not want to mess with detection mechanisms at this point. This will be things like ETW, DLL Notifications, hooks, whatever.
Once the keying is done, and any tampering is complete, we then hit payload retrieval. In its simplest form, a remote HTTP download of the next stage will suffice.
At this point, we have the correct environment, the kill switch is ready, and we’ve disabled telemetry and gotten our payload ready in memory for us to load. So, naturally, we hit our loading and executing mechanisms and then cleanup — cleanup being removing any artifacts from the previous steps.
As all this is happening, it may be worth sleeping between each step. The goal here is to not align your execution flow neatly up in the telemetry. By sleeping between each step, you give the host and process time to do OS things so that your payloads telemetry isn’t neatly aligned.
1.7 Conclusion
For each of these sections, I showed the simplest solution. In an automated framework, you could add anywhere from 1 to 1,000 different keys per section if you needed to—this ultimately comes down to creativity.
The overall goal is to protect your payload from being reverse engineered and provide a kill switch, whilst also locking the payload into a specific environment so that it does not go out of scope. In my opinion, this is a mandatory process for red teamers.
But please note—if someone wants to reverse your payload, they will.
1.8 References
https://attack.mitre.org/techniques/T1480/001/
https://eprint.iacr.org/2017/928.pdf
https://0xpat.github.io/Malware_development_part_5/
https://notes.netbytesec.com/2021/01/solarwinds-attack-sunbursts-dll.html