ESXiArgs: The code behind the ransomware

1 Deep Dive into an ESXi Ransomware
TrustedSec’s Nick Gilberti wrote a great blog covering the ESXi ransomware’s shell script here. However, in this blog, we are going to dive a little deeper into the code behind this ransomware. The sample ransomware discussed was acquired from VirusTotal and Bleeping Computers forum. The following is a list of the parts of the malware, and each part will be discussed in its own section.
- Initial Compromise
- Public PEM File
- Shell Script
- Executable
- Ransom Notes
1.1 Initial Compromise
Like most ransomware samples, the ESXi ransomware is basic. It contains multiple files, but none of them are obfuscated or contain much in the way of anti-forensics. In this case, there are no attempts to hide what the code does. The shell script is in plaintext and even contains comments. The malicious ELF file was not even stripped of its function names. The reason behind this is because at the point when the attackers are ready to launch the ransomware on the system, they already have complete control over that system; in this case, they are operating as the root user. This means that any protections that could have been enabled on the system have been removed. There are several different ways that attackers can gain access to the system, but the common theme is that they must obtain root or compromise a user who has access to the ESXi tools.
1.2 Public PEM file
Multiple files are dropped into the /tmp/ directory during the initial compromise; the first among these is the public.pem file. The encrypt executable will read in this file and encrypt the target files based on the public key contained within. To decrypt the files, the attackers must be able to provide a private key that is paired to the public.
In most ransomware attacks, the attacker creates a key or multiple keys for each target organization. Some will use multiple keys and encrypt sensitive documents or systems with a different key in order to charge a higher price for the decryption key. In this case, the same key is used to encrypt each component of the ESXi system. This means that the same decryption key can be used to recover each of these components. It also means that if the attackers use the same key against multiple companies, the same decryption key should work.
1.2.1 Analysis of the Shell Script
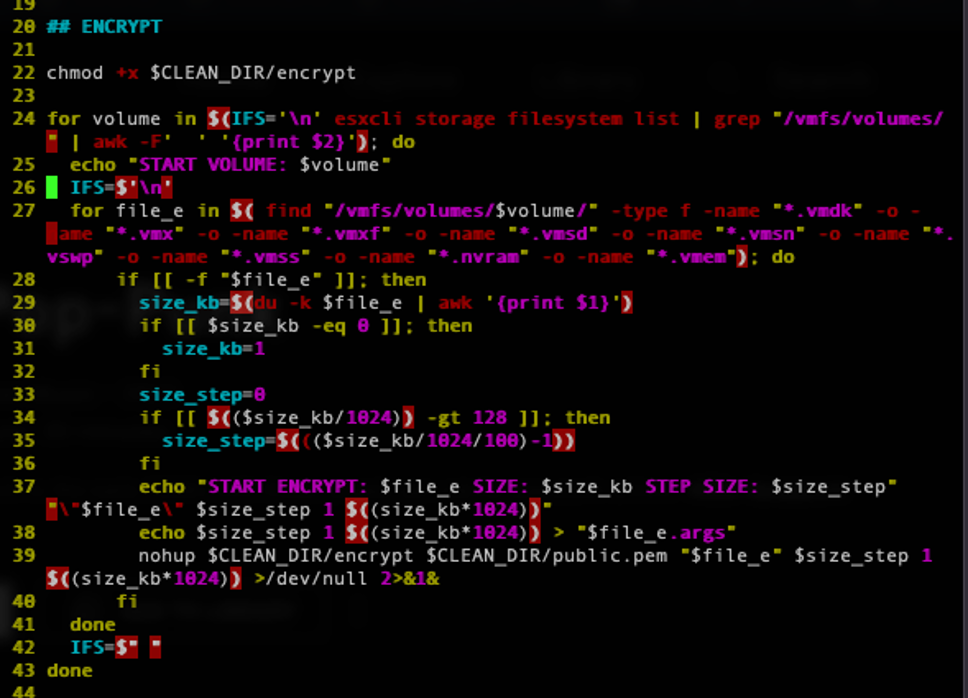
The second file of interest located in the /tmp/ directory is encrypt.sh. This is a shell script file used to perform most of the work to identify what files to encrypt. See Nick’s blog for details about what this script does. We will focus on the encrypt section of the encrypt.sh file, which searches for specific files to encrypt. This is done using a combination of ESXi tools and basic Linux commands. The esxcli is used to find the location of each volume.
The script starts off by ensuring that the encrypt file has execute permissions, followed by a for loop. Inside this for loop, a new shell command is called to obtain the volumes' names by parsing the output from the command esxcli storage filesystem list. The output is then reduced to only lines that contain /vmfs/volumes/ through the grep command. These lines are then split using the awk command to return a specific column.
Next, a second for loop is started. This for loop will find all files that match the criteria. In this case, they are looking for files that end with any of the following extensions.
- Vmdk
- Vmx
- Vmxf
- Vmsd
- Vmsn
- Vsqp
- Vmss
- Nvram
Once the filenames have been identified, the script attempts to determine the file sizes for each. Depending on the file size, the number of steps needed to encrypt the file is assigned. The file size and number of steps are both passed into the encrypt executable and used later in the encryption process. The number of steps is the number of MB to skip while encrypting.
Once the file size and steps have been determined, the script then calls nohup. This tool is used to execute a command and return immediately, allowing that command to keep running in the background. This is done to allow as many concurrent encryption processes to run at the same time as possible. The nohup is looped in this manner because the encrypt executable only encrypts one file at a time. The command line arguments for the encrypt executable include the public key, file to encrypt, step size, encrypt size, and the file size. In the next section, we will discuss the executable.
1.2.2 The Encrypt Executable
As discussed earlier, the ransomware executable is very simple, and the only functionality is to encrypt a single file. The attackers did not attempt to obscure the code or bypass any protections. They even left the symbol information in the executable by not stripping it. How very thoughtful of them.
If you've read some of my previous reverse engineering (RE) blogs, you know that the first thing I always do with malware is run file and strings. In this case, file let us know that it was a 64-bit ELF that was not statically linked and was not stripped. Strings came back with lots of useful information about the flow and functionality of the program. The attackers did not obfuscate any of the string data in the executable. So, strings provided all print messages, error messages, and even the executables usage.
puts("usage: encrypt <public_key> <file_to_encrypt> [<enc_step>] [<enc_size>] [<file_size>]");
puts(" enc_step - number of MB to skip while encryption");
puts(" enc_size - number of MB in encryption block");
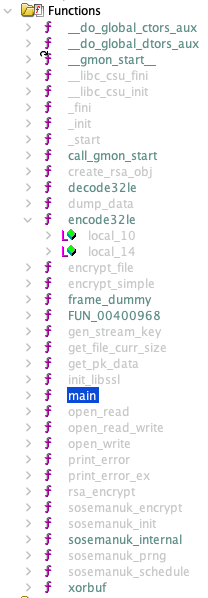
puts(" file_size - file size in bytes (for sparse files)\n");The next step was to load the ELF file into Ghidra to see what it was doing. The first thing that was noticeable was that there are only 35 functions, and almost all of them have been labeled (see Figure 1). These labels are detailed enough that it is pretty easy to understand what each one does. We still want to review each one just to verify the functionality.
The main function is responsible for parsing the command line parameters. It verifies the correct number of parameters and that they contain correct data. For example, the size and steps values are integer values. The only required parameters are the target filename and the public key filename. The main function will also load in the libssl library in order to process the public key file. The malware has two (2) helper functions—get_pk_data and create_rsa_obj. get_pk_data just opens the public key file, reads the contents into a new buffer, and returns the size of that buffer. create_rsa_obj calls the libssl functions to parse the contents of the public key file and return an RSA object.
init_libssl_rc = init_libssl();

    if (init_libssl_rc == 0) {

                    /* get_pk_data(public_key, ??) */

      rc = get_pk_data(argv[1],(char *)&public_key_string);

      if (rc == 0) {

        rc = create_rsa_obj(public_key_string,(RSA *)&RSA_object);

        if (rc == 0) {
If the RSA object was successfully created, then the encrypt_file function is called to perform the encryption.
The encrypt_file function begins by opening a file handle to the target file. After verifying that that target file can be opened, it will create a buffer of random numbers using the libssl function rand_pseudo_bytes. This buffer will contain 0x20 random bytes.
rc = (*lRAND_pseudo_bytes)(buf,num);
The random bytes are then encrypted using the RSA object in the function rsa_encrypt, and a new buffer is returned in the parameter encrypted_buffer. The encrypted_buffer variable is used later and is appended to the end of the encrypted file. This is the key used to create the cipher stream.
iVar1 = rsa_encrypt(RSA_object,random_buffer,0x20,(char *)&encrypted_buffer, &encrypted_buffer_sz_?);The encrypt_simple function is iterating over the file contents and breaks them down into sections to encrypt. The function reads in 0x100,000 bytes at a time, then encrypts, and then uses the sosemanuk functions (https://en.wikipedia.org/wiki/SOSEMANUK). Sosemanuk is claimed to be a fast stream cipher. At the end of each chunk’s encryption, the progress bar is updated with the percentage of completion.
sosemanuk_schedule(stream_cipher_?,random_buffer,(long)random_buffer_sz);

  sosemanuk_init(local_a8,stream_cipher_?,0,0);

  iVar1 = get_file_curr_size(encrypted_file_FD,&file_sz);

  if (iVar1 == 0) {

    if (CONCAT44(in_register_0000008c,file_size) < file_sz) {

      file_sz = CONCAT44(in_register_0000008c,file_size);

    }

    if (file_sz == 0) {

      return_code = 0;

    }

    else {

      alloc_buffer_0x100000 = malloc(0x100000);

…

              bytes_read_not_encrypted = read(encrypted_file_FD,alloc_buffer_0x100000,0x100000);

              if (bytes_read_not_encrypted == 0xffffffffffffffff) {

                print_error("fstat",1);

                return_code = 3;

                goto LAB_00401846;

              }

              sosemanuk_encrypt(local_a8,alloc_buffer_0x100000,alloc_buffer_0x100000,

                                bytes_read_not_encrypted);
1.2.3 Ransom Notes
Ransom notes are the key method for attackers to instruct the targets on how to contact them to pay the ransom. In this case, the attackers use a couple of different methods to notify the target. They overwrite the VMware’s index.html to contain the ransom information. Then they overwrite the message of the day (MOTD) to verify that anyone logging into the system through SSH will be prompted with the ransom note. The ransom notes are copied from the /tmp/ directory and then deleted from the /tmp/ directory as the last step of the shell script.