Command Line Underdog: WMIC in Action

Table of contents
My typical engagements are mostly Red Teams, so I do not often get a chance to play with terminal server application breakouts—but on a recent engagement, I did. For me, it was a great refresher on typical things to do after you have escaped the intended application and want to get more code execution. For tips on how to break out of the applications, I suggest reading these fine blog posts:
- Breaking Out! of Applications Deployed via Terminal Services, Citrix, and Kiosks
- Breaking Out of Citrix and other Restricted Desktop Environments
- Kiosk/POS Breakout Keys in Windows
Typical Settings for Locking Down
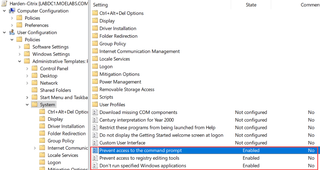
When setting up Group Policies to lock down a server, these are the most common configurations I've observed:
- Prevent access to the command prompt - Enabled
- Prevent access to registry editing tools - Enabled
- Don’t run specified Windows applications – List of applications (powershell.exe, powershell_ise.exe)
These settings can be found under User > Policies > Administrative Templates > System.
With these settings, most of the typical tools are off the table.
Is this bullet proof? Absolutely not. Does it help stop a lot of attempted attacks? Yes.

WMIC - The Underdog Shell
In my scenario, all variants of PowerShell were blocked, as well as cmd. exe / conhost. exe. Even the regedit reg.exe tools were blocked. My initial thought was to use ftp.exe and issue ! to run commands, like the screenshot below.

However, when the cmd. exe is blocked, this does not work since ftp.exe uses cmd. exe /c <command> in the background.

So, what other options do we have? The one I found that worked on this engagement (of course, every environment is different) was wmic.exe. You're probably thinking, well wmic.exe is just for querying WMI, so that sounds useless. Let’s dive into wmic.exe and take a look.
First of all, you want to start it, and that can be done by going into the c:\windows\system32\wbem\ folder and running the wmic.exe file. After running that binary, you will be presented with this shell:

From this shell, you can do a lot of different things. I recommend using /? so you can see the possibilities it offers. A great documentation of all the features can be found here: https://learn.microsoft.com/en-us/windows/win32/wmisdk/wmic. I will not go over each thing, but there are a lot of things to explore here for the curious ones.

Here are some useful wmic.exe commands I frequently use. Remember, you can basically do almost everything with WMIC. Also note that some registry commands in some scenarios require elevation to succeed, so that might be off the table in some cases.
Command | What it Does |
process call create “notepad.exe” | Starts notepad |
class stdregprov call enumkey hDefKey=&H80000002 sSubKeyName=”Software\microsoft\windows\currentversion\uninstall” | Lists subkeys in HKLM* (&H80000002) under the uninstall |
class stdregprov call getstringvalue hDefKey=&H80000002 sSubKeyName="SOFTWARE\Microsoft\Windows NT\CurrentVersion" sValueName="ProductName" | Get a specific value in registry |
class stdregprov call EnumValues hDefKey=&H80000002 sSubKeyName="SOFTWARE\Microsoft\Windows\CurrentVersion\Run" | List values under Run |
computersystem get name, manufacturer, model, totalphysicalmemory | Gather system information |
os get Caption, Version, OSArchitecture | Operating system information |
bios get name, version, serialnumber | BIOS information |
nicconfig get description,ipaddress,macaddress | Network card information |
nicconfig where ipenabled=true get ipaddress, ipsubnet, defaultipgateway, dnsserversearchorder | IP address information |
path CIM_DataFile where "Drive='C:' AND Path='\\'" get Name,CreationDate,AccessMask | List files on the C: drive |
path Win32_Directory where "Drive='C:' AND Path='\\'" get Name | List folders on the C: drive |
useraccount get * | Get local users |
useraccount where name='DaveK' set passwordchangeable=false | Set User cannot change password |
diskdrive get name,size,model | Disk information |
service get * /format:list | Service information |
service where (state="running") get caption, name, startmode, state | List out running services |
product get name,version,vendor | Installed software |
environment get name,variablevalue | Get environment variables |
process get Caption,ProcessId,ExecutablePath /format:list | Process information |
path win32_process where processid=PID_NUMBER call terminate | Kill process based on PID_NUMBER |
path win32_process where "name='chrome.exe'" get caption,executablepath,processid | Get process information based on name |
startup get caption,command,location | System startup information |
share get name,path | List shares on system |
printer get name,portname,drivername | Information about printers |
nteventlog where filename='system' call cleareventlog | Clear the eventlog |
Most commands can use /format:list appended to the end to make it easier to read.
In regard to the registry hives, the values for the different hives are as follows:
Registry Hive | Decimal Format | Hexadecimal Format |
HKEY_CLASSES_ROOT | 2147483648 | &H80000000 |
HKEY_CURRENT_USER | 2147483649 | &H80000001 |
HKEY_LOCAL_MACHINE | 2147483650 | &H80000002 |
HKEY_USERS | 2147483651 | &H80000003 |
HKEY_CURRENT_CONFIG | 2147483653 | &H80000005 |
To redirect the output of commands, you can use the global switch /output:<stdout|clipboard|filename>. This means you can redirect the output to a file directly or to your clipboard.
Example on redirecting to the clipboard:
/output:clipboard service where (state="running") get caption, name, startmode, stateAnother thing worth mentioning is that you can run commands remotely using WMIC, meaning that you can specify a remote system using /node:<NAME_OR_IP>.
Example of starting Notepad on a remote system:
/node:"192.168.1.222" process call create "notepad.exe"If you need to run this using other credentials, you can specify the user as well with /user:"yourdomain\administrator".
Example:
/node:"192.168.1.222" /user:"yourdomain\administrator" process call create "notepad.exe"This will ask for the password upon executing.
If you still want to do more, you can always use the technique Casey Smith demonstrated using the XSL stylesheet to run scripts directly. Set this up by either hosting an XSL file on a remote webserver or placing the file locally on the disk. If you want to list IP address routing using VBScript, you can create a local file in c:\temp called demo.xls and have the following code in it:
<?xml version='1.0'?>
<stylesheet
xmlns="http://www.w3.org/1999/XSL/Transform" xmlns:ms="urn:schemas-microsoft-com:xslt"
xmlns:user="placeholder"
version="1.0">
<output method="text"/>
<ms:script implements-prefix="user" language="Vbscript">
<![CDATA[
On error resume next
Set objLocator = CreateObject("WbemScripting.SWbemLocator")
Set objWMIService = objLocator.ConnectServer(".", "\root\cimv2")
Set colItems = objWMIService.ExecQuery("SELECT * FROM Win32_IP4RouteTable",,48)
list_iprouting = "----- DYNAMIC ROUTES -----" & vbCrlf
For Each objItem in colItems
list_iprouting = list_iprouting & "Description: " & objItem.Description & vbCrlf
list_iprouting = list_iprouting & "Interface Index: " & objItem.InterfaceIndex & vbCrlf
list_iprouting = list_iprouting & "Metric: " & objItem.Metric1 & vbCrlf
list_iprouting = list_iprouting & "Protocol: " & objItem.Protocol & vbCrlf & vbCrlf
Next
list_iprouting = list_iprouting & "----- PERSISTENT ROUTES -----" & vbCrlf
Set colItems2 = objWMIService.ExecQuery("SELECT * FROM Win32_IP4PersistedRouteTable",,48)
For Each objItem in colItems2
list_iprouting = list_iprouting & "Description: " & objItem.Description & vbCrlf
list_iprouting = list_iprouting & "Metric: " & objItem.Metric1 & vbCrlf
Next
Set objFSO = CreateObject("Scripting.FileSystemObject")
strFilePath = "C:\temp\output_iprouting.txt"
strContent = list_iprouting
Set objFile = objFSO.CreateTextFile(strFilePath, True)
objFile.WriteLine strContent
objFile.Close
]]> </ms:script>
</stylesheet>This code is pretty straightforward—it lists out the IP address routing information and stores it to c:\temp\output_iprouting.txt.
To get it executed, from WMIC you can run this command:
process get brief /format:"c:\\temp\\demo.xsl"The important part is the format switch that refers to the XSL file.
Conclusion
Hopefully this post gave some insights and inspiration on how to use WMIC as an alternative shell in a pinch. I found it really useful in my specific scenario. Also, a fun fact that you might not be aware of is that WMIC is going away in future versions of Windows. If you want to know more, see: (https://techcommunity.microsoft.com/blog/windows-itpro-blog/wmi-command-line-wmic-utility-deprecation-next-steps/4039242).